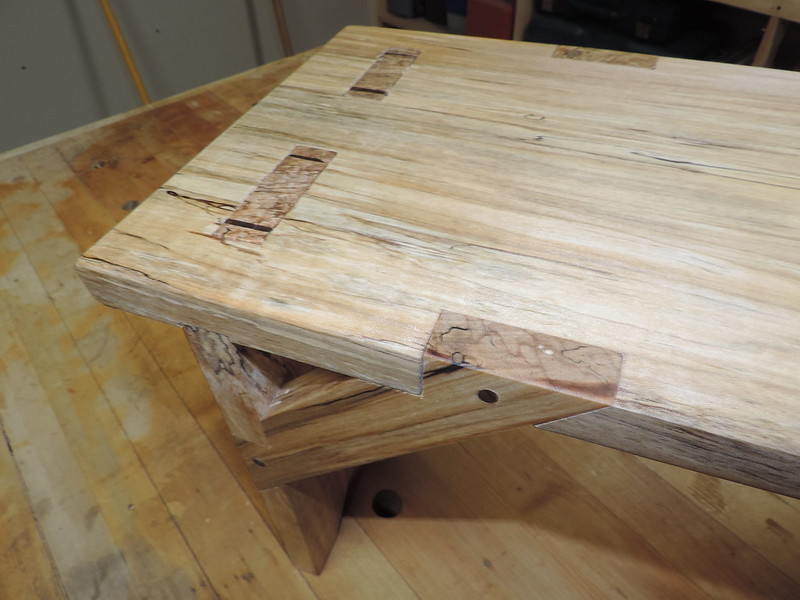
Results 1 to 10 of 10

Thread: Through Mortise & Tenon Projection

  1. #1
    Join Date
    Nov 2013
    Location
    Crozet, VA
    Posts
    648

    Through Mortise & Tenon Projection

    I’m building a trestle table and the lower stretcher connects the two trestles with a wedged through mortise and tenon. I can’t decide how much the tenon should protrude through the mortise. Right now, I have it about 1/4”, but it seems to like too much to my eye. I’m curious what others have done or prefer.

    -Tom
    There is a very fine line between “hobby” and “mental illness.” - Dave Barry

  2. #2
    Join Date
    Jan 2019
    Location
    Fairbanks AK
    Posts
    1,566
    Are you driving edges into the endgrain of the mortise it sounds like?

    I doubt you are doing the kind of wedged mortise and tenon also called a tusked tenon, you would need inches of tenon sticking out to drive the wedge shaped tusk through the tenon so the tusk rests on the face of the mortised leg.

    Anyway, I have only done one joint where I drove a pair of wedges into the endgrain of the tenon from the show side of the mortise. Mine was nominal 1x4 tenon, two driven wedges ended up about 1/8 wide at the show surface.

    If I remember I used wedges cut at about 6 or 8 degrees and used the scrap the wedges had been cut from as a chisel guide when flaring the mortise. I set mine up for the tenon to be about one eighth proud of the mortise face if all went well and came pretty close. I was sweating for certain, quarter inch is probably plenty. I did not finish plane the show surface of the mortised piece until after I sawed off the excess of the tenon and than I was able to just finish plane the whole surface once. Came out pretty good.

  3. #3
    Join Date
    Jan 2007
    Location
    Michiana
    Posts
    3,071
    I typically leave the tenon about 1/8" proud of the surface. After the wedged are set and the glue is dry I saw them off flush and sand/plane as appropriate to finish them off. If you cut your wedge slots with the growth rings and cut your wedges so the end grain is exposed they all but disappear when you finish the piece. They look like a growth ring. See below. Each of these tenons have two wedges. This is in process. Once the finishing was done they were invisible.

    Sharp solves all manner of problems.

  4. #4
    Join Date
    Dec 2016
    Location
    South West Ontario
    Posts
    1,503
    Posted a bookcase build in the Neanderthal’s about 12 pages back. Black Oak with double wedged through tenons. I used a contrasting dark wood (chestnut) for the wedges. They protruded less than a 1/4”, when dry I flush cut and planed them flush. The wedges are visible and add a handmade touch.
    ​You can do a lot with very little! You can do a little more with a lot!

  5. #5
    Join Date
    Jan 2019
    Location
    Fairbanks AK
    Posts
    1,566
    Nice work Rob. I am seeing better stylistically now than I was even 3 months ago. I saw Vic Tesolin (the Veritas guy) in a youtube just this week where he mentioned he liked the lines of the Art Deco designer Ruhlmann and the pieces looked Federal to me. So I went and looked some more and am finding I like Federal/ Art Deco lines with straight tapered legs, but without the high wow factor surface treatments.

    Ruhlmann's white (holly?) feet to lift an item even further off the ground are a step too far for me, but if I could make wedges dissappear I think I want to try that. Can you easily link to a thread where you have done that before, that I wouldn't have noticed last week?

    FWIW pic is the one I did that came out fine structurally. Mortised piece is the Doug Fir chop on my leg vise. Through tenon is QSWO parallel guide, wedges are hickory because I had it handy. Finish one coat equal parts thinner, BLO and oil based varnish.

    20210701_221104[1].jpg

    EDIT: I paged back through the threads started by Rob back about two years. The one with the repeated picture above is pretty recent, but I still can't see the wedges. I am very curious to know how closely the ring orientation (and ray pattern in oaks) needs to be for the wedges to vanish into the end grain of the tenon. FWIW the foot stool pictured above does appear in unfinished state at the beginning of this thread: https://sawmillcreek.org/showthread....ess&highlight=
    Last edited by Scott Winners; 07-02-2021 at 8:06 PM. Reason: did some searching

  6. #6
    Join Date
    Apr 2017
    Location
    Michigan
    Posts
    2,771
    1/8" to 3/16" depending on the scale of the joint. Chamfer at half that. Wedges from Ebony or Purpleheart would not be wrong. They would add interest to the close observer and be invisible to the quick glance.

  7. #7
    I'm with Tom Bender, it's all about the scale of the joint and the piece as a whole. It has to look in proportion, there is no "set" size.

  8. #8
    Join Date
    Jan 2007
    Location
    Michiana
    Posts
    3,071
    Here's another approach where I wanted the pegs and wedges to stand out.


    @Scott Winners - I've found that the wedges all but vanish if you just match the wood type, grain, and orientation. If you look close you can see them on the oak stool.
    Attached Images Attached Images
    Sharp solves all manner of problems.

  9. #9
    Join Date
    Mar 2006
    Location
    SoCal
    Posts
    22,512
    Blog Entries
    1
    This is really a design and scale question, right? We use everything from flush through enough tongue for a tusk tenon depending on the piece style, size, etc.

    Flush Wedged Tenons.jpg . Tusk tenon-Gilpin.jpg
    Last edited by glenn bradley; 07-07-2021 at 10:55 AM.
    "A hen is only an egg's way of making another egg".


    – Samuel Butler

  10. #10
    Join Date
    Dec 2016
    Location
    South West Ontario
    Posts
    1,503
    If you stretch the picture you can see the wedges.
    ADC77A4E-22CA-4360-BD14-D4EADF9036AD.jpg
    ​You can do a lot with very little! You can do a little more with a lot!

Posting Permissions

  • You may not post new threads
  • You may not post replies
  • You may not post attachments
  • You may not edit your posts
  •