Results 1 to 11 of 11

Thread: Rust hunt score, Disston and singular son, six bucks

  1. #1
    Join Date
    Jan 2019
    Location
    Fairbanks AK
    Posts
    1,566

    Rust hunt score, Disston and singular son, six bucks

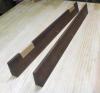
    1865-1871, 8ppi filed crosscut, most common handle type, short plate with only three nuts, intact nib, more common of the two known "and son" buttons. Good temper, I bent the blade 180 degrees and let it snap both ways in the store before I bought a $34 hard sided suitcase to fly it home in a checked bag.

    The wood is in remarkable shape for a tool that is at least 150 years old. A little wear, but no pieces broken off. The plate is evenly rusted suggesting it was oiled or waxed the last time it was used, but it could have been 100+ years ago.

    So here is the thing. If I can restore this and put it in my till as a user I want to tighten the split nuts back down in July or August at the height of my wet season here and let this thing rest in the dry season with possibly loose nuts. The plate is fairly pitted, in the one pic you can see where someone started on the plate with a power sander, found pits where the etch would be and sold it off cheap (to me, yippee!!).

    If I can't restore it to use I at least want to get the wood and brass looking dignified before someone paints a primitve landscape scene on it and hangs it up in a bar or outhouse. Hopefully an indoor space with good climate control.

    I feel good about using mineral spirits and fine stool wool to lift the grime off the wood. I feel good about leaving reasonable patina on the brass.

    The plate gives me the heebie jeebies. I am just flat going to have to start with 80-100 grit to break through the rust, and may have to step back to 60 grit to expose metal. I am sorely tempted to joint the teeth before I do anything else to the plate (looks pretty flat) , and then shape the teeth just to get the rust out of the gullets before I get going on the sides of the plate.

    I have some concerns about setting the teeth on a saw this old. I read a couple places the steel can (not a metalurgist) change over time, putting the teeth at risk of snapping off when set. I don't want to do that. If all y'all think it is a go I will probably wait a little while for Lee Valley to ship a new saw set before I dare try it, none of the wonky vintage sets I own currently will ever touch this saw.

    If I mangle up a screw driver tip to fit these split nuts, will at work on similar products, or am I going to end up sacrificing a screwdriver tip on the altar of technical excellence for each successive split nut saw?

    Did Pete Taran ever start a new thread on vintage wood finishes that you remember? I found a thread from 2017 where he had ordered up some sandarac resin (mediterranean cypress tree) to make some spirit varnish with grain alcohol, but I haven't been able to find a later thread with his results. The sandarac resin as readily available on Amazon, and I can get 190 proof up here still.

    Getting those answered will keep me going a while. I found it at the north end of the San Joquain valley, pretty dry place up around Redding, Ca. In a few days I might be asking if I should immerse the wood in a 50-50 mix of mineral spirits and BLO for a few days, but first I have to introduce Mr. Screwdriver to Mr. Benchgrinder and Mr. File.

    Thanks in advance, I really don't want to screw this up.

    20210614_164011[1].jpg20210614_164103[1].jpg20210614_164045[1].jpg

  2. #2
    Join Date
    Mar 2015
    Location
    SE Michigan
    Posts
    3,225
    Nice find, Scott. You have your work cut out for you. I’m not certain, but I believe the prevailing wisdom is to leave the split nuts alone on a vintage saw. It is very likely they will break trying to unscrew them. I’d do some research on that before attempting to remove them.

    And it may just be me, but I try to remove rust with the least abrasive methods first before resorting to low grit sandpaper. Scotchbrite and wd40, or paper towels soaked in Evaporust wrapped around the plate and then covered in plastic wrap to slow the evaporation. Even scraping with a razor blade first may remove the bulk of it. Just my 2 cents.

  3. #3
    Join Date
    Sep 2007
    Location
    Longview WA
    Posts
    27,441
    Blog Entries
    1
    It looks like you have a wall hanger. My experience with a few older saws has found the metal to be very brittle and likely to snap when setting the teeth.

    You might want to read this > https://en.wikipedia.org/wiki/Embrittlement

    Here is what happens when rust forms:

    It should be noted that hydrogen bonds less strongly to oxygen than iron does. This means that iron will, albeit slowly, take the oxygen right out of water to become rust - producing hydrogen gas.
    Note in the link above the section on hydrogen embrittlement. This is why some teeth are likely to snap when being set on an old saw.

    In a few days I might be asking if I should immerse the wood in a 50-50 mix of mineral spirits and BLO for a few days
    BLO can be a restorative, but it can also darken wood.

    This is my favorite wood restorative:

    Howard Feed-N-Wax.jpg

    Available at Home Depot, Lowe's and many furniture and hardware stores.

    Rub on a good amount and watch it soak in, then wipe off any excess. One rag in my shop is somewhat saturated with this and is used for pieces on the lathe or on tool handles.

    jtk
    "A pessimist sees the difficulty in every opportunity; an optimist sees the opportunity in every difficulty."
    - Sir Winston Churchill (1874-1965)

  4. #4
    Join Date
    Jul 2015
    Location
    Broadview Heights, OH
    Posts
    714
    A couple thoughts.

    Your saw is pretty far gone in the grand scheme of what's restorable. Looks as though it spent considerable time hanging in the barn or even outside in the elements. Some general conservation tips:

    I would not remove the handle. They never go back together like they did before you took it apart. Consider carefully scraping and sanding around the handle and leave it on the saw. The shanks on those screws are very slender and it takes no force at all to shear them off.

    You are on the right track with your approach to getting the blade somewhat bright again, I'd start with 120 silicon grit paper and work it hard with some lubricant. I would consider windex as it doesn't stain the wood and is less noxious to use. Work both sides and then wipe down and see how many pits are visible at this point. It's a judgement call if it's riddled with pits whether its worth it to invest the time to continue. Again, that saw is pretty far gone in the long slide to decrepitude.

    While the saw is early, it's not super rare as these things go. Perhaps rare for Alaska, but not that uncommon, especially in that condition. I mention this not to dissuade you from restoration, but to suggest you will not be committing any old tool sins if you get aggressive with the restoration.

    As to the handle, I did fool around quite a bit with spirit varnishes, but never did post a follow up. I did have some trouble getting the sandarac to dissolve, but after reading about it more, discovered that there were all sorts of gums that were likely also used in spirit varnishes. Copal, Gum mastic, sandarac all were common in "spirit of wine" (ethanol) formulations. I'm convinced that some version of this was used by Disston.

    Having said that, I don't think this saw warrants a deep dive into a bespoke varnish formulation. I would consider using some wood brightener on it followed by some very light 220 sanding followed by some Kramer's antique restorer. This handle has no finish on it, so a penetrating finish like that which is mostly wax based is not a bad approach.

    Failing that, you could also consider removing the handle and making a new one. You will likely need new split nuts and there are quite a few people making them now. This will of course ruin any collectible value but might be an approach if you think the steel is salvable and you are able to file and set the teeth.

    In my experience, the teeth snap because the steel has been compromised by very fine pits and they just break. Not unlike how paper can be scored with very fine perforations to tear along a predetermined path.

    Without seeing your saw, my guess is it's too far gone to be worth all that effort, but for $6, I think it might serve as a useful experiment in your saw restoration knowledge...even if the only outcome is a lot of wasted time and you realize that not every tool is worth the time and effort to restore it. Said another way, $6 in your pocket is worth more than spending a week of time and effort on a project that will have no useful outcome.

    Hope this helps.

  5. #5
    Join Date
    Jan 2019
    Location
    Fairbanks AK
    Posts
    1,566
    Jim, Pete, appreciate the reality check. I will see how far I can get without removing the handle. Worst case I can resell it to a wall art painter in good enough condition to last another 150 years.

  6. #6
    Join Date
    May 2011
    Location
    Bellevue, WA
    Posts
    297
    I've got 1 of those 'Son' (single) saws. I paid a lot more for mine, maybe 10 times ($60 with shipping?), but still it was a deal. It is in good condition. Its a rip saw (6.5 ppi), a model 7. It had been given a light cleaning, and that was good enough for the user I was after. I've sharpened once, no need to adjust the set. The steel seems to be in very good shape, based on use and the 1 sharpening. I like the handle, as it fits my hand better than most of my other saws, but then that's largely on account of my hand. I've had it for more than 5 years.

    I'd suggest not giving up on it as a user. Do what you can to clean it up and condition the handle. Sharpen it and go a bit easy on the set adjusting and probably leave the spit nuts and bolts alone.

  7. #7
    Join Date
    Jan 2019
    Location
    Fairbanks AK
    Posts
    1,566
    A couple hours in. I derusted with a razor blade and then wet 100 grit. It is pretty pitted, but I can wax it once it is clean. At the tooth line I sanded just until the points of the teeth were showing shiny, there is a bit of rust left to remove there. It jointed up pretty nice, nicer than some of mine will when I have to resharpen my own work.

    Sharpening my own saws has gotten me into the habit of using the whole plate in the cut so my tooth line doesn't end up with a dip in the middle.

    I sharpened at 15 degrees rake and 15 degrees fleam with no gullet slope. Pretty close to how it was last sharpened on the right side, but a bit off from the last sharpening from the left side, I am back to cow and calf tooth pattern but clean metal in all the gullets now.

    I left the split nuts alone, and got after the handle with some fine steel wool and mineral spirits. I was using a paper towel to lift old grime out of the goo before the mineral spirits evaporated and the grime resettled. Is there a better absorbent to use to lift the dirt off while the wood is still wet?

    I re-counted teeth when I uncovered a "10" stamp on the heel of the plate. It sure enough is 10 ppi/ 9 tpi. Dunno how I counted that wrong before.

    There is no useful set on it, maybe 0.005" in a few places comparing plate thickness just above the tooth line to kerf width at the tooth tips. It does bind fairly quickly in KD white oak, I will need to take it up to at least 0.010" set, maybe 015 to have a user. I will see about a small wire brush on a dremel to clean off the outside faces of the teeth, that might help a little, I haven't tried that method before. Usually I clean that area up by sanding with my fingertip down the teeth to clean, and then make all the scratches run the same direction the saw will run with more fingertip pain. Not anxious to keep doing it that way.

    If I can get it up to 010 set and wax the plate up real good I could use it to cut up KD hardwood scrap for my BBQ cooker without having to be overly fussy about how smooth it cuts, I would count that a victory.

    I am going to spend some more time cleaning up the wood before I post another picture, need to check the paper towel inventory.

    Thanks for the pointers so far.

    EDIT: One of my wife's friends is a chemical engineer who specialized in metals, retired now. The engineer said spring steel is cold drawn, so not at risk for embrittlement. I got nothing, no metallurgy background here.
    Last edited by Scott Winners; 06-16-2021 at 12:03 AM.

  8. #8
    Join Date
    Jun 2010
    Location
    twomiles from the "peak of Ohio
    Posts
    12,171
    Side note: I have a Disston ( no son/sons) No.7 .....Had to make a split nut spanner to remove the handle.....as it did need a crack repaired. I sent it out to be sharpened.....first tooth he tried to set..snapped off...

    Now it merely sits in a corner....May polish it up into a wall hanger....

  9. #9
    Join Date
    Sep 2020
    Location
    Portland Oregon
    Posts
    83
    This is a fascinating read. I hope you post a followup.
    Last edited by Meryl Logue; 06-18-2021 at 1:49 AM.

  10. #10
    Join Date
    Jan 2019
    Location
    Fairbanks AK
    Posts
    1,566
    Quote Originally Posted by Meryl Logue View Post
    This is a fascinating read. I hope you post a followup.
    I conclude Pete and Jim were right. I finished the plate with a wire wheel on a dremel and it is pit city. I cleaned the "gum line" where the teeth meet the plate real careful while the dremel was running and I don't think I can set these teeth without breaking a bunch of them off, wee tiny rust pits everywhere looking with a 10x loupe. I don't see any point in filing the teeth off and cutting new teeth either, there are a bunch more small pits up there where new teeth would need to be set.

    I will spend some more time on the wood eventually, and will post a pic once it is cleaned up, but this is going to be a wall hanger - with intact vintage teeth and no useful set.

  11. #11
    Join Date
    May 2004
    Location
    N Illinois
    Posts
    4,602
    Quote Originally Posted by Phil Mueller View Post
    Nice find, Scott. You have your work cut out for you. I’m not certain, but I believe the prevailing wisdom is to leave the split nuts alone on a vintage saw. It is very likely they will break trying to unscrew them. I’d do some research on that before attempting to remove them.

    And it may just be me, but I try to remove rust with the least abrasive methods first before resorting to low grit sandpaper. Scotchbrite and wd40, or paper towels soaked in Evaporust wrapped around the plate and then covered in plastic wrap to slow the evaporation. Even scraping with a razor blade first may remove the bulk of it. Just my 2 cents.
    Agree with Phil on the scraping aspect first is a good initial step.
    Jerry

Posting Permissions

  • You may not post new threads
  • You may not post replies
  • You may not post attachments
  • You may not edit your posts
  •