
-
Level the playing fields...
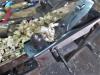
Level the box, at the corners.JPG
Ends were a tad higher than the sides were...one corner really high...Lid sits better, now
Level the box, lis sits flat.JPG
Same with the bottom of the box...slips were showing, so...
Level the box, level the bottom.JPG
Same Millers Falls No. 9 plane to level things...had to mind the direction of the grain,,,,
Level the box, Bottom leveled.JPG
Seems there was a couple shavings on the bench, under the box...
Level the box, test the lid.JPG
But....it do sit flat, without any rocking going on...may either sand and fill tomorrow, or....add some hardware. Need to rip some parts to build a try, or two..
Stay tuned 
-
Decided the lid needed to be shaped a little differently....was too wide ( trimmed a bit from each end) and wanted a finger lift...
Lid rework, re-shaped.JPG
Something more along these lines...
Lid work, scrapered.JPG
Had a bit of glue line, that needed removed...Stanley No. 80 did the trick...Sanded, spokeshaved, planed....and sanded some more...to get all the edges rounded over...then seen how it fit the box...
Lid work, fitted to box.JPG
Got out some tools..
Lid work, hinge tools.JPG
Cut the head off of a small nail, to make a pilot hole drill bit...
Lid work, pilot hole drill.JPG
There is a candle to wax the threads, and a phillips screwdriver to drive them TINY screws. Square to make sure both hinges are the same distance in from the edge. Pencil to mark where to drill the holes..
Lid work, hinges installed.JPG
Even tried to "clock" the screws....
Entire box and lid have been sanded to 220 grit.....wiped down....about time for a coat of stain?
The PIP, Stained, right rear corner...JPG
The PIP, Stained, inside.JPG
Almost time for a PIP?
Stay tuned..
-
Steven,
The grain in that last photo is amazing. Beautiful.
Stew
-
Good work, Steve as always....
Jerry
-
Brass for the corners?
First coat, brass foot.JPG
All 4 corners.
.First coat, all the feet.JPG
First coat of clear gloss poly....
First coat, lid catch.JPG
Piece of metal stuck to the underside of the lid.....must be a magnet around?
First coat, lid magnet.JPG
Yep....
First coat, lid view.JPG
Keeps the lid shut, while the first coat goes on....waiting to see how it dries..
Stay tuned..
-
Box is now sitting with the lid opened....the insides have their first coat, as does the underside of the box's bottom.....and the underside of the lid.....will let dry overnight....
Stay tuned...
-
Needs rubbed out, lightly sanded, BEFORE coat #2 can even be started....
Re-thinking.....have this "thing" hanging on a wall..
Key Safe, old style.JPG
If you even look at it wrong, it will drop to the floor. So....theory being, IF I make a rack for inside the case, and run a router bit..
Key Safe, hanger bit.JPG
To cut a pair of slots for screws to hang this case on the wall....and call it a Key Safe.....Handle options? Stay with just the finger lift,,or
Key Safe, handle option 1.JPG
Or..
Key Safe, handle option 2.JPG
Maybe fire up the old scroll saw, and cut out a key, to attach to the front of the door...
We'll see....stay tuned...
-
Going with just the finger lift as the handle...for now....Have installed a 1 x 1 for a few hooks...
Key Safe, needs 4 cup hooks.JPG
Room for 4 hooks....can always add a second bar below this one.
A small tray is sitting in a bunch of clamps at the moment...need to add the back panel....need to go out and buy a few small "Cup" hooks to hang the key rings on.
Installation will be just a pair of screws through the back of the case, and into the wall.....washers to keep the heads from pulling right on through.
May lightly sand the case later today...and see about a second coat of varnish....
Stay tuned...
-
4 hooks should have been easy to do...drill a pilot hole, wax the threads..
Key Safe, pilot holes.JPG
Good thing I bought 8 hooks....broke off 4 trying to get 4 in place...
Key Safe, hooks installed.JPG
Make a little 3 sided tray.....for all those keys that one forgets what they go to.....they can sit in here, until I figure them out...
2 screws, with a washer each....
Key Safe, Open for business.JPG
Attached to the front of the door...
Key Safe, door ornament.JPG
A silver key? Not exactly...a chrome painted piece of 1/4" thick Ash...
Key Safe, scrollsaw key.JPG
3 screws to hold it in place....key was cut out on a scrollsaw..
Key Safe, Scrollsaw.JPG
Key Safe is now open for business....
-
Posted as a project....I'm done for a while...
 Posting Permissions
- You may not post new threads
- You may not post replies
- You may not post attachments
- You may not edit your posts
-
Forum Rules


 Reply With Quote