Page 8 of 10 FirstFirst ... 45678910 LastLast
Results 106 to 120 of 142

Thread: And so it begins...time to setup the temporary shop at the new property

  1. #106
    Join Date
    Mar 2003
    Location
    SE PA - Central Bucks County
    Posts
    65,827
    Thomas, I haven't decided yet exactly what I'm going to do for a "driveway extension" to the location where the new shop will necessarily have to go, although I doubt it will be a paved extension because of not pushing the impermeability numbers. It will either be a gravel drive or, perhaps a variation on that with a grid base system filled partially with stone and the remainder of soil and grass. It acts like regular lawn visually but is more durable for those occasional times I need to bring a vehicle to the shop building. I'm going to do 10' walls, but two of the three options I'm thinking about are open to the peak anyway due to their "post frame" nature.
    -------

    Despite the cost, I think I'm going to pull the trigger on quick connect ductwork from Blastgate Company. It will be easier to install and easier to re-use once I have a building. They were really fast turning around the quote, too.
    --

    The most expensive tool is the one you buy "cheaply" and often...

  2. #107
    Join Date
    Feb 2010
    Location
    Collegeville PA (30 min west of Philly)
    Posts
    1,143
    Blog Entries
    1
    Back in my post frame construction days, we built a dream garage for a guy over in Newtown Square area, and had impervious coverage considerations... We used red chip 3/8" stone for the drive and specific pavers for the main parking area that look like typical pavers but actually allow drainage between each tile... these could have been used for the entire project but he wanted the red chip stone look for the driveway portion. I just visited him a few weeks ago (after 10 years!) and all of this setup looks great still.

    In contrast to the honey comb grid items, the pavers used in this case look just like normal hard scaping (no grass growing through etc.).

    At the time, we had also considered using the pavers for the tire track areas of the driveway, and allowing grass to grow everywhere else. I actually voted for that look at the time as it's functional, cost effective, and has an "old timey" look somehow (at least in my mind).

    If you wanted to check it out, I think Newtown Square isn't too far from you, and this guy has alllllll sorts of cool stories.
    - Bob R.
    Collegeville PA (30 minutes west of Philly)

  3. #108
    Join Date
    Mar 2003
    Location
    SE PA - Central Bucks County
    Posts
    65,827
    Bob, I'm a 3/8" red stone fan...all of the "mulch" at the old property was 3/8" red as was the guest parking area and pathways in the herb garden. I'd definitely use it again for a driveway extension to the shop if I go the stone route, probably with the grid just to hold it in place better...the cost uplift isn't huge. The singular downside to the 3/8" red, other than it's a little more money than regular 3/4 modified, is that it tends to stick in the cracks in one's shoes, so before going in the house, checking the feet is necessary to avoid scoring the wood floors. There's no need for hardscaping. The driveway/parking areas are already paved (although they need to be refreshed when money is once again available and the building project is done)
    --

    The most expensive tool is the one you buy "cheaply" and often...

  4. #109
    Join Date
    Feb 2010
    Location
    Collegeville PA (30 min west of Philly)
    Posts
    1,143
    Blog Entries
    1
    I'm also a big fan of the red chip stone. What many don't realize is that round stone (such as "pea gravel") is very difficult to walk on as compared to angular stone (such as the red chip) which has edges and surfaces that allow it to "pack in" and offer a stable walking/driving surface. We've done two large patio areas in the red and love it - we place geotextile fabric down first to prevent mud/stone mixing and it works great.
    - Bob R.
    Collegeville PA (30 minutes west of Philly)

  5. #110
    Join Date
    Mar 2003
    Location
    SE PA - Central Bucks County
    Posts
    65,827
    Golly gee wiz, those Blastgate Company folks are quick...ordered Tuesday; two boxes of stuff arriving tomorrow. There was only one machine adapter that required custom sizing (stretched to fit over the SDD inlet) but even so, they quote 2-3 days for assembling an order plus 2 days shipping time for my location. They beat it for this order!
    --

    The most expensive tool is the one you buy "cheaply" and often...

  6. #111
    Join Date
    Mar 2003
    Location
    SE PA - Central Bucks County
    Posts
    65,827
    Today's progress was two-fold. The router table "joined" the bandsaw in the center "island". Literally. I had forgot this thing when I did my original preliminary plan, but adding it to the extension table of the bandsaw made a lot of sense...extra support for both tools and simplicity. The router table and the bandsaw can share a DC drop, too.

    IMG_9650.jpg

    Secondly, I got most of the ductwork hung...I need a few more (fortunately small) components to complete the work and will order them on Tuesday. While this is a "temporary" shop, I opted to go with clamp-together from Blastgate Company because of the simplicity of installation and high quality. It will all easily transition to the new shop at the point I get it built. I ordered late on Tuesday and had two big boxes arrive on the big brown truck just after lunch on Friday. In this space, it's hung a little less formally using heavy "wire" ties through screw in eyes, but it went up easy and it's so easy to tweak things simply by loosening a clamp slightly with one hand and rotating something with the other hand. Please note that I am absolutely aware that it's not a best practice to for the branch of a wye to go direction vertical. That will not occur in the new shop when it's built and fitted out. In this small space, however, it's expedient for both cost and close quarters, so I'm not going to worry about it.

    IMG_9652.jpg
    --

    The most expensive tool is the one you buy "cheaply" and often...

  7. #112
    Join Date
    Mar 2006
    Location
    SoCal
    Posts
    22,510
    Blog Entries
    1
    Love the router table as BS extension ;-) You are making some great decisions for your temp space.
    "A hen is only an egg's way of making another egg".


    – Samuel Butler

  8. #113
    Join Date
    Mar 2003
    Location
    SE PA - Central Bucks County
    Posts
    65,827
    Quote Originally Posted by glenn bradley View Post
    Love the router table as BS extension ;-) You are making some great decisions for your temp space.
    Thanks. This is a real dance, Glenn...I"m trying really hard to keep things functional as there will already been the challenge of adapting to bandsaw/tracksaw for material cutting. Hand tools will get a bit more use, too. I do think at this point that I"m going to have to store the "guitar bench" until I have a building as I really need the space it's takes up as a possible way of avoiding having to use the miter saw in the driveway or having to store the lathe and not having it's use. (I have some furniture projects where I really need it to be available)
    --

    The most expensive tool is the one you buy "cheaply" and often...

  9. #114
    Join Date
    Feb 2009
    Location
    Bucks County, PA
    Posts
    973
    That duct run looks great, Jim. And very nice job connecting the BS and RT.
    And there was trouble, taking place...

  10. #115
    Join Date
    Mar 2003
    Location
    SE PA - Central Bucks County
    Posts
    65,827
    Quote Originally Posted by Steve Wurster View Post
    That duct run looks great, Jim. And very nice job connecting the BS and RT.
    Thanks. I haven't setup for the bandsaw yet....it's going to be just another hose that I'll exchange for the drop that the RT is attached to in the photo unless I can fabricate "identical" ports on both the RT and the BS. THe former has a plastic 4" port that takes a slip on plastic connector. That connector will not fit on the 100mm port of the BS. I'll figure it out, however, in my copious free time. 
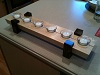
The other 4" drop in the photo is for the CNC machine. The "main" hangs a right from there once I have a few more components with one more overhead drop toward the back that I can use for utility, such as for the drum sander or downdraft table in my aux bench.
    --

    The most expensive tool is the one you buy "cheaply" and often...

  11. #116
    Join Date
    Feb 2013
    Location
    Houston, Texas
    Posts
    22
    Jim, you might try this adapter from Rockler. (https://www.rocklerpro.com/rockler-s...r-for-fittings) We use it on our FS 30 to connect our DC hose. We made up our own version with a Fernco and a dust fitting for our Laguna Lt 18HD before Rockler started selling their adapter.

  12. #117
    Join Date
    Mar 2003
    Location
    SE PA - Central Bucks County
    Posts
    65,827
    Quote Originally Posted by Erich Elfeldt View Post
    Jim, you might try this adapter from Rockler. (https://www.rocklerpro.com/rockler-s...r-for-fittings) We use it on our FS 30 to connect our DC hose. We made up our own version with a Fernco and a dust fitting for our Laguna Lt 18HD before Rockler started selling their adapter.
    There's no PCV duct here, so the sizing on that side would likely be off. I have a clamp machine adapter that will work on the bandsaw as it will slip (with effort) into the 100mm port...I have to get one adapted for the router table as that's one of those "mass market" 4" dust hood type connections that's only standard with itself.
    --

    The most expensive tool is the one you buy "cheaply" and often...

  13. #118
    Join Date
    Feb 2013
    Location
    Houston, Texas
    Posts
    22
    I found that the rubber side of the fitting fit the outlet on the BS. Sorry for my lack of clarity.

  14. #119
    Join Date
    Mar 2003
    Location
    SE PA - Central Bucks County
    Posts
    65,827
    Quote Originally Posted by Erich Elfeldt View Post
    I found that the rubber side of the fitting fit the outlet on the BS. Sorry for my lack of clarity.
    I've made use of Fernco rubber sewer adapters for my 120mm ports but have not measured and investigated using them on the 4" and 100mm ports to-date. Since I do have some extra 4" metal "machine adapters" for the quick connect, I'm likely going to find a way to adapt one to the existing hood on the router table or to cut a replacement piece for the plastic hood out of plywood that I can insert the machine adapter cleanly. I can do that as soon as I have my electrical inspection passed and am free to run my CNC. (I'm avoiding running the big tools until the inspector has been back for his blessing) I was mulling this around in my head last night and I think that's the route I'll take and it makes my hoses "universal" across my different machines/devices.

    BTW, links to Rockler don't end up at the specific product for some reason...they seem to dump to the main "please sign up page". I did find what you were talking about, however.
    --

    The most expensive tool is the one you buy "cheaply" and often...

  15. #120
    Join Date
    Mar 2003
    Location
    SE PA - Central Bucks County
    Posts
    65,827
    Today, I received a small box from Blastgate Company that had the remaining components that I determined were needed to complete the small dust collection system in this temporary shop...well, with the exception of one clamp, but that was on me for miscounting. (These folks have been GREAT to do business with) There are only four drops; 5" J/P, 4" BS + router table (shared), 4" CNC machine and a utility drop that can be either 5" or 4" at the very end to service the drum sander, downdraft table and anything else that needs it. Air flow with just the "hand test" was quite pleasing...

    IMG_9756.jpg IMG_9757.jpg IMG_9758.jpg

    In that last photo, you can see how I'm sharing a drop for both the router table and the bandsaw. I had a couple of machine adapters and a short piece of hose available, so that was easier than buying customized machine adapters to fit the 100mm port on the BS and the "sorta" 4" port on the router table. Moving between the two tools only requires opening the clamp on the end of the drop hose and switching over to the "other" pigtail hose. On the utility drop toward the back of the shop, it's setup for 4" by default, but I can unclamp a 5" to 4" reducer and buckle up a 5" drop hose if that will serve a need better.

    The inspector was supposed to be here today to do the final approval for the electric, but he got tied up up-county with no hope of getting back before day's end. (He's doing 10 or more inspections per day right now over several counties) He was very apologetic (he's actually a woodworker for fun and a former contractor) and will try to get buy tomorrow afternoon if he can get out of a major inspection he has in the morning about 50 miles away at a reasonable time. Otherwise, it will likely have to be next Tuesday. At any rate, I should soon be able to start working on things that grace my "list".

    On another note, it was 86º F in the gara, err...temporary shop...today. It was ok with several fans going and much better than it would have been 7º F higher and likely even more humid if I opened the door. While I can pump some cool air out there from the house with a big fan if I'm not running machines and the birds are locked up, I may have to get more serious about considering a minisplit to be able to do actual work. I'm trying not to spend a lot of money right now because the old property still doesn't have a buyer, but the "consideration" has ratchets up a little more each day I'm out there with the heat we've been having and will likely continue to have.
    --

    The most expensive tool is the one you buy "cheaply" and often...

Posting Permissions

  • You may not post new threads
  • You may not post replies
  • You may not post attachments
  • You may not edit your posts
  •