Page 1 of 2 12 LastLast
Results 1 to 15 of 30

Thread: New Gazebo, needs a table made

  1. #1
    Join Date
    Jun 2010
    Location
    twomiles from the "peak of Ohio
    Posts
    12,169

    New Gazebo, needs a table made

    To place between a couple of chairs. Something to sit my Guinness on. So, started in on a top for the table....slowly hauled three 1 x 6 x 4' Ash planks to the shop. Placed them on the cleaned off bench...
    Gazebo Table, start up, top.JPG
    Had set the worse of the 3 on top.....wanted about 30" good wood....Hmmm. One end..
    Gazebo Table, top, cut line 2.JPG
    Will have to remove this section...down at the other end..
    Gazebo Table, top, cut line 1.JPG
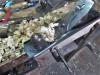
    Can't have that in a tabletop, either...set up a saw bench..
    Gazebo Table, top, saw bench.JPG
    Sorry, no tablesaw, today...doesn't take all that long, with a decent saw..
    Gazebo Table, top, cut-off pile.JPG
    Plus, no need to shoot every edge..
    Gazebo Table, top, a square cut.JPG
    When they are this well sawn.
    Gazebo Table, top, reflections of.JPG
    Splitting the lines, and watching the reflection in the saw plate...

    One done, two more to do..
    Stay tuned

  2. #2
    Join Date
    Jun 2010
    Location
    twomiles from the "peak of Ohio
    Posts
    12,169
    For the next 2...laid the first plank on top...
    Gazebo Table, top, mark out #2.JPG
    Set #1 where the best of the board was....had to trim the ends, again...sometimes wasn't much needed to be sawn..
    Gazebo Table, top, needs a trim.JPG
    More of a way to square up one end...was a bit rough...
    Gazebo Table, top, curvy.JPG
    Edges had a bit of curve going on...Manage to get all 3 boards cut..
    Gazebo Table, top, edges need work.JPG
    Hmmmm...needs a bit of work done...before glue and clamps arrive....I ripped the worse bows off..
    Gazebo Table, top, needs jointed.JPG
    Still need to run the jointer plane....10 pound limit ends this Saturday....then, maybe a #6 or a #7, to get these ready for some glue?


    Legs: will do a glue up of 2 strips...watching how the grain goes...
    Aprons: Full width of the 1 x 6....there MIGHT be a drawer involved on one end ( to hold coasters?)....

    There will be pads added to the feet of the legs...to keep them high & dry.

    After that...Depends on what I can come up with....bead work...tapered legs....we'll see..

    Stay tuned..

  3. #3
    Join Date
    Feb 2014
    Location
    Lake Gaston, Henrico, NC
    Posts
    9,029
    That "taking it easy" didn't last long.

  4. #4
    Join Date
    Jun 2010
    Location
    twomiles from the "peak of Ohio
    Posts
    12,169
    1-1/2 hours of shop time, today. 10 pound weight limit ends Friday night.....means Saturday morning I can ease back into the shop...

  5. #5
    Join Date
    Jan 2010
    Location
    Lafayette, Indiana
    Posts
    1,378
    Good for you Steven. Tom beat me to it in posting his observation. Glad to hear you are back on your feet and up and down the stairs, carrying lumber no less.

  6. #6
    Join Date
    Jun 2010
    Location
    twomiles from the "peak of Ohio
    Posts
    12,169
    Was looking at which jointer plane to use,,,
    Gazebo Table, 2 jointers.JPG
    A Stanley No.7c might be a bit too big...
    Gazebo Table, jointer logo.JPG
    The Millers Falls No. 15 seems to be about the right size...set up the first edge to be jointed..
    Gazebo Table, jointer set up.JPG
    leg vise and a 6" f clamp....to hold things steady..
    Gazebo Table, 1st edge jointed.JPG
    Turn the board over/around, and do the other edge....not sure which will be IN the glue joint..yet..
    Gazebo Table, getting a square edge.JPG
    Hardest part, was getting a square edge....instead of beveled ones...
    Gazebo Table, almost done.JPG
    Testing for a dry fit....square edge means things don't flop over. Laid the 3 boards out, looking for grain alignment
    Gazebo Table, dry fit for grain.JPG
    Meh...could be better?.....
    Gazebo Table, line up marks.JPG
    Sometimes that "V" helps align during the glue ups....provided the operator bothers to look...

    Trip to the ER this evening.....seems a headache had refused to go away....for almost a week...went to get it checked out, was there anyway, to get my blood thinner readings....

    Will see what Saturday brings...
    Stay tuned

  7. #7
    Join Date
    Jun 2010
    Location
    twomiles from the "peak of Ohio
    Posts
    12,169
    Re-arrange a board or two...
    Gazebo Table, top, grain patterns,cauls.JPG
    Clamps, glue, and cauls


    Gazebo Table, top, caul details.JPG
    Pairs of cauls....
    Gazebo Table, top, glued up.JPG
    And let sit a day...or 2....

    Then set aside, and start work on 4 legs.
    Stay tuned..

  8. #8
    I am glad to see the Dungeon is back in operation.

  9. #9
    Join Date
    Jun 2010
    Location
    twomiles from the "peak of Ohio
    Posts
    12,169
    Most of the clamps were removed....and the panel for the top was set aside, for now...
    Gazebo Table, top, set aside.JPG
    Leave the cauls in place, for now. Needed to cut another plank for lengths...
    Gazebo Table, legs, stock.JPG
    2 crosscuts with the Disston D-112.....reset the rip fence..
    Gazebo Table, legs, rip fence.JPG
    Distance being a hair over what 2 thicknesses of the plank would be....and run all 3 blanks through. Then pick the best 8 out of the 9 pieces.....#9 may wind up as a bread board end?
    Gazebo Table, legs, 1st glued up.JPG
    Select 2 that will match, big bead of glue, and a few clamps...set aside...and do the other 3 blanks..
    Gazebo Table, legs, 4 legs glued up.JPG
    And let these sit a spell......will come back once the glue is dry, lay out and taper 2 faces. Need to install the brand new 1/4" bandsaw blade, too. Plan is to rough saw the tapers, then plane them smooth....

    Stay tuned...am even working on a Monday

  10. #10
    Join Date
    Apr 2007
    Location
    Columbus, Ohio, USA
    Posts
    3,441
    Quote Originally Posted by Tom M King View Post
    That "taking it easy" didn't last long.
    It almost felt like....

    Need to take it easy.... and now time to build a chair...

    Watch out if he chooses to work hard!

  11. #11
    Join Date
    Apr 2007
    Location
    Columbus, Ohio, USA
    Posts
    3,441
    Steve, I think that you do not know how to take it easy. I might need to come out and relieve you of those really big hand planes of yours! <see Steve flattening a board with a block plane>

    Making good progress!

  12. #12
    Join Date
    Jun 2010
    Location
    twomiles from the "peak of Ohio
    Posts
    12,169
    Bandsaw to rough a line...
    Gazebo Table, legs, 1st taper.JPG
    Gazebo Table, legs, 2nd taper.JPG
    Then clamp the blank to the bench, and get out 2 planes...
    Gazebo Table, legs, mess makers.JPG
    And plane away the saw marks/burn marks...
    Gazebo Table, legs, 2 legs to do.JPG
    2 legs have both of their tapers done....need to finish the other 2 legs..
    Gazebo Table, legs, tapers done.JPG
    Taper is to start just below the 5" width of the aprons....

    Aprons will get started later today....need 2 sides, a back, and a drawer front.....drawer front and dividers will be from one board....so the grain will line up.

    Stay tuned....

  13. #13
    Join Date
    Jun 2010
    Location
    twomiles from the "peak of Ohio
    Posts
    12,169
    Hauled a plank to the shop....wound up bringing a second one....Cross cut..
    Gazebo Table, aprons, sides.JPG
    to get a pair of long aprons. Also a short apron for the end.....and a blank for the drawer front...
    Gazebo Table, aprons, set-up block.JPG
    Made a set-up block... to mill the tenons.
    Gazebo Table, aprons.JPG
    That will do for the main aprons....drawer front?
    Gazebo Table, drawer front.JPG
    It took a pair of rip cuts....will do the tenons later...
    Gazebo Table, drawer parts.JPG
    Once I figure out what I need for a tenon.....and can cut the drawer front to size....

    Set up to mill beads..
    Gazebo Table, legs, beads done.JPG
    Legs get a double bead down the outside corner....for now.....then the aprons get a bead along the bottom edge...
    Gazebo Table, aprons, bottom bead.JPG
    Longer aprons also got face planed..
    Gazebo Table, aprons, face planed.JPG
    tenons got cleaned up...
    BRB..

  14. #14
    Join Date
    Jun 2010
    Location
    twomiles from the "peak of Ohio
    Posts
    12,169
    Tenons got cleaned up..
    Gazebo Table, aprons, tenon clean up.JPG
    Then the edge got a bead....
    Gazebo Table, aprons, bottom beaded.JPG
    The part below the drawer front, also gets a bead....
    Gazebo Table, aprons, drawer's bottom bead.JPG
    Have to keep this lined up.....and see about tenons on the ends.
    Gazebo Table, aprons, leftovers.jpg

    Not sure IF I will build a drawer out of these leftovers....or just go out and buy a stick of Pine. Might be easier with the Pine.
    Gazebo Table, legs, beads done.JPG
    Those "T" marks show which face the tenons are supposed to get mortised to. Which will be the next step along the way...
    Stay tuned

  15. #15
    Join Date
    Jun 2010
    Location
    twomiles from the "peak of Ohio
    Posts
    12,169
    Shop turned out to be a bit too warm, today....cut things short....
    Gazebo Table. legs, 1st mortise chopped.JPG
    Got this far....decided to stop....after getting a dry fit...
    Gazebo Table, legs, test fit tenon.JPG

    It's a start, at least....will see how things go....Ash does NOT like being chopped.

Posting Permissions

  • You may not post new threads
  • You may not post replies
  • You may not post attachments
  • You may not edit your posts
  •