Page 1 of 3 123 LastLast
Results 1 to 15 of 31

Thread: dimensioning lumber for benchtop lamination - how perfect is perfect?

Hybrid View

Previous Post Previous Post   Next Post Next Post
  1. #1
    Join Date
    Feb 2021
    Location
    Israel
    Posts
    317

    dimensioning lumber for benchtop lamination - how perfect is perfect?

    Hi all,

    was hoping to get some advise as to whether I am proceeding in a smart or at least feasible way.

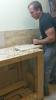
    I'm building a bench, starting with the top back half (split top Roubo) out of hard maple.

    I'm using all hand tools (yeah I know)


    so my plan is this:

    1) plane the sides (2 faces and an edge) as perfect as possible
    2) line up the boards for glue up
    3) plane down the last edge so that all the boards are of equal thickness (the idea behind this is that it would let me keep the top as thick as possible?)

    one thing that concerns me is gaps.
    I've dimensioned a couple of the boards so that they are pretty flat. I've done a dry run on it 0 and the gaps between the lumber pretty much disappear using 1 clamp in the middle. If I check with a straight edge and feeler gauges set to 0.004" I can go beneath it. in some areas. does it really take that much work to flatten boards by hand? I have 66" x 5-1/2" boards and it takes me hours to get it that flat. I guess what I'm asking is how flat do I actually need it to be? I would absolutly hate to resurface the top and see gaps appear from deeper levels.

    thanks,
    any advise would be deeply appreciated.

  2. #2
    Join Date
    Apr 2013
    Location
    Stone Mountain, GA
    Posts
    751
    How thick are the laminations? The thinner they are, the easier they will pull tight under clamping pressure. The thicker they are, the more perfect the will have to be.

    My bench was made out of construction lumber, at 1-1/2" thick. I did not precision flatten each lamination, but ran a #4 over it until there were no high spots left (takes shavings everywhere), then took a bit off the center of board (across the width) so that the edges will pull tight. After doing this to all of laminations, I dry-clamped them together and checked for gaps. There were a few small ones, so I marked their locations and disassembled the stack. I then lightly planed the areas adjacent to where I had marked (since those would be high spots). That got rid of the gaps.

    Also, when I dry-fit I used the actual clamping rig I was going to do the glue-up with, which was basically using every clamp I own. One clamp in the middle might not have pulled all the gaps out unless everything is dead perfect, but I don't think that's reasonable to do if you're working entirely by hand. Wasteful of time and material. There's a ton of glue surface on these laminations, slightly bowed boards are not going to make it come apart.

    I would not worry about trying to get each lamination the same thickness, just get the faces flat enough so they can clamp to each other without showing a gap.

  3. #3
    Join Date
    Apr 2013
    Location
    Stone Mountain, GA
    Posts
    751
    Sorry, I misunderstood what you were saying about getting each board the same thickness. You meant across the 5-1/2" dimension, which I would call width. IMO if they are reasonably close I wouldn't bother too much with trying to get every lamination exactly the same width. You have a lot of material to burn and its difficult to align them perfectly when doing the glue-up. None of my boards were perfectly straight on the edges, being ripped with a circular saw. So I aligned them as best as I could during glue up, then got to work with a jack plane and leveled it all down. I feel like you could waste a lot of time precision-prepping each board and then STILL have to do a lot of jack planing after glue-up, wasting more time and more material.

    If you have a power jointer and planer its a different story, but working by hand I would economize effort.

  4. #4
    Join Date
    Jun 2008
    Location
    So Cal
    Posts
    3,765
    My suggestion is to get them as flat as possible.
    When time comes to glue them use as many clamps as possible wet both surfaces and thin the glue a little bit something in the order of one table spoon of water to one cup.
    Thick creepy glue lines are just as disappointing as gaps maybe worse.
    Good Luck
    Aj

  5. #5
    I am going to be undertaking the same crazy idea of building my workbench using only hand tools. I anticipate it taking a lot of work and probably then, even more. I haven't done any super-thick glue ups ever, but I would expect that, unless you have an obvious hollow, the gaps are closing up for a least a quarter inch or so below the surface (maybe that's just wishful thinking though). I think getting the tops as finished as possible before gluing is another good preventative, so that after the glue up there isn't a ton of material to remove (WYSIWYG so to speak), leaving less of a chance of a surprise gap from appearing. Personally, I'm not too concerned about small gaps on the bottom side, since that will never be visible, so I'll sacrifice a small gap on the bottom to get the top nice and clean.

    I'm curious, how are you checking for flatness over that long of a span? I'm going to be making mine 8 feet long, and I can't come up with any ideas on how to make sure they are flat lengthwise.

    Good luck!

  6. #6
    Join Date
    Mar 2020
    Location
    Central TX
    Posts
    75
    For flatness over the length, I'd argue that if you're getting a full-length shaving with a jointer plane, your bench is flat enough. you can check for twist with winding sticks, though with a lamination like this it should be minimal.

    With big lamination glue-ups I inevitably get a little variation/misalignment that needs to be leveled (this could probably be eliminated with Dominos or other floating tenons I suppose). Because of that, I try to get the edges and width pretty close, but don't sweat it if it's a little off since I'm going to be flattening anyway. Traversing with a jack plane takes care of this quickly.
    Last edited by Daniel Culotta; 04-22-2021 at 4:33 PM.

  7. #7
    Join Date
    Sep 2008
    Location
    N. Idaho
    Posts
    1,621
    A little off topic: I'd recommend gluing up in quarters, gluing two quarters and finally gluing the two halves to minimize (but not eliminate) chaos during glue-up.
    "You can observe a lot just by watching."
    --Yogi Berra

  8. #8
    Knowing that my beech was just air dried I used a cabinet scraper to make a little hollow in the middle third of each piece. Many here have
    seen small openings at joints. Some of that is from wiping the top with wet cloth ,and some is just the nature of beech .

  9. #9
    Quote Originally Posted by Christopher Charles View Post
    A little off topic: I'd recommend gluing up in quarters, gluing two quarters and finally gluing the two halves to minimize (but not eliminate) chaos during glue-up.
    I agree. And before gluing the sections shuffle the pieces around to get straightest unit. It might be a good idea to leave the outside
    pieces of each “unit “ unplaned until you are ready to glue the units together. Then you will only be doing ....not redoing.

  10. #10
    Join Date
    Feb 2021
    Location
    Israel
    Posts
    317
    That's my plan too!

  11. #11
    Quote Originally Posted by Christopher Charles View Post
    A little off topic: I'd recommend gluing up in quarters, gluing two quarters and finally gluing the two halves to minimize (but not eliminate) chaos during glue-up.

    +1,

    I agree with Chris, I've done a few slab glue ups over the years and have found starting with two boards to build "modules" and doing the slab glue up over a several day process where I work with the modules building to a final glue up of two half modules. Working that way there is no need for any one board to be "perfect". I will add, it is not important to have the top perfect because it will need flatting anyway but it is good for the bottom to be close so it only needs a little dressing to true the area that sets on the base. I guess the best advise is to remember it is a workbench, not fine furniture. Build simple, strong, cheap, and quickly, then go to work making things.

    ken

  12. #12
    Join Date
    Mar 2019
    Location
    Upstate SC
    Posts
    15
    I wouldn't strive for perfect on the boards before gluing. When i built my top i tried to make every board as straight and flat as I could before glue up, and still had quite a bit to remove to get the top flat and square. It wasn't worth the time and effort.

    Assuming the stock is mostly the same dimensions, I would recommend using a plane to remove the saw marks and waves from the faces to be glued. The clamps will pull any bow or twist out of the boards. Paul Sellers did a video building a top from 2x4s in his backyard some time ago and I'm pretty sure this is all he did before glue up. I used a #6 for this, Paul used a #4

    Then I would orient the boards in the manner you plan to glue them, mark the edge that will be resting on the supports, and get those edges roughly straight. I would also work past any radius or chamfer on that edge as well. That way you can look across the ends and see if you are clamping any twist into the top.

    That about sums up the prep I would do before glue up. There will still be a lot more work, so dont burn yourself out at this step.

  13. #13
    Join Date
    Dec 2016
    Location
    South West Ontario
    Posts
    1,503
    Assaf, I forget how thick your top is but as mentioned here thick tops don’t have any give, hence lots of accuracy is required. Don’t worry about the top face very much you will plane that flat afterwards. I would use a bright light right behind the joint to find high spots and very carefully hone them to bring the boards to ‘black out’. Glue them up, then repeat with the next board.

    It is worth the effort, actually it’s not that bad, use a #4. Don’t rely on glue and clamps to fill gaps, it will only be temporary. At least with the light behind you can see what you are doing.
    ​You can do a lot with very little! You can do a little more with a lot!

  14. #14
    Join Date
    Feb 2021
    Location
    Israel
    Posts
    317
    I have a 50" straight edge and a feeler guage. I don't know what I would do without them

  15. #15
    Join Date
    Dec 2016
    Location
    South West Ontario
    Posts
    1,503
    Without them you would use a taught string line and three identical blocks of wood. The middle block would kiss the string, or not, as you slide it. They would be far better than your ‘straight’ edge, the right length and save the feeler gauge for spark plug gaps.

    Don’t get too carried away the bench will shift and move all over the place for two years!
    Last edited by William Fretwell; 04-23-2021 at 7:38 AM. Reason: Add line
    ​You can do a lot with very little! You can do a little more with a lot!

Posting Permissions

  • You may not post new threads
  • You may not post replies
  • You may not post attachments
  • You may not edit your posts
  •