Page 1 of 2 12 LastLast
Results 1 to 15 of 27

Thread: A Three Legged Stool for Candy

  1. #1
    Join Date
    Sep 2007
    Location
    Longview WA
    Posts
    27,430
    Blog Entries
    1

    A Three Legged Stool for Candy

    It has been a decade since my last sitting stool has been made. It was supposed to be for Candy but my feet rest on it all the time while watching TV. It is occasionally used as a work table. Candy does use it when she is working on things around the house and outside.

    Candy has asked me to make another one so she can leave it in the greenhouse or use it when working on some of the larger potted plants outside. She is expecting one just like the one made ten years ago. It was made in the style of a small saw horse >

    https://sawmillcreek.org/showthread.php?159721

    She hasn’t painted it yet.

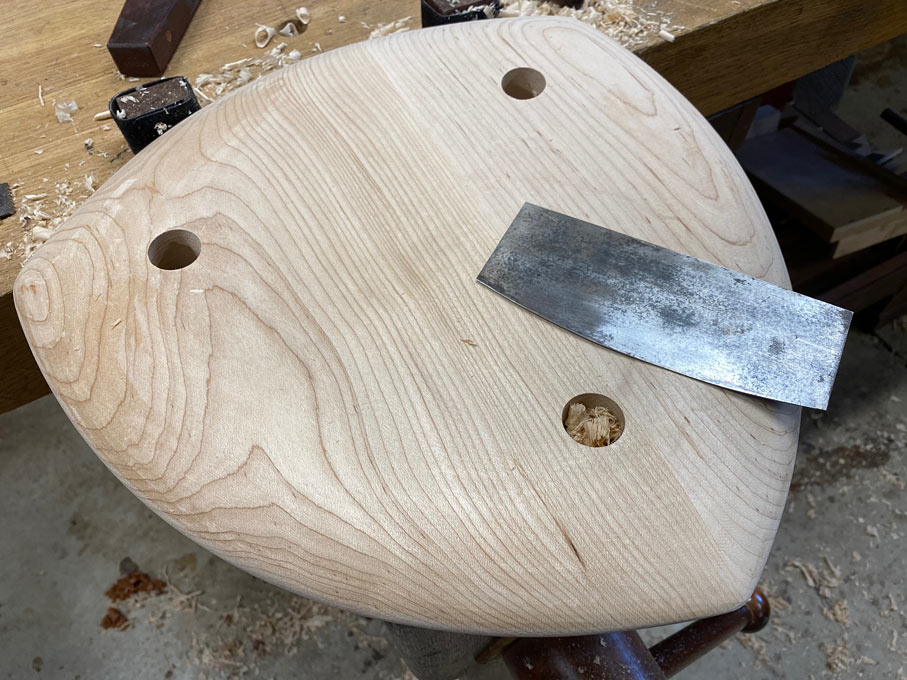
    Since she wants to use the new stool outside and in the greenhouse my plan is to make a three legged stool, for use on uneven ground. The top will also be round.

    The stock chosen for this came from the firewood pile years ago. It was a square of ~2” thick alder. A circle was drawn on it to cut out on the bandsaw. My original intent was to turn this on the lathe. Turns out the radius is about an inch too much for my lathe.

    A piece of scrap had a matching arc cut into it to help hold the piece on the bench:

    a Scrub Work.jpg

    The piece needed some cleaning, an apt job for a scrub plane.

    A spokeshave was used to cut a bevel all around what will become the underside of the seat:

    b Shaving a Bevel.jpg

    Spokeshaves were used to smooth the edge:

    c Smoothing The Edge.jpg

    A #51 spokeshave was used with the blade set to an even, light cut. An old wooden spokeshave was also used and worked well in difficult spots with its low angle of engagement.

    In the image the shave is being pulled up from the lower right. On a round work piece the direction of shaving changes over each quarter. It also helps to skew the shave and even slide it from side to side in motion. This produces a slicing cut that works quite well at avoiding tear out and chatter.

    The top side of the seat needed a few more strokes with the scrub plane:

    d Last Few Scrubs.jpg

    My plan is to make a depression in the center instead of being a flat top stool. First to do along this line is to find and mark the center:

    e Marking Center.jpg

    My tendency is to make multiple marks to determine the best spot for center. A circle was drawn using the averaged center:

    f Circle Layout.jpg

    A convex shave was used to remove material next to the drawn line:

    g Trimming to the Line.jpg

    A scorp was also used to remove waste from the center:

    h Give Scorping a Chance.jpg

    The scorp has a bevel on the outside. Using it here has me thinking the bevel should be on the inside of the curve.

    To be continued…

    jtk
    "A pessimist sees the difficulty in every opportunity; an optimist sees the opportunity in every difficulty."
    - Sir Winston Churchill (1874-1965)

  2. #2
    Join Date
    Sep 2007
    Location
    Longview WA
    Posts
    27,430
    Blog Entries
    1
    A convex shave was used to remove material next to the drawn line:
    Forgot to mention here the hand in the center is held stationary and the shave swings in an arc. This technique is also often used with a flat bottomed shave to round over edges.

    jtk
    "A pessimist sees the difficulty in every opportunity; an optimist sees the opportunity in every difficulty."
    - Sir Winston Churchill (1874-1965)

  3. #3
    Join Date
    Feb 2004
    Location
    Perth, Australia
    Posts
    9,491
    Jim, I am interested to see that you began shaping before drilling for the legs. Is that correct? If so, would it not be easiervto drill first, then shape, in order to retain the reference angle of a flat and parallel surface?

    Regards from Perth

    Derek

  4. #4
    Join Date
    Jan 2019
    Location
    Fairbanks AK
    Posts
    1,566
    Derek raises a good point. I looks to me like Jim is leaving a full width border all the way round the seat; but in my shop it would have been "easier" to clamp and drill for legs while both sides were still flat.

    Plus I could have clamped a scrap to the flat side to minimize tearout when drilling through. Not Jim's frst rodeo, looking forward to the outcome.

  5. #5
    Join Date
    Sep 2007
    Location
    Longview WA
    Posts
    27,430
    Blog Entries
    1
    Quote Originally Posted by Scott Winners View Post
    Derek raises a good point. I looks to me like Jim is leaving a full width border all the way round the seat; but in my shop it would have been "easier" to clamp and drill for legs while both sides were still flat.

    Plus I could have clamped a scrap to the flat side to minimize tearout when drilling through. Not Jim's frst rodeo, looking forward to the outcome.
    Quote Originally Posted by Derek Cohen View Post
    Jim, I am interested to see that you began shaping before drilling for the legs. Is that correct? If so, would it not be easiervto drill first, then shape, in order to retain the reference angle of a flat and parallel surface?

    Regards from Perth

    Derek
    Please note there was no claim to knowing what what the heck is being done.

    Okay, Yes Scott, Derek, this is my first rodeo as far as making staked leg furniture. Maybe since the edge around the top and the bottom are still flat it is time to layout and bore the leg holes before anything else is done.

    Thanks for the heads up guys.

    Very little was done on this today. Did a bit of outside garden work since things are starting to get active in the garden.

    jtk
    "A pessimist sees the difficulty in every opportunity; an optimist sees the opportunity in every difficulty."
    - Sir Winston Churchill (1874-1965)

  6. #6
    Join Date
    Jan 2019
    Location
    Fairbanks AK
    Posts
    1,566
    Spring is when I come home from work and use a mattock to start chipping a 6" thick layer of harpacked snow off the paved portion of my driveway. So yeah, I guess it is spring. It started snowing while I was out there with the mattock this afternoon, but the chickadees are going bananas trying to get established nests before the robins show up. Meanwhile my first PMV11 blade arrived today in the mail and remains sealed in the shipping box.

    The only thing I have learned for sure in my time here, there is more than one way to do anything.

    I do appreciate the tip about holding one end of a spokeshave stationary while swinging the other handle. I can think of two places I could have used that tip already, once to prevent tearout and once to prevent using a bandaid at the base of my thumb.

  7. #7
    This is going to be fun. Thanks for the tutorial, Jim. Can you elaborate on your workholding? I find this more daunting on stool seats than even the carving. I like your caul.

  8. #8
    Join Date
    Sep 2007
    Location
    Longview WA
    Posts
    27,430
    Blog Entries
    1
    Quote Originally Posted by Prashun Patel View Post
    This is going to be fun. Thanks for the tutorial, Jim. Can you elaborate on your workholding? I find this more daunting on stool seats than even the carving. I like your caul.
    You are welcome, but from what Derek and Scott mentioned it may have been trouble brewing with leaving the boring the leg holes for later.

    The work holding is rather simple. After the circle was cut on the bandsaw it was used as a template to mark a piece of scrap:

    Circle Holder Engaged.jpg

    This is using a different piece against the vise dogs. The original piece worked fine before the spokeshaves were used to remove the saw marks from the disk. After the saw marks were smoothed a second piece of scrap was needed to make up the difference.

    The cut out jaw was left rough:

    Circle Holder Disengaged.jpg

    Here the cut out jaw is sitting on the two bench dogs.

    It seemed smoothing it would not only be a poor use of time but the roughness would do a better job of preventing the disk from slipping.

    The cut out was made to keep the center of the disk in line with the vise screw. If it was off center the vise racking may have caused a problem. It was just luck having the chosen piece of scrap exactly matching the distance to the edge of the bench dogs. It would have been better to use a longer piece to allow adjustment. If need be a longer piece of scrap could have been used between the cut out and the dogs. For more holding power two pieces with cut outs could be used.

    jtk
    Last edited by Jim Koepke; 04-01-2021 at 11:10 AM. Reason: Moved: Here the piece is sitting on the two bench dogs. and changed wording
    "A pessimist sees the difficulty in every opportunity; an optimist sees the opportunity in every difficulty."
    - Sir Winston Churchill (1874-1965)

  9. #9
    You’ll be fine boring the stake holes. I do it from the top. As long as your seat sits square on the bench and you can reference off the rim and you can secure it , you will have no problem.

    I like to use a couple mirrors ala Peter Galbert to keep the bit on path and use a hand drill or brace rather than taking it to the drill press.

    I am sure this is child’s play for you.

  10. #10
    Join Date
    Jan 2019
    Location
    Fairbanks AK
    Posts
    1,566
    Wow. Nice technique Prashun. I have a Galbert book but only one shop mirror, so I haven't been able to try his setup; my wife has a thing Saturday morning, one of her small cosmetic mirrors may make a brief guest appearance on my bench top this weekend. Heaven help me if I get sawdust on it.

  11. #11
    Join Date
    Feb 2004
    Location
    Perth, Australia
    Posts
    9,491
    I've drilled the mortices using sliding bevels and a brace, and also with a drill press. A three-legged stool has the advantage of only needing one angle to calculate as the rake and splay are combined. In this set up for the three-cornered stools I built recently, the angle was 10 degrees ...


    After the mortices were drilled, the seat was clamped at the bench using dog holes - two in the bench and one in the leg vise chop ...


    Regards from Perth

    Derek

  12. #12
    Join Date
    Sep 2007
    Location
    Longview WA
    Posts
    27,430
    Blog Entries
    1
    Getting back to this has been difficult with all the other work to be done in the greenhouse. Must have done something right. This year was my highest yield of rooting on bay laurel cuttings. They are known for their difficulty to propagate.

    Also spent some time working out how the stool will go together. The legs are turned, two finished one still on the lathe:

    Turned Legs.jpg

    Hopefully one day my lathe abilities will include being able to make multiple turnings that all look alike.

    The legs will be angled at 6º. Since the boring for the leg tenons will be done with an auger bit it seemed a guide would be very helpful. A piece of scrap was checked for square all around and bored with a 3/4" auger:

    a Boring Guide Block.jpg

    The piece was marked all around and a guide was used to help keep the auger at right angles.

    The base of the block was cut on the band saw with the miter gauge set to 6º:

    b Kevin Bacon Cut.jpg

    A 3/4" auger bit was fed through and turned lightly into the base at the center of the leg mortise. The block was set against the base with the radiating center lines aligned to the center lines on the block. The side center alignment line was drawn in alignment with the circular mortise center line:

    d Marking Block for Alignments.jpg

    The part hanging over the edge of the seat was cut off.

    The next step was delayed due to not having a 42mm socket to adjust the table on the drill press. A ramp was made, but we had to go into town to look at a truck and a few other things so a socket was purchased and the table has been tilted. This will allow making a larger mortise with a forestner bit for the first step on the leg below the tenon:

    e Drill Press Set Up Check.jpg

    The work and block were used to check the alignment, everything looks good.

    Next have to switch the belts on the drill press and break out some clamps to hold the work.

    jtk
    Last edited by Jim Koepke; 05-19-2021 at 1:07 AM. Reason: The part hanging over the edge
    "A pessimist sees the difficulty in every opportunity; an optimist sees the opportunity in every difficulty."
    - Sir Winston Churchill (1874-1965)

  13. #13
    Glad to see this thread resumed. I enjoy watching your method. Did you pick 6 Deg for a reason? How are you planning to taper the holes?

    Your turning ability looks fine from here. I’m curious what turning chisels your used for those details?
    Last edited by Prashun Patel; 05-19-2021 at 6:14 AM.

  14. #14
    Join Date
    Mar 2013
    Location
    North Alabama
    Posts
    548
    Quote Originally Posted by Jim Koepke View Post
    Hopefully one day my lathe abilities will include being able to make multiple turnings that all look alike.
    I'm still looking forward to my lathe abilities being such that what comes off the lathe resembles what I wanted in the first place.

    This is an interesting build. Thank you for sharing it.
    Chuck Taylor

  15. #15
    Join Date
    Sep 2007
    Location
    Longview WA
    Posts
    27,430
    Blog Entries
    1
    Did you pick 6 Deg for a reason? How are you planning to taper the holes?
    6º came about by using a large bevel and my eye on the underside of the seat. Hopefully it will work out for use in the greenhouse and outside. No taper is planed for the holes or tenons. Wedges will likely be used. In that case a little taper might be used on the top side.

    I'm still looking forward to my lathe abilities being such that what comes off the lathe resembles what I wanted in the first place.
    It seems the first step of learning to turn is accepting what was made not looking quite like what was wanted, but it will work.

    Eventually the next step is when things sort of look like what you wanted but not what was intended, but it will work.

    Then the turner starts to get much closer to what they want and it works and a little pride comes from the accomplishment.

    The turnings start to get closer to what was wanted and the turner shows it to their spouse who complements them on their work and maybe kisses them on the cheek.

    This encourages the turner to spend more time at the lathe which improves the turnings even more. A few more lathe tools are purchased. Their other tools go unused for months and get sold to buy a better lathe and more turning related tools.

    The turner now barely takes breaks for meals and is fully addicted to the turning process.

    And we thought being a hand tool woodworking was having an effect on our lives.

    jtk
    Last edited by Jim Koepke; 05-19-2021 at 10:57 AM.
    "A pessimist sees the difficulty in every opportunity; an optimist sees the opportunity in every difficulty."
    - Sir Winston Churchill (1874-1965)

Posting Permissions

  • You may not post new threads
  • You may not post replies
  • You may not post attachments
  • You may not edit your posts
  •