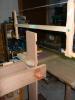
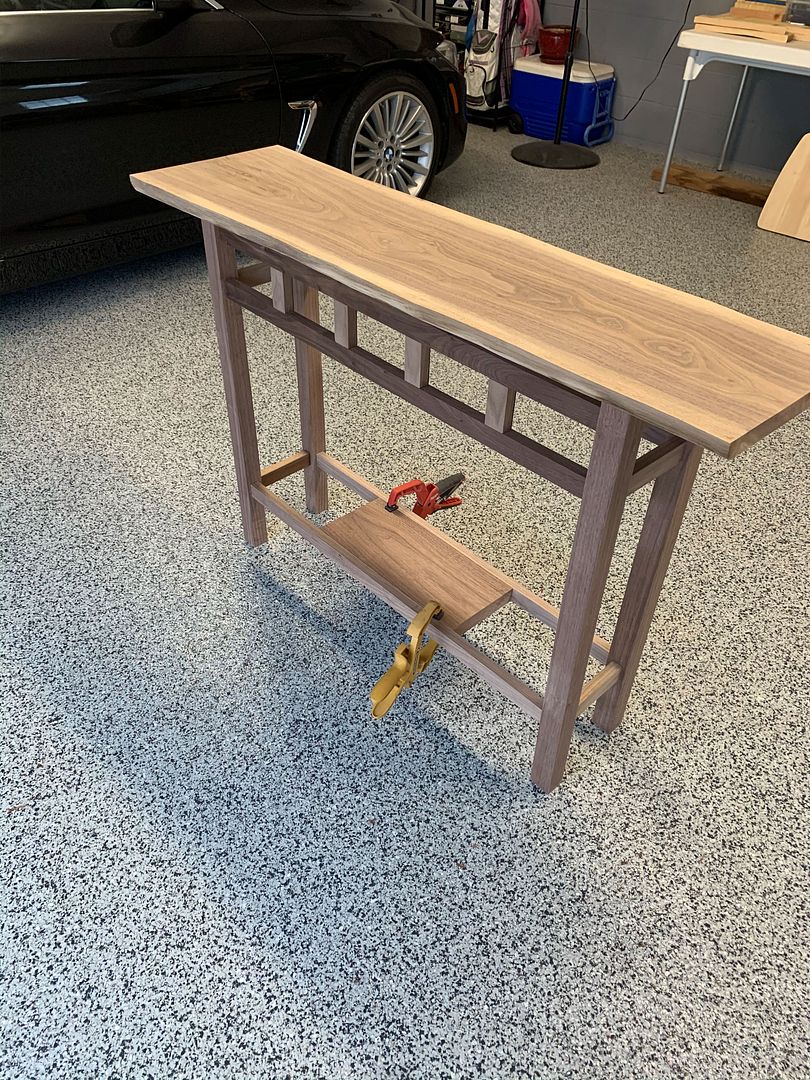
Results 1 to 10 of 10

Thread: Advice on slimming down the base of this walnut hall table build?

  1. #1

    Advice on slimming down the base of this walnut hall table build?

    The hall table I’m building came out a bit clunkier/boxier than I was hoping. Looks more farmhouse than the "minimal" look I was aiming for. Any magical ideas to make the base appear more delicate?


    I’ve broken all the edges and put an 1/8” round over on the outside corners of the legs. It helped but still not where I’d prefer it to be. Also, top isn’t to final cut or shaped.


    Help. Please. Thanks!

    IMG_4798.jpg
    IMG_4799.jpg

  2. #2
    Join Date
    Dec 2010
    Location
    South Coastal Massachusetts
    Posts
    6,824
    It's the color contrast to the wall behind it.

    Could the base color be lightened (pickling/washcoat/bleaching)?

  3. #3
    Bevel the underside of the top. It will make it appear thinner and lighter.

    You can make heavier chamfers on all parts (or roundovers).

    You can thin the stretcher and center posts to make them more delicate.

    You can taper the bottoms of the legs starting from just beneath the stretchers.

    All this being said, I don't find the look as it is now objectionable. I think it looks clean and well made (I would however, under bevel the top).

  4. #4
    Join Date
    Jul 2016
    Location
    Lebanon, TN
    Posts
    1,722
    I just used my new Panto router to make all the mortise and tenons for my friend's side table. It's very similar to yours and I think you could change the aspect ratio by narrowing the legs a little, bringing them closer together, making them look a little less Bulldog.

    https://hosting.photobucket.com/imag...MarkTable1.jpg


  5. #5
    Here are some other photos with better lighting. It will live at a customers house. My shop is just too crammed to stage it at the moment
    IMG_167F96E98D4E-1.jpg

    IMG_4803.jpg
    Attached Images Attached Images

  6. #6
    I was thinking it'd be nice to thin the stretcher and center posts...just not sure on the best approach as the base is glued up.

  7. #7
    It's glued up so not going to change that. I could make the top a bit wider I suppose..

    Quote Originally Posted by ChrisA Edwards View Post
    I just used my new Panto router to make all the mortise and tenons for my friend's side table. It's very
    similar to yours and I think you could change the aspect ratio by narrowing the legs a little, bringing them closer together, making them look a little less Bulldog.

    https://hosting.photobucket.com/imag...MarkTable1.jpg


  8. #8
    Look at some of those McIntosh chairs ....your work is much better. The table is your ,not out of bounds, take on on a popular style. The open
    apron probably seems dark , I would put mirrors in those spaces.
    I failed to mention you would have to add a square bar all a round to make “those spaces”. Perhaps 3 inches to 4 inches down
    from the top.
    Last edited by Mel Fulks; 03-12-2021 at 3:52 PM.

  9. #9
    Join Date
    Mar 2003
    Location
    SE PA - Central Bucks County
    Posts
    65,894
    My immediate thought was that the base was deeper and longer than necessary for the top. That adds to the slightly heftier feel. I generally build these without stretchers, just aprons and taper the legs to lighten things up.
    --

    The most expensive tool is the one you buy "cheaply" and often...

  10. #10
    Thanks for all you suggestions. While I didn't get to top today, I managed to trim up a few base components which I feel satisfied with.

    For the curious- I took off 1/8-3/16" on the underside of the stretcher and two lower rails through a combo of a Rotex (to take off the meat of it), planes, and chisels for the corners. I then used the same procedure to remove +- same amount from the backside of the stretcher and backside of the center supports. Finally, I went over the legs corners with a 6mm roundover.

    Here are some updated photos. It may not looks like much but definitely helped shed some weight. Live and learn...

    IMG_4822 2.jpg
    IMG_4821.jpg
    IMG_4824.jpg
    Attached Images Attached Images

Posting Permissions

  • You may not post new threads
  • You may not post replies
  • You may not post attachments
  • You may not edit your posts
  •