Page 1 of 2 12 LastLast
Results 1 to 15 of 23

Thread: The gang that couldn't saw straight

  1. #1
    Join Date
    Sep 2019
    Location
    Lafayette, CA
    Posts
    843

    The gang that couldn't saw straight

    Wow.

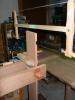
    I need lots of practice. Today I marked several L-to-R pins on a scrap piece of poplar and set out to practice the cuts I did so poorly last time I worked on pins. Here's the end of the board after the cuts (including one R-to-L cut just for fun):

    L-to-R.jpg

    Overall not horrible, but it's pretty clear some of the cuts are not parallel to the others. Let's call it Problem No. 1.

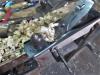
    But wait, there's more. Look down the face:

    L-to-R result.jpg


    Augggggh. A much bigger problem.

    They say, "buy this saw and you'll be doing perfect dovetails on your first try." Hah. One thing I can say is the saw cuts straight in the direction I point it in.

    I need a coach. This is going to be a skill that is a challenge for me to adopt. I'm hoping to lessen Problem No. 1 by using Cosman's saw-tooth marking knife method, where the knife actually starts the kerf for you on the end of the pin board. But it's clear that will only take me part of the way. Until I can put Problem #2 behind me, there will be no actual dovetails cut in my shop.
    Last edited by Bob Jones 5443; 02-13-2021 at 10:13 PM.

  2. #2
    Join Date
    Jan 2010
    Location
    Lafayette, Indiana
    Posts
    1,378
    Don’t despair. You only have to cut straight for 3/4 of an inch or so for most dove tails. Practice a few more times and you will get the hang of it. Years ago someone here, I think, suggested setting up a small mirror behind your work in order to see how the saw tracks on both sides of the cut. I am in need of much, much more practice so am in no position to coach. But I will encourage you, try again

  3. #3
    Join Date
    Dec 2010
    Location
    South Coastal Massachusetts
    Posts
    6,824
    How high do you mount the board, from the floor?

    When you have your cutting hand parallel to the floor, with your elbow tucked in at 90 degrees (shake hands position) - how high is your hand off the floor?

    While my dovetails aren't great, my best ones come when the board is a little higher than my neutral (shake hands) position.

    ****
    I try to only cut lines I can see, first from the top rear corner down to the front baseline - then down the back side away from me.

    My *best* dovetails still require paring.

    It's not you, these are a fiddly PITA for the first hundred or so.

  4. #4
    Join Date
    Feb 2014
    Location
    Lake Gaston, Henrico, NC
    Posts
    9,021
    Do twenty more, before buying anything else.

  5. #5
    Join Date
    Jan 2007
    Location
    bloomington il
    Posts
    184
    there is a lot to good sawing other than just a nice saw.
    How are you standing?
    the way your arm moves past your body.
    how straight the saw is to the start of the cut.
    But don't worry it is all simple things that you will learn and be sawing laser lines down a board.

    This video was the most helpful bit of info that got me to being able to saw a good line
    https://www.renaissancewoodworker.co...r-hand-sawing/

    https://www.youtube.com/watch?v=rMKs...ature=emb_logo
    Last edited by justin sherriff; 02-13-2021 at 7:53 PM.

  6. #6
    Imho proper work holding and light and height comes before learning to saw straight. Can u describe your set up?

  7. #7
    Join Date
    Oct 2004
    Location
    SoCal
    Posts
    866
    I believe that I have easily cut well over a thousand, maybe 2 thousand practice lines. I was getting better but that is couple of years in the past. Things that have helped me:

    Kerf-Starter
    If right handed then stand to the left of the cut line so the arm can swing freely. Exaggerate this until you get a feel for it. The arm must swing in a straight, unobstructed line.
    Consciously lighten up on your grip.
    A weel tuned saw will cut straight - let it.

  8. #8
    Join Date
    May 2015
    Location
    Ingleside, IL
    Posts
    1,417
    I've played pool my entire life, and it has given me a real edge when it comes to sawing straight. In a pool stroke the shoulder, the elbow, the hand, the dominant eye, bridge hand and the cue tip are all in the same vertical plane. If you think about keeping your shoulder and elbow and hand all in the same vertical plane when sawing, it will keep your elbow from flying out, which flexes your wrist and the saw will move in an arc. I know this for a fact - I have mis-cued thousands of times and it's always the elbow flying out of the plane. It's exactly the point of the video that Justin shared. Stop in mid stroke and look back and see where your elbow is. Watch your elbow and shoulder and hand while sawing. My 2 cents. And worth every penny.

    2021-02-13_19h48_40.jpg
    Stand for something, or you'll fall for anything.

  9. #9
    . . . and don't come up off the cue/shotgun stock/dovetail saw too fast.

  10. #10
    Join Date
    Dec 2015
    Location
    Cincinnati, Ohio - north
    Posts
    110
    It helps if I tilt the board in the vise so that the series of cuts from one half of the lines are vertical. Cut all those lines that are vertical. Then reposition the board so that the lines for the other half of cuts are vertical. Always making vertical cuts - never making angle cuts. Eye, hand, arm, and stroke orientation never changes. Muscle memory takes hold.
    Last edited by al heitz; 02-14-2021 at 12:45 AM.

  11. #11
    Join Date
    Feb 2004
    Location
    Perth, Australia
    Posts
    9,491
    Bob, and all those wanting to saw "straight" ...

    Some might argue it is about developing a sense of plumb. To some extent this is correct, but then what about dovetail angles? I have read advice to angle the board so that the line is plumb. I consider that this misses the mark. Even Rob Cosman makes a big deal out of squaring the board to be sawn. I prefer that the board is square as well, but this will not help you in the important area.

    What is the secret? Actually, it is quite simple, and it goes for tenon cheeks and shoulders as well. In fact, it goes for ALL sawing.

    When we mark out Tails or cheeks (or whatever), we draw the line across the top and then down the sides. You will always saw straight if you saw two lines at the same time! Saw the top of the tail board lightly, and run the teeth over the side to the following line.

    First this ...


    .. then drop the saw ...


    Curt's recommendation of the Kerf Starter is a good one (photos below from a review I wrote some years ago). I just score the line (or use a pencil), but eventually you will develop a sense of "square".


    This can really help start a saw and reduce the concern that forces you to watch the top line and not both lines simultaneously.


    Regards from Perth

    Derek
    Last edited by Derek Cohen; 02-14-2021 at 9:04 AM.

  12. #12
    Join Date
    Dec 2016
    Location
    South West Ontario
    Posts
    1,503
    Derek, that’s exactly the same technique I just described a few days ago in my bookcase build!
    ​You can do a lot with very little! You can do a little more with a lot!

  13. #13
    Join Date
    Feb 2004
    Location
    Perth, Australia
    Posts
    9,491
    William, that underlines that it is the correct technique!

    Regards from Perth

    Derek

  14. #14
    Join Date
    Jun 2010
    Location
    twomiles from the "peak of Ohio
    Posts
    12,165
    One item no one has mentioned through all of this......your ( in my case..Left) thumb.....why buy some fancy guide....when you were born with a guide. Thumbnail at the line, knuckle against the saw's plate....By adjusting how close or far from a 90 degree thumb goes....THAT will be the angle the saw will follow.....When you get the saw far enough down into the kerf, to where the plate will follow it, you can then move the thumb away.....Can't bend the knuckle far enough to the far side of 90 degrees....turn the board around. You can also easily tell when you go "off line"....you will start cutting into your thumb....hurts, don't it? Teaches you not to do that again....

    Fingers of the "guide hand"? just wrap them over the board, to support the thumb...

    Also, after the first one or two short "starter strokes" .....use the full length of the saw plate for the rest of the cut....be surprised how few strokes you will need to do ( 8 full strokes should get you to 3/4" depth)

    You PAID for a 12-14" long saw....use the entire length....evens the wear out on those hard to see teeth....

    back to saw work...
    Bathroom Cabinet, rip cut.JPG

    I do cheat a bit, though...
    Bathroom Cabinet, 2 saws, no waiting.JPG
    When doing an angled cut, like a 45 miter cut...
    Bathroom Cabinet, frame parts done.JPG
    Comes in handy, when doing Mitered Half Lap joints....
    Bathroom Cabinet, test fit corner.JPG

    At least the 2 beads will line up...YMMV

  15. #15
    Join Date
    Sep 2019
    Location
    Lafayette, CA
    Posts
    843
    Love the Creek! What a trove of encouragement and actionable advice. If you'll indulge me, I'll try to reply to each of you. So scroll down to see yours.

    First, though, thanks to Joe for the sincere pep talk. I know you're right, and I have every intention of busting through the learning curve.

    Tom, for sage advice. It is not the tool but the user. Fortunately, as far as I can see, I'm more than set for gear. Twenty more, here I come.

    Dennis, for the advice to follow through with the swing/shot/cut.
    Last edited by Bob Jones 5443; 02-14-2021 at 2:37 PM.

Posting Permissions

  • You may not post new threads
  • You may not post replies
  • You may not post attachments
  • You may not edit your posts
  •