
Well, for those that saw my lament on a recent "Creeker's weekly accomplishments" posts about whether or not my custom doors would fit the opening they were made for- I'm happy to report that not only did they fit, but they needed no trimming- fit like a glove first try with perfect gaps all around.
This is for a historic property called "Smith's Fancy" which happens to be on my street- Crystal Gade. The name of the street is because it was the first street with glass windows. My house was one of three first homes to have glass windows in St. Thomas. I was really excited when the Smiths asked me to build mahogany doors for this historic property. Note: I have two shops- one is my own, and the other is a non-profit where I teach woodworking. This project was done by the students at the non-profit, which is called "My Brother's Workshop." We keep kids off the street and teach them woodworking, and I could not be happier doing this.
This was a big challenge, because the doors we were replacing were very warped, and also I was not allowed to take them to the shop to make templates because they were functioning as a security gate. We went out and measured the opening very carefully, including measuring the arch. We went back to the shop and laid it all out on a building table. These doors are nine feet tall, six feet wide combined, so we had to put two tables together and add an extension.
I did a few drawings- one was a wrought iron Bird of Paradise flower, which I loved, but obviously it was a bit too much for students.. We started narrowing down to a mahogany door with bars. The bars were so people coming out can see before opening the doors that all is clear.
We try to teach students to build things the way they will build in the field. These kids likely won't get jobs building custom doors, but rather will more likely get jobs in general construction, but it is very possible they will build simple shutters, which are common here. I decided not to use the shaper, but to have them figure out how to build them with the table saw and router. The tongue and groove vertical panels are a common way doors here were built in the 1800's. I decided rather than a tongue and groove, a splined joint would be less complicated. The groove was cut with a router or dado blade, depending on whether it was a stopped dado (router) or through dado (table saw).
The arch was a bit tricky- I had our CNC shop make a plywood arch to use as a template, and we used a router to cut the arch. The parts were rough cut on a bandsaw, then routed to final shape, and then the doors were built with the stiles protruding, and we laid the arch over that and cut the stiles to match the arched rails.
Believe it or not, the wrought iron came from Home Depot!!! I was really pleased with the way they looked. We decided to stagger them because lining up all the spirals wouldn't look right. I really wanted to offset them more, but the length versus the opening dictated where they fell. I recessed them 3" into the rails and epoxied them in as well. They ain't goin' nowhere!!!
Today we installed them. I didn't sleep much because I was really worried about that arch. It is very hard to get arched doors to fit when you build the jambs, but fitting them in an existing brick opening when you weren't really sure if you got the arch right or not- well- that was scary. I'm happy to report that they fit perfectly. I brought the track saw, but never had to use it. Top to bottom, side to side, they were a perfect fit. Good job, men!!!
Photo dump:
image_9.jpg Ugh, I downloaded to the computer to try to get these to be upright. Still sideways. This was the drawing I did with my students at concept stage.
image - Copy.jpg Look close, and you can see the full-size drawing we did on the layout table. The wrought iron is in place over the drawing.
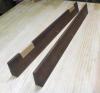
image_1 - Copy.jpg Everything is cut oversized. This is a must with mahogany. It was left to acclimate, then cut again to final dimensions.
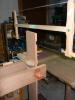
image_3.jpg Coming together now. The wrought iron was inserted (after this photo) into the rails and that was made like one unit, then we did the most harrowing glue-up ever, getting everything to come together properly. We had to elevate everything because the spirals in the wrought iron stick out past the doors.
image_4 - Copy.jpg This is the template we used for the arch. I had the CNC shop cut it full size and used it first to make the smaller rails, then once the doors were assembled, I used it to route the stiles down to the same arch. It also was used on site before we committed to that arch to be sure it actually was the right arch!!!
I think five photos is the limit. Will add comment with others...

 Reply With Quote