Results 1 to 12 of 12

Thread: Planing figured walnut

  1. #1
    Join Date
    Sep 2020
    Location
    Oakland, CA
    Posts
    257

    Planing figured walnut

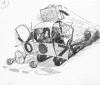
    The top of my credenza is really beautiful walnut, but very figured. I've planed the bits that I could plane and scraped the bits that I could scrape (or at least identified the bits I can plane and scrape), but there are still some areas that I don't know how to tackle. I'm sure you all know what I mean: surface that looks like tear out or end grain in the middle of a board before you even touch it.

    What are my options for those kinds of areas? Is there anything to be done short of sandpaper? If sandpaper is the answer, I'd obviously prefer to keep the nice iridescent planed surface on as much of the top as possible. Do I then try to feather between the sanded patches and the rest of the board?

    Thanks for any tips and ideas!

    P.S. I know the glue up board selection is meh. I'm annoyed with myself. I used all the really nice straight wood for the legs of the credenza thinking the figured stuff would make a nice top, but i never considered exactly how the figured boards would fit together. It's still going to look good, I'm sure, but the grain doesn't flow between the boards the way I would have wanted. Oh well, live and learn!

    20210107_172234.jpg

  2. #2
    Join Date
    Apr 2015
    Location
    New England area
    Posts
    588
    Sharpen up, lighten the cut, move the cap iron closer, close down the mouth, or a combination of these. An opportunity to experiment a little, but do it on scrap. This is a moment not to implement somebody's rigid prescription, but to figure it out for yourself. You'll learn a lot about the tool and the species you're planing in the process. You're going to be inundated with sub-millimeter settings and all manner of this and that. Just go out to the shop and work it out. You'll thank me in the fullness of time.

    Me, I'd just scrape.
    Last edited by Charles Guest; 01-07-2021 at 9:16 PM.

  3. #3
    Join Date
    Aug 2019
    Location
    Pittsburgh, PA
    Posts
    850
    Aaron, I made a walnut coffee table with similar figured grain. I tried a scraper like yours and it wasn't that effective. After some time I followed the advise of setting up the cap iron and iron for very fine shavings to achieve the final finish tear out free.
    This video and other two on this subject offer good instruction on what to do.

    https://youtu.be/fVfJxDFNinc

  4. #4
    Join Date
    Jan 2007
    Location
    On the edge of Pisgah National Forest
    Posts
    236
    I'd lose the Cabinet Scraper. For really difficult grain like you encountered, only the control you get from the feel of a well-tuned card scraper will do.
    Nostalgia isn't what it used to be

  5. #5
    Join Date
    May 2015
    Location
    Ingleside, IL
    Posts
    1,417
    Quote Originally Posted by bill epstein View Post
    I'd lose the Cabinet Scraper. For really difficult grain like you encountered, only the control you get from the feel of a well-tuned card scraper will do.
    2nd the well tuned card scraper
    Stand for something, or you'll fall for anything.

  6. #6
    Join Date
    Mar 2015
    Location
    SE Michigan
    Posts
    3,225
    Card scraper recommended here as well. You might also try dampening (not soaking) the area with mineral spirits or DNA. It’s a method I use to get a little better result out of planing end grain.

  7. #7
    Join Date
    Apr 2019
    Location
    Madison, Wisconsin
    Posts
    283
    A trick that I’ve read about but with which I have no direct experience is to apply a coat of dewaxed shellac to the surface to help in planing difficult areas. As the story goes, it helps adhere the troublesome fibers together to prevent tearout and improve the smoothness of the achievable finish. If I remember correctly, a half pound cut was recommended. I would imagine that it would help whether scraping or planing. As I have not tried this technique myself, I would suggest trying it out on a piece of scrap first.

  8. #8
    Join Date
    Jan 2007
    Location
    On the edge of Pisgah National Forest
    Posts
    236
    Quote Originally Posted by Bill Carey View Post
    2nd the well tuned card scraper
    Sometimes, when the most careful scraping still leaves small pits, you have to dig into the bag of tricks and burn in some colored shellac sticks.
    Nostalgia isn't what it used to be

  9. #9
    Join Date
    Mar 2015
    Location
    SE Michigan
    Posts
    3,225
    Good suggestion, Bill. I’ve used clear shellac burn in sticks for tear out/depressions and it works very well. I like the clear because it, well, is clear and the natural wood color shows through. Dries quickly and sands/planes/scrapes easily. I do put on an initial finish prior to the shellac stick. That way the wood color/tone stays true to the rest of the piece.

    In other words, don’t fret the tear out. Do an initial finish coat on the piece. Then use the burn in sticks to fill any voids. Plane the shellac fill smooth and carry on with the finish.
    Last edited by Phil Mueller; 01-08-2021 at 9:24 AM.

  10. #10
    Join Date
    Jul 2007
    Location
    Inkerman, Ontario, Canada
    Posts
    1,403
    You can handplane that without too much trouble, the grain is fairly plain and usual for Walnut.
    You need to *tune up your handplane and play with the chipbreaker setting. Walnut is not difficult to plane. Set your chipbreaker close to the cutting edge, snug the screw to tighten it, then smack it with a hammer a few times to get the chipbreaker closer to the cutting edge, until only the faintest line of light from the blade is visible. Try it, observe, adjust, rinse and repeat as necessary. Using a hammer to adjust the chipbreaker is the most accurate way to do fine adjustments. Tap the top of the chipbreaker to close the gap, tap the top of the blade to increase the gap, tap the sides to align. Use light to view the protruding cutting edge. You don't need to measure anything. You need only experiment. You will in time be able to set things up easily without any problem, by eye.

    * Tune up your handplane; That requires that you understand how to tune it up. You don't need an expensive handplane; a cheap hanplane can be setup to work as good as any plane, if you know how to set it up. I have an old record #4 that has probably taken millions of shavings over the past 50 years that i have owned it.

    All of the boards below were cut on a supersurfacer. A supersurfacer is mechanically identical to a handplane, the only difference is that you provide the power with a handplane and a supersurfacer has a power feeder! The supersurfacer has a blade and a chipbreaker just like a handplane.


    Birdseye6.JPGBirdseye3.JPGSAM_1805.jpgSAM_1812.jpgSAM_1813.jpgSAM_1814.jpgSAM_1815.jpgSAM_1294.JPG
    Last edited by Mark Hennebury; 01-08-2021 at 10:46 AM.

  11. #11
    Join Date
    Jan 2007
    Location
    Michiana
    Posts
    3,071
    I have a bunch of Walnut Crotch Wood that presents a similar challenge. I've had the best luck with a Low Angle Bevel Up plane sharpened to 50* for a 62* cut angle. It makes for a firm push but it's manageable with light cuts. Zero tear out.
    Sharp solves all manner of problems.

  12. #12
    Join Date
    Sep 2020
    Location
    Oakland, CA
    Posts
    257
    My smoothing plane is an old #4. I was definitely running the mouth too loose and tightening it up helped a bunch. I'll resort to a card scraper if I cannot get it all with planing.

    Thanks as always!

Posting Permissions

  • You may not post new threads
  • You may not post replies
  • You may not post attachments
  • You may not edit your posts
  •