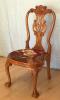

Ive posted a few pieces of this over the last year, just thought Id consolidate for those interested. This is the leg build for a demilune table Ive been working on for some time. Many thanks to famed Steve Latta for his articles in FWW and our own Mike Allen. If you havent seen his build, search for Federal Style Table Build back in Sept/Oct 2016. His work is stellar.
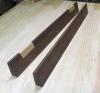
The legs started with 8/4 Brazilian Cherry. Leg blanks were sawn out and squared to 1 3/4 . First step was to make the mortises.
The back two legs receive regular mortises, the front two are essentially a bridle joint.
4AB7B2DB-8192-40D1-93FE-255953ACA6C3.jpg 34B5F6AE-D268-4A35-9094-0DEFC801DE8E.jpg
Second step was to make the shaded ovals. Here is a link to the post on making a fan...the process for the ovals was the same.
https://sawmillcreek.org/showthread....eral-Style-fan
443CDE87-4043-423F-8C51-A18C623E71F6.jpg E3037E3E-D761-49B2-B720-B73CEF09D336.jpg
I made a few extras knowing something would go wrong and hopefully Id get at least four that were usable.
Next step was to inlay the ovals.
Heres a link to that post: https://sawmillcreek.org/showthread....36-Oval-inlays
Once that was complete, I rough cut the taper and hand planed the tapers to final dimension. They go from 1 3/4 to 3/4. (no pics here, just basic leg tapering).
Next step was to create the grooves for the stringing. The top oval was done first. Heres a link to that post:
https://sawmillcreek.org/showthread....nlay-stringing
Then the straight inlay down the legs. Ive done this with the LV inlay tool and router plane...but considering 10 leg sides/two inlays per side, the router came out. Set for depth and using an edge guide, it was relatively quick work. The inlay is 3/16 in from the side and 1/16 wide.
CC1157E9-90A3-4FD1-B75C-AC37EB53435D.jpg
Gluing in the inlay is pretty straight forward.
2A13A49D-3F84-47A1-902E-9065A06C13C6.jpg D113BE5D-ECB6-4CBB-84D9-6497A573EEFB.jpg

 Reply With Quote