Thanks Jim
Regards from Perth
Derek


 [OP]
Contributor
[OP]
Contributor
Thanks Jim
Regards from Perth
Derek
Derek I'm really enjoying this build the thread. I'm completely impressed with the precision of your execution. Don't think I've ever build a chest which was square in all dimensions. Yours looks beautiful!
Many lessons I'm taking away from your build:
* The value of a template to precisely aligned drawer blades on both sides of the carcass.
* Dry assembling the carcass to flush smooth the front and back edges, before disassembling to plow rabbits for the back. I never thought of that – must be why my rabbits rarely line up!
* Mitered dovetails really add that touch of pizzazz that to a fellow woodworkers says "this piece was built by a master who went the extra mile". From a practical perspective. I didn't realize it would allow hiding a through rabbit – super helpful.
I can't wait to see the rest of the build. I'm guessing the fit and finish on these drawers is really going to be something to see!
Thanks for sharing.
Cheers, Mike
 Contributor
Derek, the drawer blades are dados - none are dovetailed, not even the center blade. Would you please describe your reasoning? Thank you.
[OP]
Contributor
Thank you Mike.Originally Posted by Mike Allen1010

I think that I may finally be getting this woodwork-thing. Plan ahead. Mark clearly. Cut to the line.
All good, in theory at least!
Regards from Perth
Derek
[OP]
Contributor
Curt, the drawer blades run in dados. I recall that I was not clear about this part, earlier on. What I intended to write was that the template/story stick allows for precise positioning of the lower edge of the dado. Once cut - hopefully accurately (a reason I like to do this with hand tools) - only ever adjust the upper edge (using a side rebate plane). This was the dado will remain as tight as can be, and the positioning of the drawer blade will be so as well.
Sliding dovetails are unnecessary for the horizontal, if this fit is tight and does not deform the case. More important is the vertical drawer dividers. These are made with sliding dovetails - the next chapter in the build. The sliding dovetails here will ensure that the drawer blades do not move when weight is placed on them by the drawer.
Regards from Perth
Derek
Last edited by Derek Cohen; 12-31-2020 at 8:42 AM.
 Friend of the Creek
Looking great, Derek. Among all the rest of the quality build, the coloring is really nice. Look forward to the rest of the build.
[OP]
Contributor
Thanks Phil. The colour of the case will likely need a little adjusting at the end to blend with the drawer fronts. We have to wait until then.
Regards from Perth
Derek
Contributor
Thank you Derek,
Despite my unclear language you answered the question anyway. The reading I've been doing lately has seemed to pound the drums for sliding dovetails fpr horizontal pieces such as shelves or drawer blades. I wondered about the weight of tools that will be in your drawers. I also wondered about modern bookshelf construction which does very well with all adjustable shelves that are laden with books. It made me wonder. I hope you do not mind these questions and I also hope that you and yours have a Happy and Safe New Year!
[OP]
Contributor
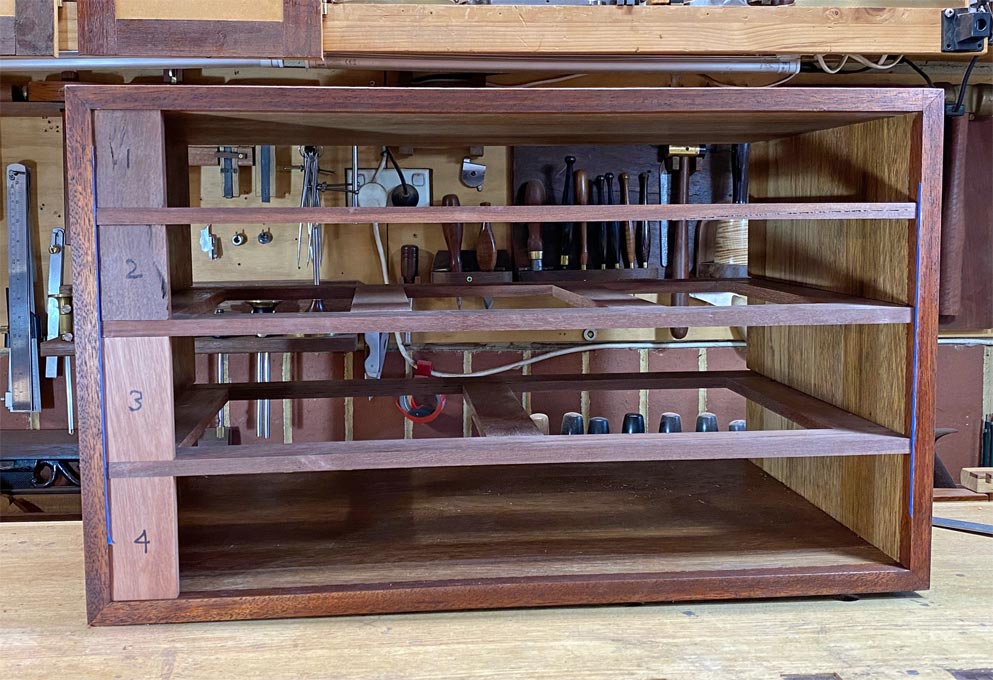
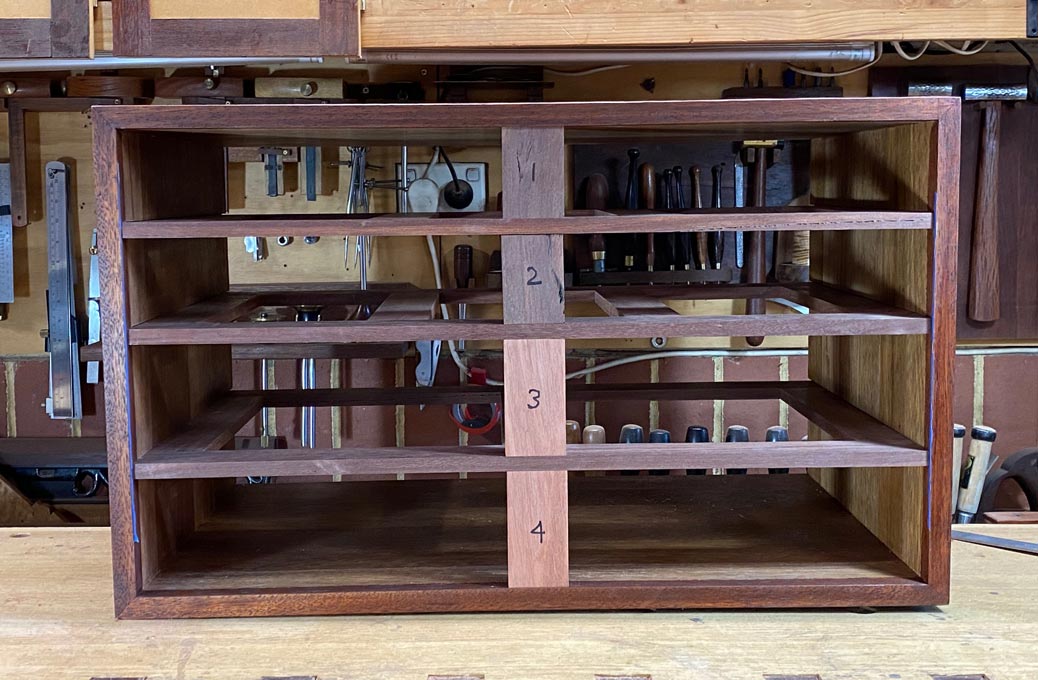
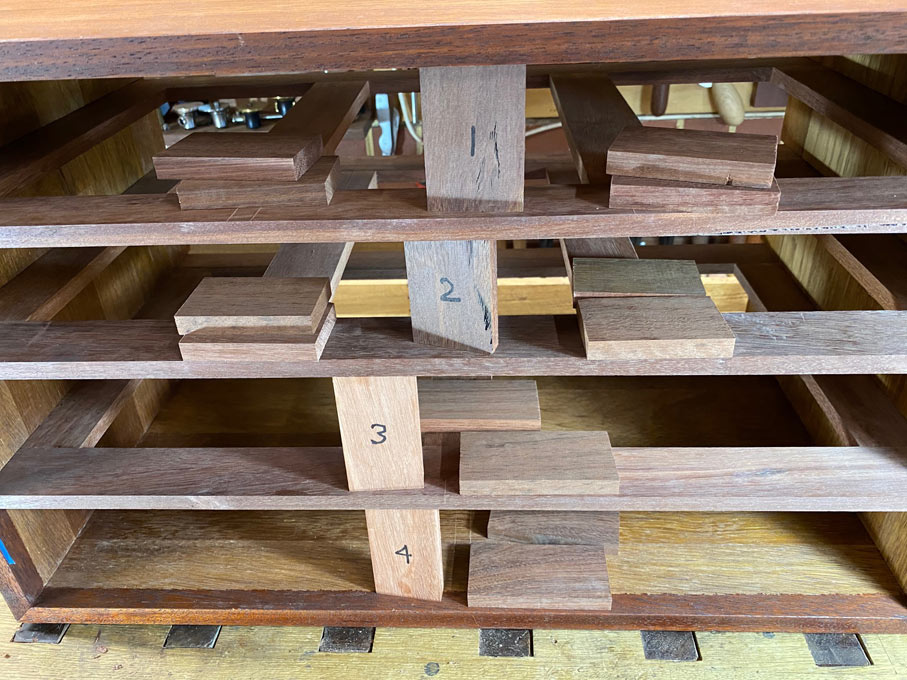
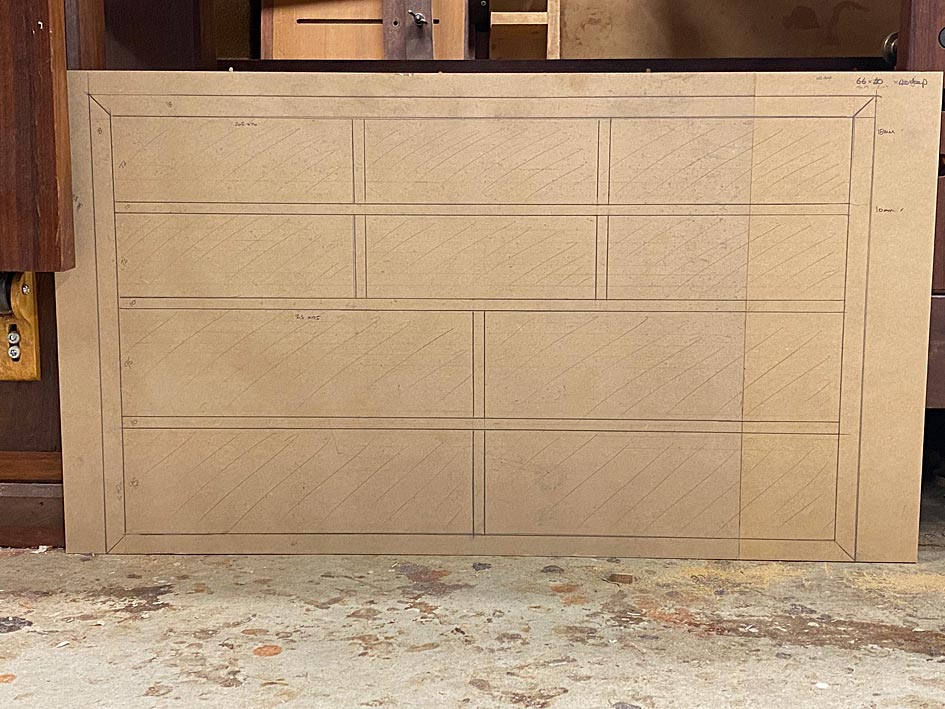
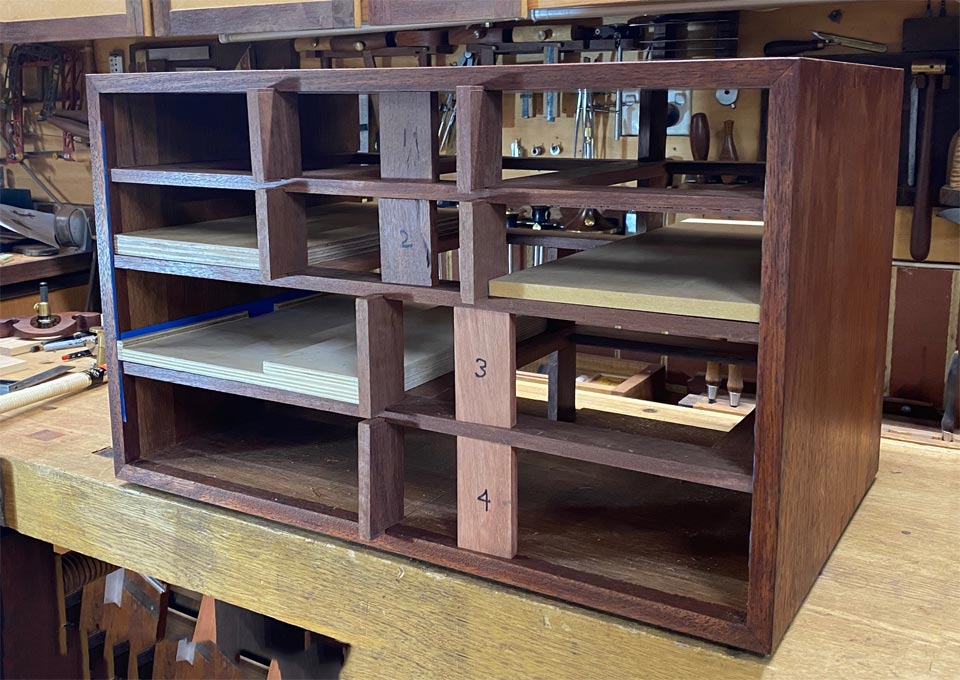
After making dados, and drawer blades, and then fitting them, comes the vertical drawer dividers. I consider that these are the make-and-break of a chest of drawers. It is tough to get a case square. It is tough to get the the dados positioned correctly. The drawer blades are simple. But then comes the dividers ...
Drawer dividers are needed when there are more than a single drawer in each row. In this cabinet, there are two rows of three drawers and two rows of two drawers. Care in aligning the dividers at the front and rear is necessary to ensure the drawer case is parallel and square if the drawers are to run smoothly.
It is easy enough to attach the dividers with dados. However, this is a less-strong design than attaching them with sliding dovetails. Building sliding dovetails is more complex, but the advantage here is that they tie the drawer blades to the case, making the case more rigid. That is a good thing, especially for a tool cabinet.
This article is about the preparations for the dividers, and the next article will be making them - there are too many photos for a single article.
Issue: drawer blades flex and bow. Accurate marking out needs a stable foundation.
The first step is to make spacers to keep the height even. Start with the ends ...
.. and then move them into the centre ...
The second task is to make templates for spacing out the drawer dividers, similar to the heights for the dados ...
Later, I made these thicker so that they could also aid in ensuring that the dividers were plumb when marking out.
Lastly, for now, the drawer dividers were cut ...
The dovetails will be 3mm deep at each end ...
Onward to the dovetailing ....
Regards from Perth
Derek
 Contributor
Happy New Year and thanks for the detailed descriptions Derek. Your design is an improvement on the NBSS box Pop WW published a couple years ago that I'm currently building if I'm correct in assuming you'll dovetail a divider at the front and another at the back? The PWW design only has a (short) dovetailed divider at the front, though the drawers are shallow and thus probably not as prone to sagging in the back.
The color match looks impressive.
Best,
Chris
"You can observe a lot just by watching."
--Yogi Berra
[OP]
Contributor
Thanks Chris!
Regards from Perth
Derek
[OP]
Contributor
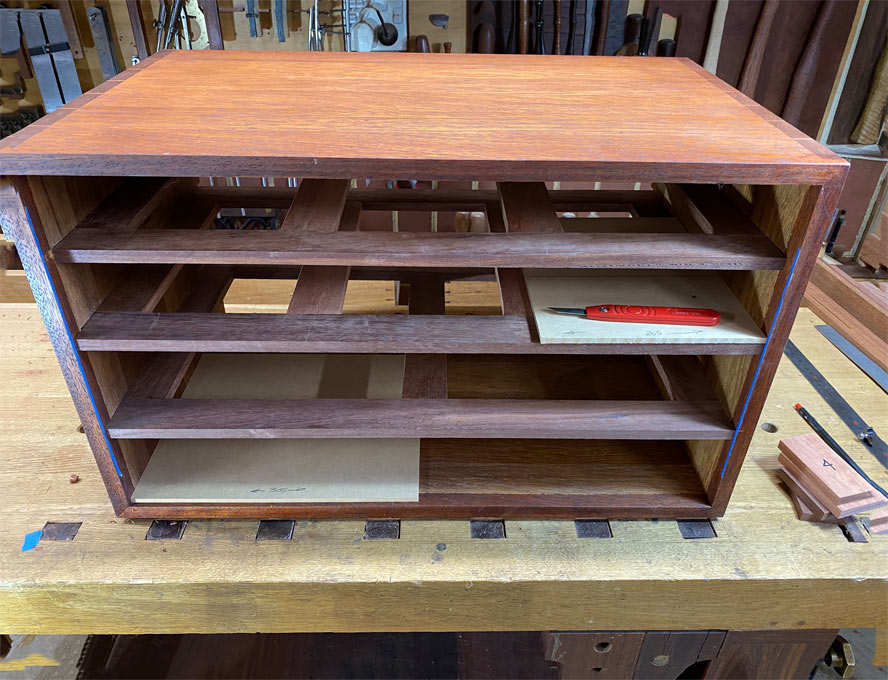
This is the front elevation of the cabinet ...
I decided to work on the rear of the chest first .. so I could get in some practice and make my mistakes where they will not be seen!
Much preparation has gone into accurately positioning and marking the sliding dovetail parts for each divider. This was described in the previous post ...
Sliding Dovetail Tails
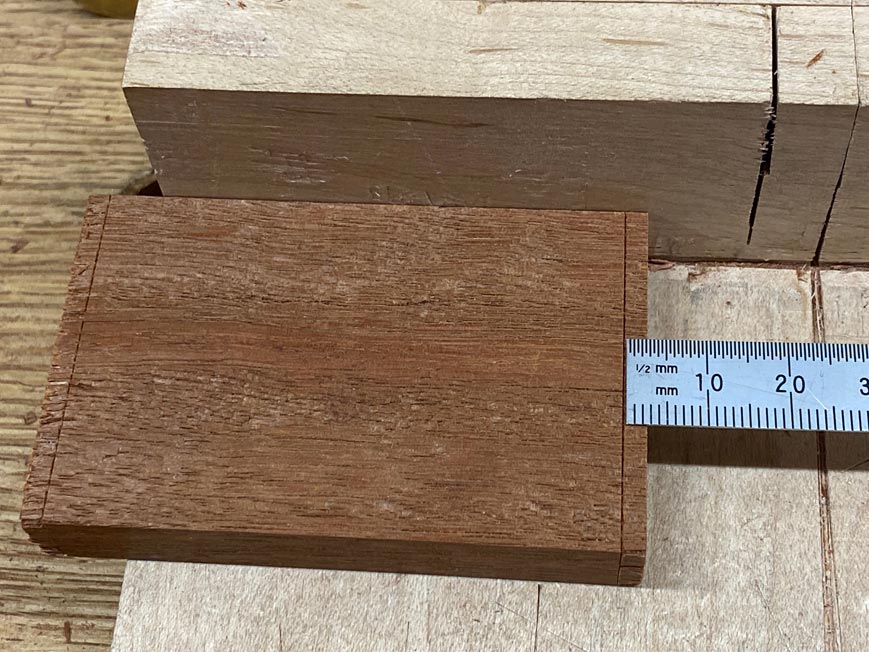
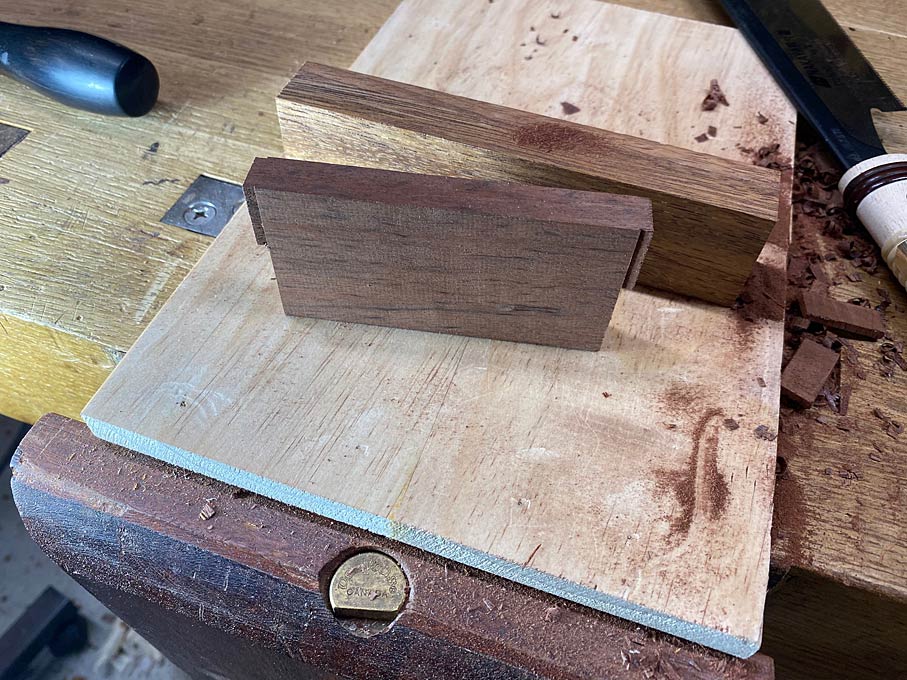
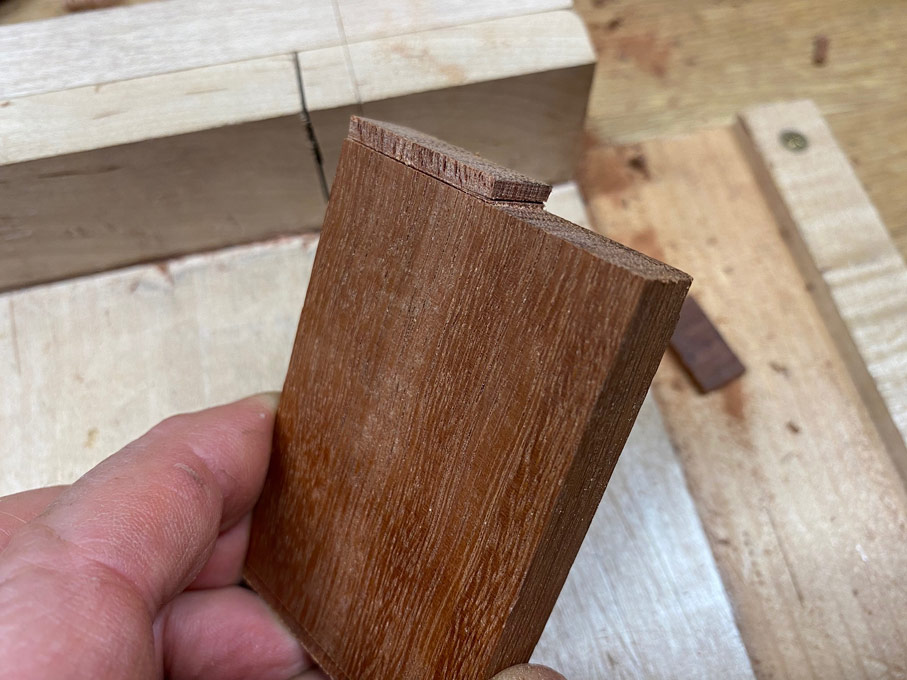
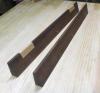
It is a good place to start. All the dividers are cut to size. These are each 12mm wide x 45mm deep. The heights vary per row, but there are essentially two drawer heights.
The tails will be 3mm deep as the drawer blades are 12mm thick, and two sockets take up 6mm of this.
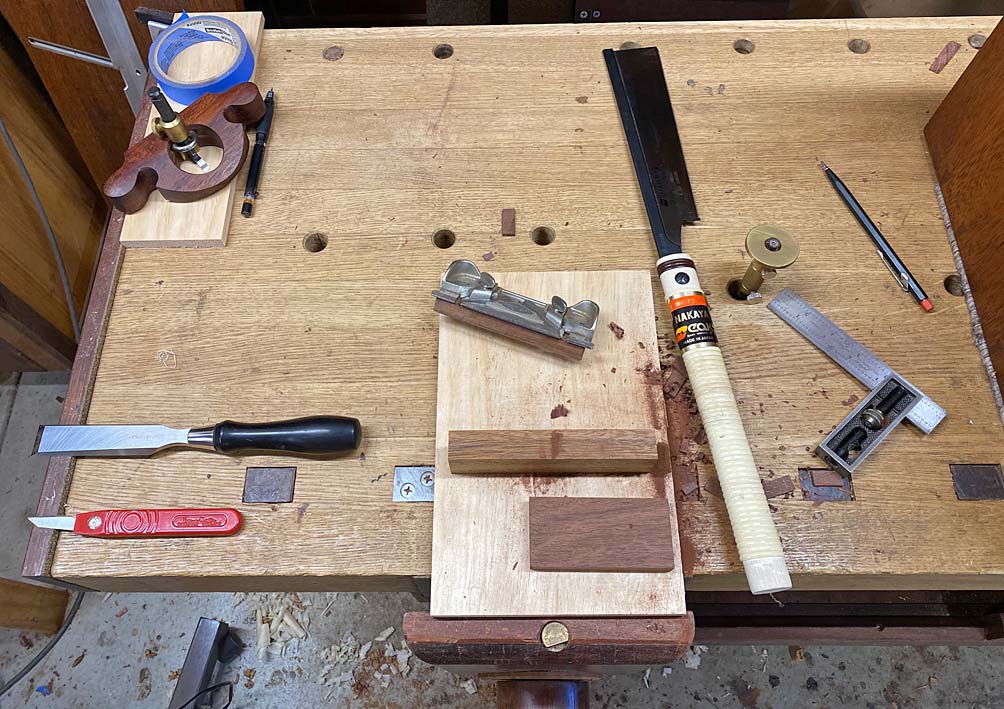
This is the work area and tools ...
There is a bench hook for a dozuki, a Stanley #79 side rebate plane converted into a plane for dovetailing, a cutting gauge, a knife and a wide chisel.
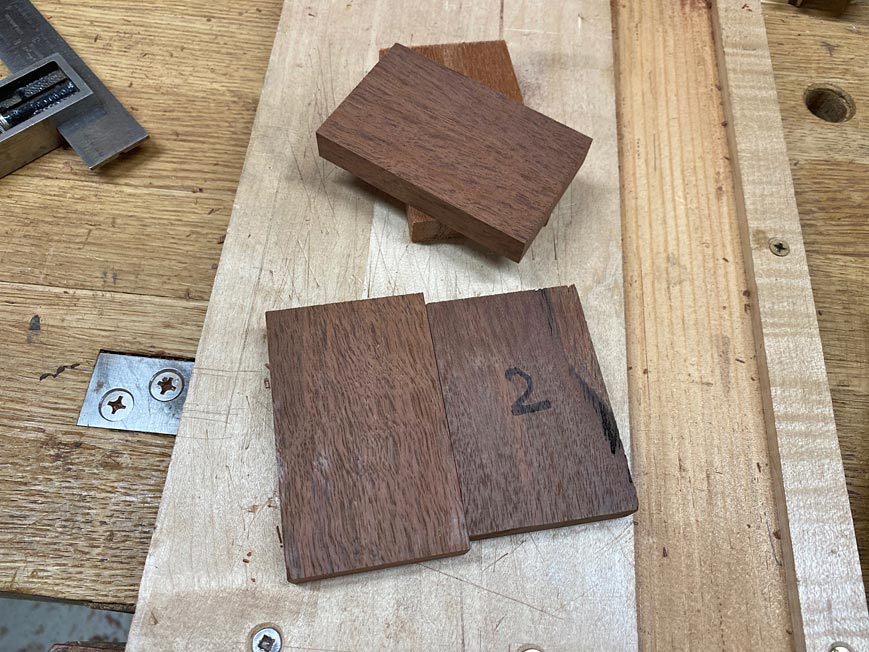
The aim is to make dividers like these ...
Begin by marking the shoulders of the dovetails ...
Ensure these lines are deep. Score them with a knife.
Pencil in the cheeks ...
The pencil is going to act as a "depth gauge" when dovetailing.
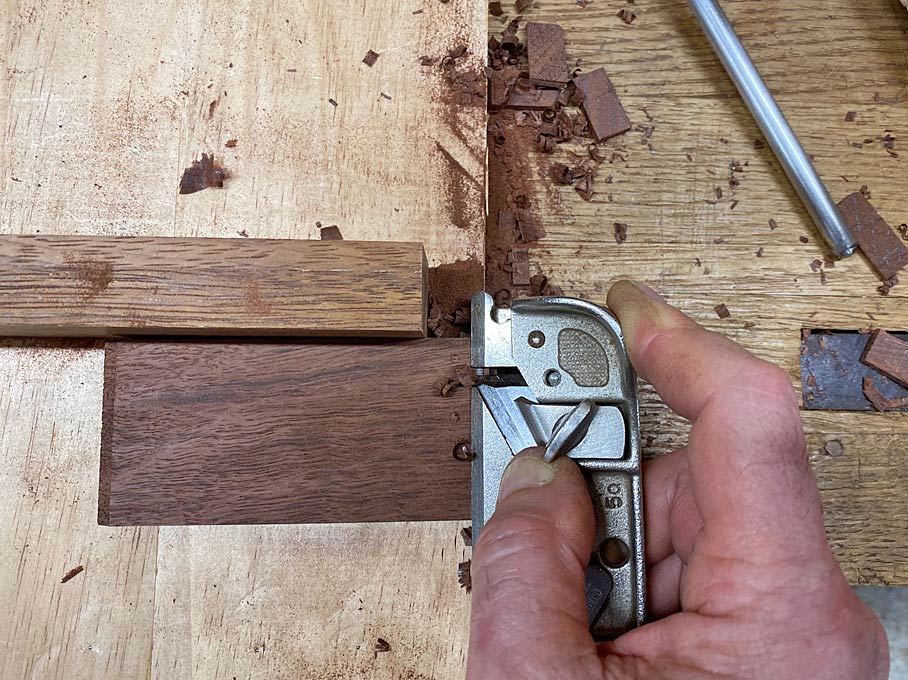
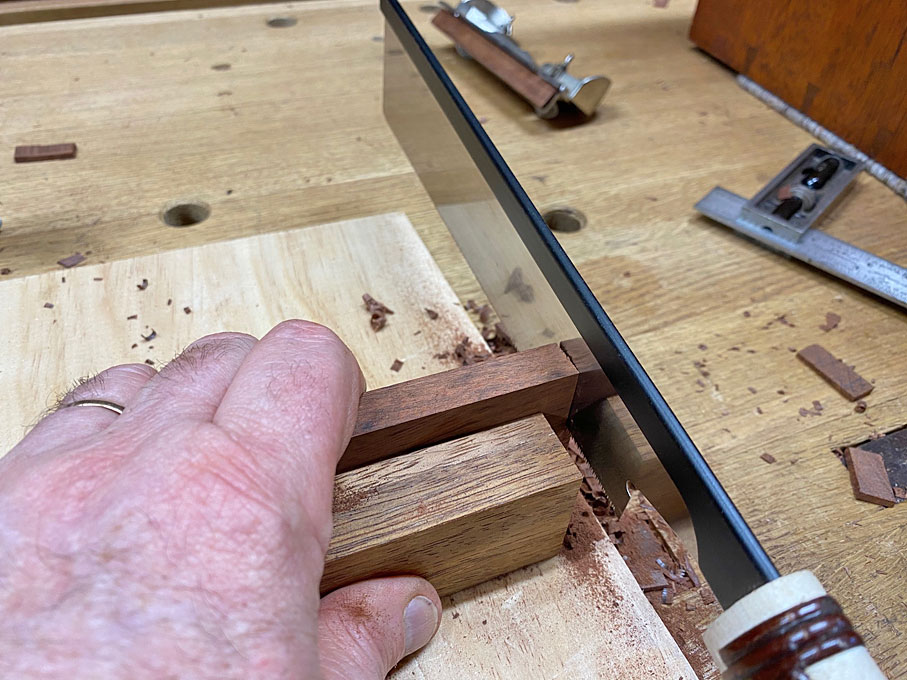
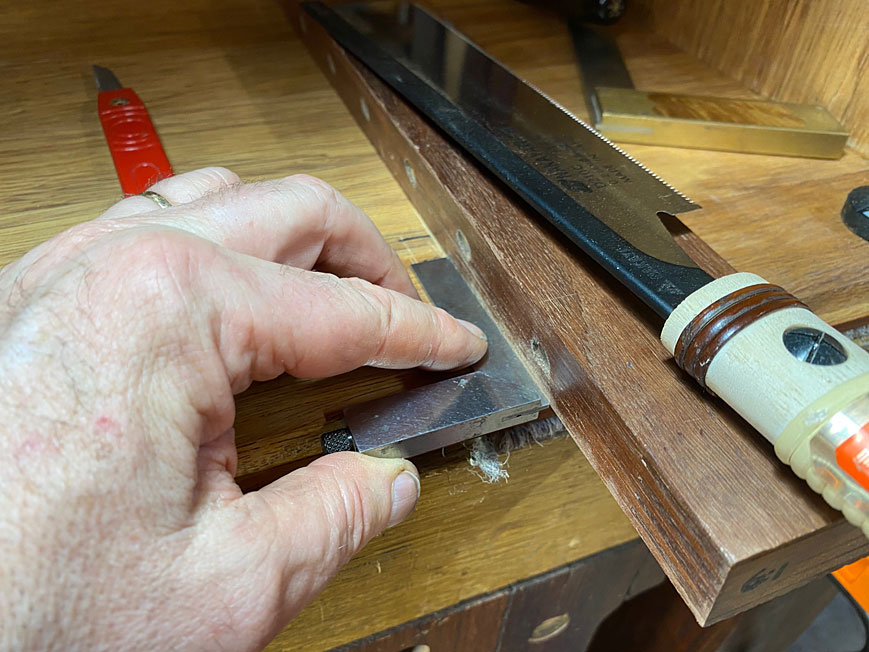
The Stanley #79 was originally designed to take a slither off the inside of a groove or a dado. I have modified this one by adding an angle (6:1 ratio) to the depth stop ...
By running the #79 along the edge, the angled blade will now slice away the cheek at a 6:1 ratio ...
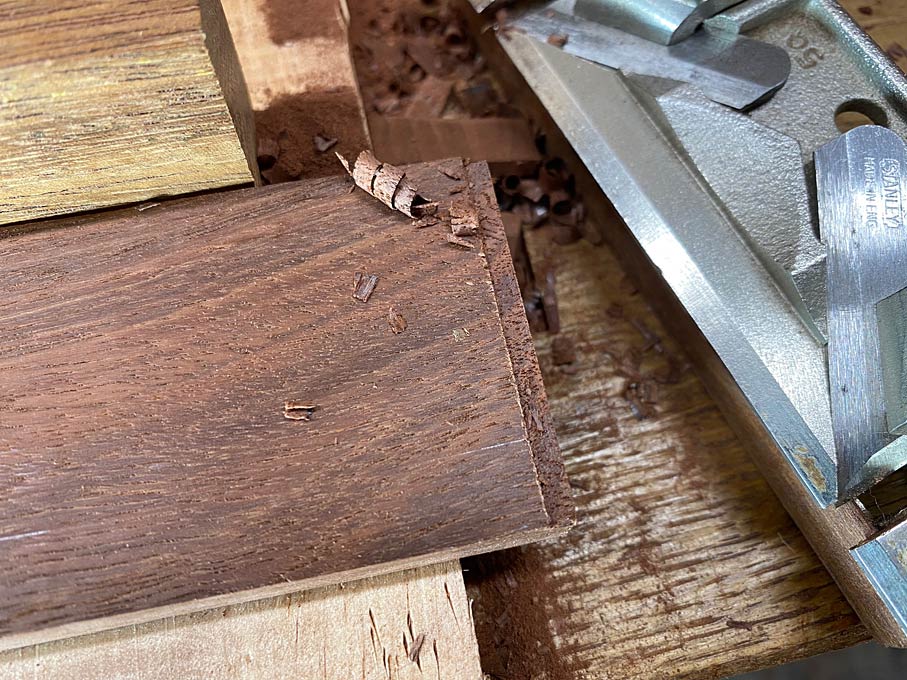
Look carefully at the beginning of the cheek for a sliver of pencil. This shows what has not been cut to the edge ...
Just work that area. One slice is enough. Done ....
The drawer blade is 45mm wide, of which 20mm contains a tenon from the mortice-and-tenon joint (created with a Domino). The dovetail socket must remain clear of this, and therefore the maximum length of the Tail is 25mm.
The 20mm waste is removed with the dozuki ...
Result ..
Sockets
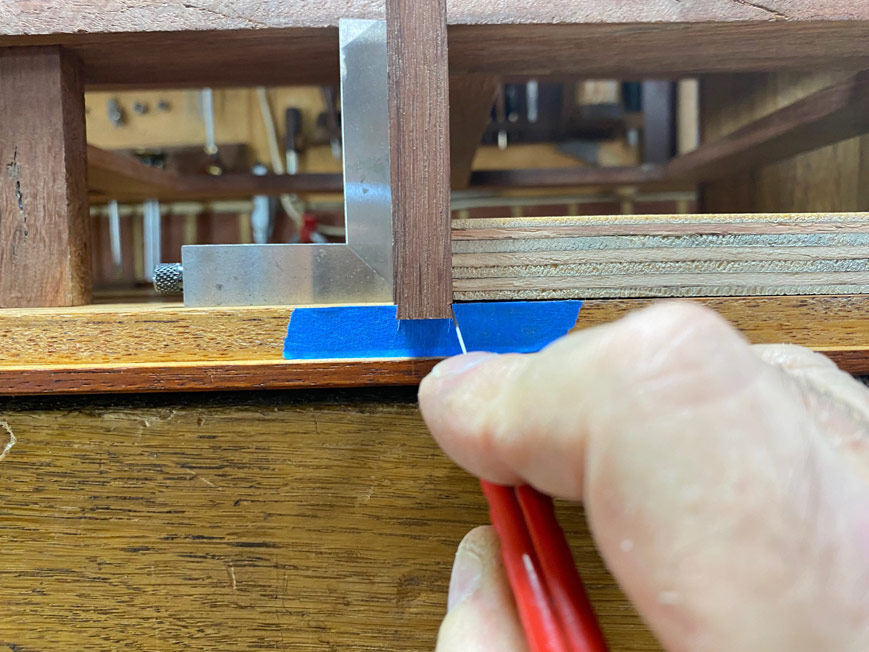
Positioning and marking out the sockets is a aided by a template and blue tape (it would otherwise be impossible to see anything this small in dark wood).

Last edited by Derek Cohen; 01-02-2021 at 11:59 AM.
[OP]
Contributor
Time for just one example. I have chosen the more difficult dovetailing into the case. From the rear it is possible to excavate into the case, itself. (This is not possible at the front, and blind sockets will be made there).
The divider is positioned with all drawer blades inserted - the drawer blades will be removed once the marking out is complete to permit room to work ... there is a lot of removing and replacing throughout!
The tails are marked ...
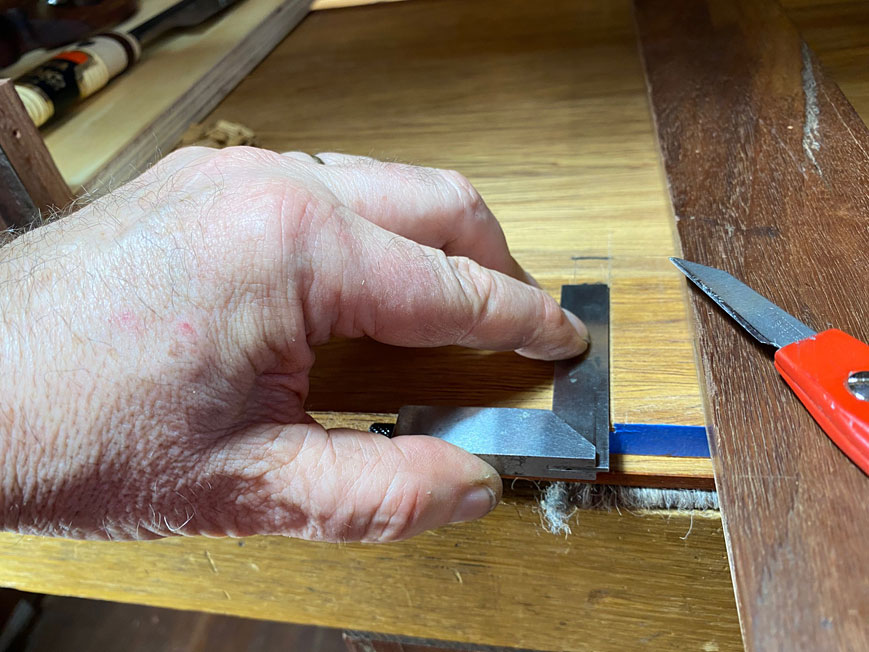
The boundary lines are scored ...
It is important that the lines are scored from the inside of the square, otherwise they will be in danger of moving to the wrong side.
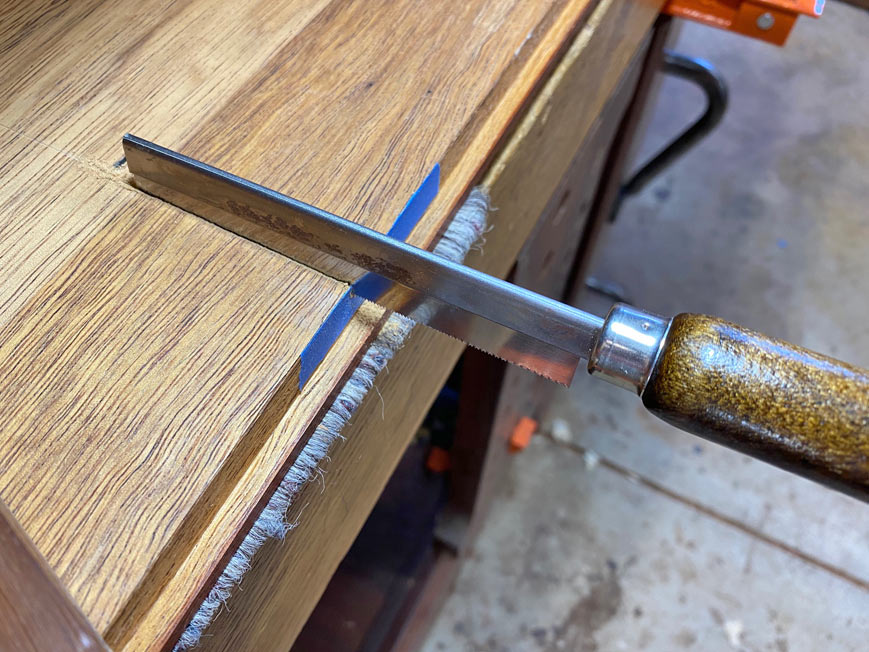
Similarly, when positioning a sawing guide (also 6:1 angle), ensure that the saw is inside the cut line ...
One added advantage of using the saw guide is that accuracy of marking the tails is not critical. The tails are cut at 6:1, and the saw guide just needs the apex of the tails to be marked accurately.
Sawing with the dozuki leaves a triangle of waste at the far end. The kerf can be extended using a razor saw ...
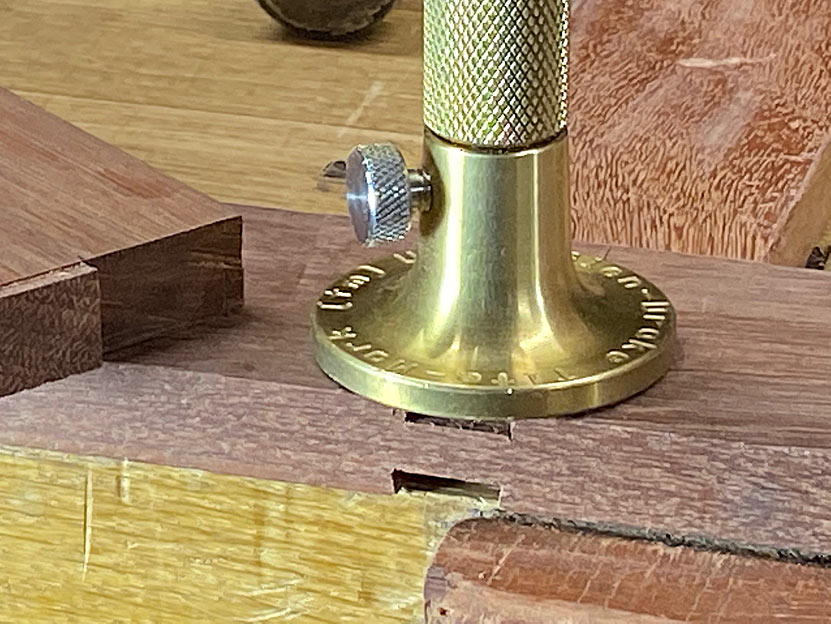
With the sidewall cut, zip out most of the waste with a paring chisel ...
Finish to the desired depth with either a router plane ...
... or the wheel gauge ....
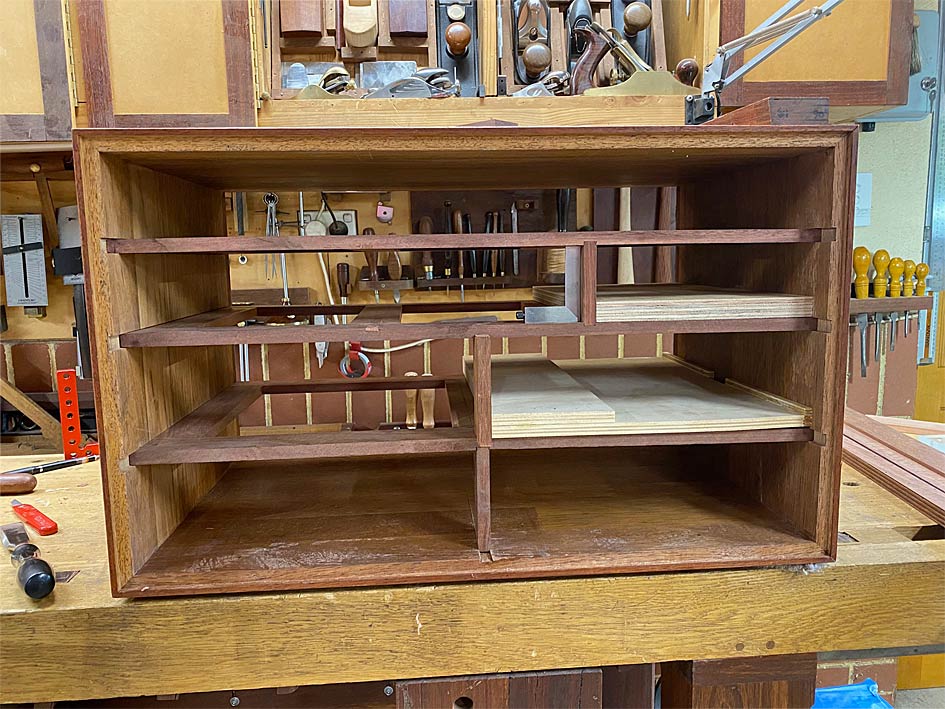
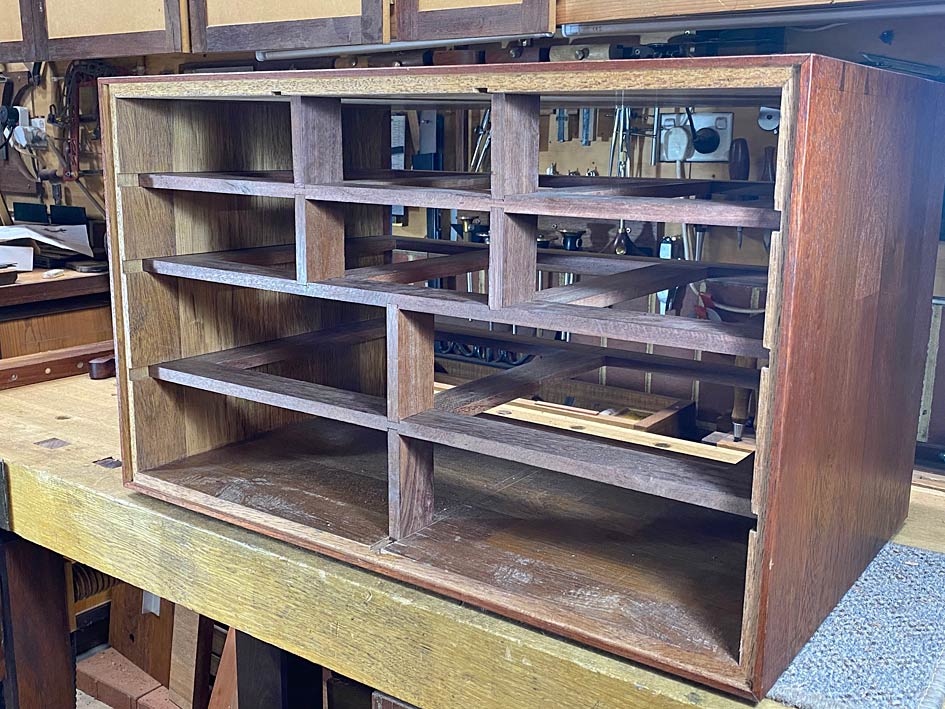
Here is the rear of the case with all the dividers completed ...
The result is a very solid lattice of drawer blades and dividers. Rock solid!
Work has now begun on the front drawer dividers ...
Regards from Perth
Derek
Last edited by Derek Cohen; 01-02-2021 at 12:01 PM.
Contributor
Newb type question: Why not solid dividers? I surmise that you want the accuracy and durability of a dovetailed joint at both front and rear and that a joint of that length would require a tapered sliding dovetail?
[OP]
Contributor
Curt, you answered your question
Solid dividers into dados is sooooo much simpler!
Regards from Perth
Derek
 Posting Permissions

 Reply With Quote