Interesting idea Joe. I'm pretty sure she wants the live edge front, but the sides could have a slight concave to kinda let those tall cathedrals end somewhere.Originally Posted by Joe A Faulkner


 [OP]
Contributor
[OP]
Contributor
Interesting idea Joe. I'm pretty sure she wants the live edge front, but the sides could have a slight concave to kinda let those tall cathedrals end somewhere.
Stand for something, or you'll fall for anything.
 Contributor
Oh my!.... We would appreciate a transcript of your explanation for the finished front to the boss. If necessary, feel free to heal completely before you type the transcript and share it with us.
Ken
So much to learn, so little time.....
[OP]
Contributor
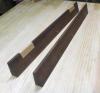
Finally got back to the dresser after taking a moment to make some adjustable height saw horses and start on a walnut slab coffee table for my daughter and her new house. So I figured is she wants to see cathedrals, she's gonna see cathedrals. Got the poplar drawers built and installed and found enough cherry with decent figure to make the drawer fronts - they are gonna look weird (to me and maybe to you) with the boards running vertically instead of horizontally, but weird can quickly become a "feature" in my shop. Got some of the cherry glued up today and the final glue up will be tomorrow then I can try to figure out how to cut the drawer front.
IMG_0671.jpg IMG_0673.jpg IMG_0694.jpg
I decided to try making the pulls so I pulled out a router bit I got free at a garage sale I went to in what seems like a life time ago. (I really miss those weekend excursions looking for cool stuff.) Routed out the finger pull in walnut and glued a thin piece of cherry with nice cathedrals onto it and sanded to the edges of the pattern in the cherry, exposing some of the walnut. I did a test piece and I think it came out pretty cool looking.
IMG_0678.jpg IMG_0677.jpg IMG_0674.jpg
I'll do more shaping on the final pulls to soften them up a bit.
And Ken, if I tried to post the transcript it would be so redacted it would look like a piece of paper painted black.
Stand for something, or you'll fall for anything.
 Friend of the Creek
Love the pull concept, Bill. Great idea putting two woods together and sanding out a reveal. Going to have to figure out how to use that in a future project. I wouldn’t sweat the cathedrals. I think they can look really nice, especially with cherry. They will warm up with time and look great.
You might even be able to put the cathedral running right on the right side and left on the left side...?
 Contributor
Unique pulls Bill - looking forward to seeing them on the drawers.
[OP]
Contributor
Been cold in the shop, but managed to get the 6 pulls finished. Hopefully finish the drawer fronts this weekend. Then on to the live edge top.
IMG_0699.jpg
Stand for something, or you'll fall for anything.
[OP]
Contributor
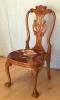
Finally finished the dresser, now I can start on the top.
IMG_0707.jpg IMG_0708.jpg IMG_0711.jpg
Here's the top after flattening ready for epoxy. Chalk marks are approx piece I'll use for the top.
IMG_0713.jpg
I got pretty good at planeing end grain - the low angle BU plane worked great for fiddling with the gaps between the drawers. Finish on both the walnut and the cherry is nothing but Minwax Antique Oil. First time I've used it and I like it.
Stand for something, or you'll fall for anything.
Friend of the Creek
Looking great, Bill. Yes, my low angle BU plane is a joy to use on end grain. Planing end grain always made me anxious but gaining confidence with this plane. Looking forward to seeing the progress on the top.
Contributor
Coming along nicely. The vertical drawer grain looks rather modern which might fit with a floating top. It may appear differently in actuality, though, and the natural edge for the top also is a rather modern trend, I think. No matter, it will be a great piece.
Rustic? Well, no. That was not my intention!
 Contributor
Until I see the finished pics of this project! Honestly that was my first thought when I saw your coffee table post. I thought I had missed the final pics of the dresser. Now I see you are just keeping a lot of plates spinning. I’m anxious to see how the dresser turns out. Liking it so far.
Last edited by Joe A Faulkner; 01-15-2021 at 5:50 PM.
Contributor
I think you did good on this one. That was not an ideal set of veneers to choose from, but putting the dark ones under one drawer pull and the light ones under the other drawer pull, good choice. I have spent a couple minutes looking at the seven panels.
Numbering from left to right you might have switched your 1-2-3-4 to 2-1-3-4 and then put a third set of drawer pulls down the centerline on #4, but it would be a pain in the neck to make three more pulls and those extra pulls might clutter up the front face, I think this one is job done well as is.
Personally for the top I would want to put more or less the same curve up the sides on a smoothly curved front edge of the top, but happy spouse, happy house.
Contributor
I like the look of that front a lot, pulls are very nice also.
have a dresser sitting downstairs pushed aside for over a 1 1/2 yrs that will end up in master bedroom. Lost interest in it all it needs is drawer fronts and finish
Thinking i may borrow your ideas and run mine the same way
It is all cherry, full dovetails for carcass and drawers with a cherry top
Now you have me thinking about slipping some walnut trim in there somewhere
Everything else is popular stained with dark walnut in there now
Ron
[OP]
Contributor
Went to measure the top one last time and opened one of the drawers and all the ball bearings from the slide spilled out on the floor. No idea why. Must be my turn in the box.
Dave - the idea of a floating top is intriguing - but I would need to put a false top on to keep dust etc. out of the top drawer, and not sure the lovely Mrs Client would like it. So in the interest of simplifying my life I'm not even gonna ask her.
Scott - like the idea of curved ends on the top to mimic the curved legs. Thx - gonna use that. And I matched up the panels for the front based on the cathedrals not the color. Now I wish I had payed more attention to the color. SO it goes
Stand for something, or you'll fall for anything.
Very nice Bill- I love the curve of the legs, complementary woods, and excellent grain matching! Seems to me sort of subtly elegant. Maybe consider a little curve for front of top? Beautifully done.
Cheers, Mike
[OP]
Contributor
Finally finished
Well it's done - soon to be packed with linens. I think the top came out pretty good. I know she loves it. This originally started when she asked if I could build a box for her to put linens in, and I got a bit carried away. The only problem was that the drawer fronts warped in and the rails had to be adjusted so the drawers would have the soft close complete it's action. A simple fix but a PITA nonetheless.
20210201_171810.jpg 20210202_134745.jpg 20210202_134711.jpg 20210202_134734.jpg 20210202_135002.jpg
Stand for something, or you'll fall for anything.
 Posting Permissions

 Reply With Quote
")