if you want to do ww’ing without clamps, you’re in for a challenge.Originally Posted by Laurent Marshall


 Member
if you want to do ww’ing without clamps, you’re in for a challenge.
Member
Get better clamps. With decent _parallel_ clamps (Bessey K-body, Jet, Yost etc) you just set up the clamps, drop the glued board assembly into them, and tighten. Cauls help with alignment. Easy peasy woody squeezy.
 Contributor
Originally Posted by Laurent Marshall
Mostly what I don't like about clamping is the set up and then fiddling with and setting all the clamps well. It's just a lot of pieces to handle, and even with cauls you still often need a ton of clamps as the cauls will only spread the clamping pressure an extra few inches sometimes. Not dealing with clamps for a glue up would just be kind of nice. If a part of the process is not enjoyable, and there's another way to get a good result, why bother with the less enjoyable method? I certainly want my projects to last, but on the other hand I'm not doing this for paying customers.
Well, now .... mortice-and-tenon joints go together with drawboring ...
Drawers go together with dovetails ...
... and panels can be pulled tight with a rubbed joint and/or stretched blue tape ...
Regards from Perth
Derek
Contributor
Derek, tomorrow there will be a lot of guys trying to buy " dovetail decals ,like I saw online "
 Member
LMAO, thanks Derek.
ken
Contributor
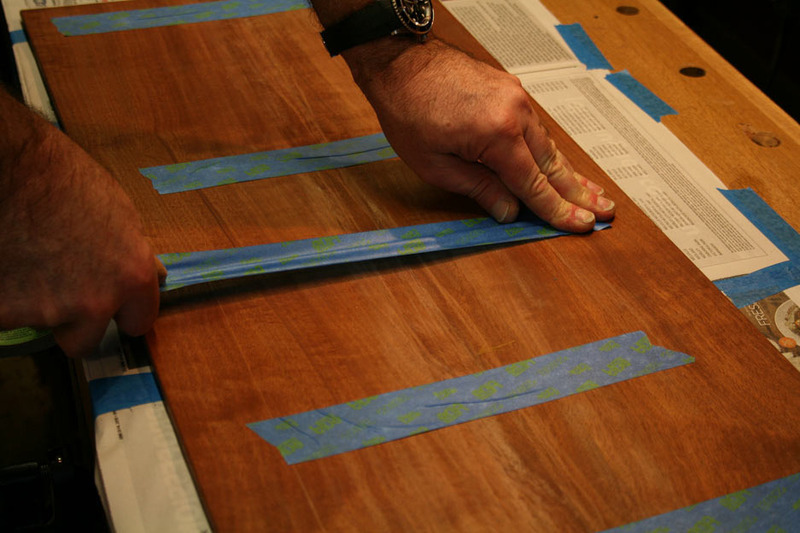
Another clampless method for panels is to just use the dogs on your bench. I find that draw bottoms, being thin, are particularly annoying to clamp up so I just use my bench top. Heres an example of a small drawer bottom.
panel glue up.jpg
Ive certainly done ones wider, and ones made up of three or four boards. It just depends on your spacing and the width of your bench because when it goes too far off the end of your bench it can be tricky to keep the edges aligned and also might require a spring joint. But it does work and its guaranteed flat. I usually save these kinds of glue-ups for the end of the day. I lay down some painters tape where the glue lines will be to protect the bench, and then I drop a dumbbell (or however many are necessary) on top to keep it from bowing up. Then I walk away and come back in the morning. Its much much easier than using clamps, but it does tie up your bench for a while, which is why I do them at the end of the day. I successfully did a 36 wide x 22 deep drawer bottom for my sons desk using this method on a 24 wide bench. Ive also seen people use this method without a dogged vise by using pairs of wedges to apply pressure.
One of the nicest things about this method is that the thickness of your boards doesn't matter. For a caul to work, your boards need to be pretty darn close to the same thickness, which can be a bit of a pain when thicknessing by hand. If they aren't pretty consistent in thickness, the caul won't be very effective at keeping the faces even. I've been burned by that a few times! Then you have to plane both sides after gluing up. With this method, you can have pretty wild thickness fluctuations and it doesn't matter. Then the face side just needs a little smoothing (or card scraping if it's already pretty much finished) and the backside is the only side you really have to plane down.
[OP]
Member
I haven't seen your technique for holding a rub joint together with blue tape before, so I have a few questions!
I wouldn't think the blue tape provides much pressure, is it more to simply avoid undue stress on the joint as the glue dries? Also, did you make that rub joint with the boards vertically in your vise, then remove them after the glue tacked to tape them?
Contributor
Sometimes more open time lets people slide the pieces around too long.
Pinch dogs are good but I was surprised at how expensive they are, I made a bunch by buying mild steel flat stock ,
using a skinny cutting wheel to make the V cut first ,then make the cut-off. And finally tapering the sides a little with
standard wider grinding wheel.
Last edited by Mel Fulks; 12-06-2020 at 5:42 PM. Reason: more!
Contributor
Laurent, as mentioned, the tape has a little stretch, and this adds pressure.
The fact is that a good fit does not require much pressure. Using blue tape is proof of this.
We do the same when attaching edging. No clamps required, just tape.
Regards from Perth
Derek
[OP]
Member
I made a few shorter practice joints this evening with the hot hide glue, but I haven't tried the tape yet.
My goal is to try experiment a bit for now and get a feel for getting the right viscosity to the glue mixture before gluing up my panels.
Do you find it necessary to heat the wood surface with a hair dryer before brushing the glue on with these longer edge joints?
[OP]
Member
I thought it would be good to post an update.
This weekend I went ahead and glued up the first two panels for the chest of drawers (each panel was composed of 3 boards, 42in long). I took the plunge and did the rub joints with hot hide glue - no clamps.
It worked. And it worked really well in the end. Was it a lot of work? Yes, yes it was. It was maddening at times. But it was worth it.
Getting that much practice with my jointer plane has definitely made me a better woodworker. Hide glue is also interesting stuff - with two matching edges, the shrinkage of the glue as it dries seems to pull the boards together incredibly tightly. If you get it right you basically won't see any glue line at all, and I don't think you could tell one of these joints apart from a clamped joint. I did get a few joints with sections where the glue line is visible, but I'm not worried about it. Most of the joints came out almost perfectly seamless over the full 42" length.
So if you have the time, traditional rub joints are pretty cool, and definitely worth trying out!
Moderator
A very good exercise! Sounds like you really improved your jointing skills. Great jointing solves a lot of issues with glue ups. It definitely gets less maddening over time. You get way better at spotting the spots that need attention, and squarely taking off less material.
 Posting Permissions

 Reply With Quote