Page 2 of 8 FirstFirst 123456 ... LastLast
Results 16 to 30 of 111

Thread: Mortising machine - clean mortises?

  1. #16
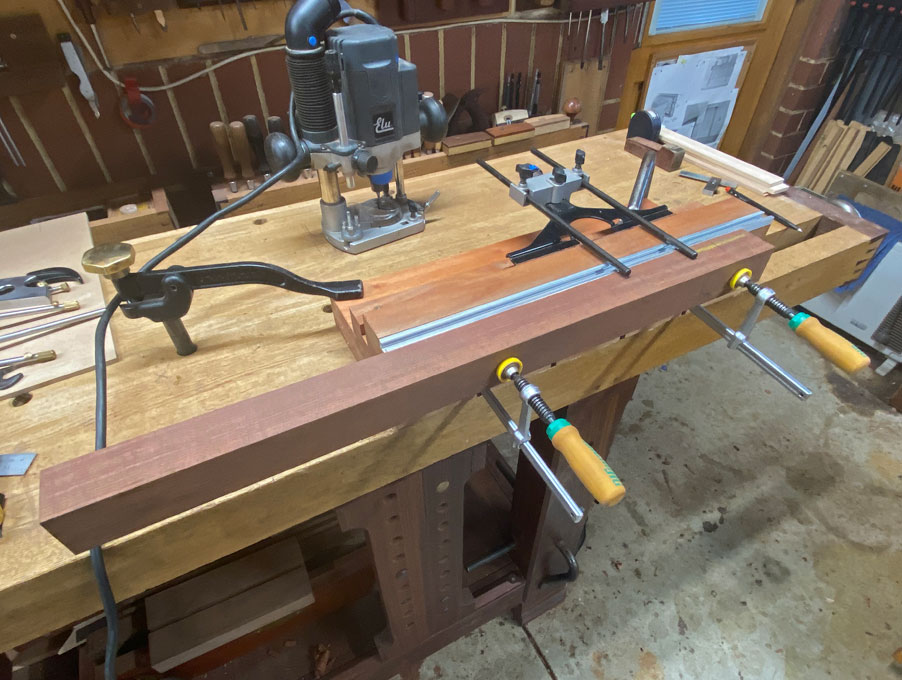
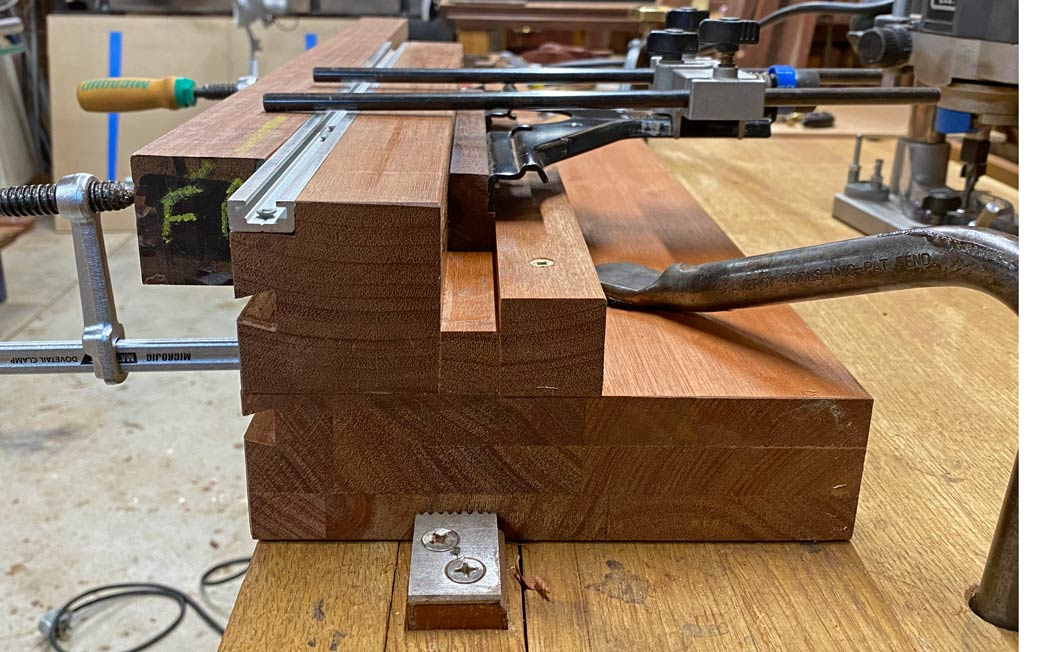
    One way of getting a super clean exit on a through mortise (with a mortiser) is to mortise almost all the way through, drill an access hole through the bottom, and clean up the other side with a flush cutting bit. You still have some small corners to deal with, but that’s quick work with a chisel.

  2. #17
    Bear in mind the o.p.'s project uses 1/4" mortises. I don't think a flush trim bit is available in that size.

    As far as a recommendation for a mortiser, if you require square ended mortises a hollow chisel machine is the way to go (aside from a swing chisel unit like a Maka which would not fit your budget). I have had good results with a Delta benchtop machine, within its size capacity and with careful setup. If you don't mind squaring up mortise ends by hand a good plunge router is the best budget option.

  3. #18
    Join Date
    Nov 2009
    Location
    Peoria, IL
    Posts
    4,521
    Quote Originally Posted by Kevin Jenness View Post
    Bear in mind the o.p.'s project uses 1/4" mortises. I don't think a flush trim bit is available in that size.
    Not true. https://www.amazon.com/Amana-Tool-MR.../dp/B002QB0PVU There are also bits that use a brass bearing instead of ball bearing and is even smaller diameter.
    I've never seen a hollow chisel mortiser make dead clean lines on entry or exit. Maybe I never had high end drill and chisels, but as mentioned, the drill always leaves little crescent shaped notches outside the chisel line.

  4. #19
    If money is an object, the router method mentioned above is probably best. Nothing will be as clean, or as inexpensive, since the OP probably already has a router. If finishing off the corners with a hand chisel is not an option, what about finishing off the corners with a square hole punch (such as Lee Valley sells)? You can go from each side and handle up to 3/4" stock.

    A step up in cost would be to an adapter for a drill press to finish off the corners, assuming the OP already has a drill press. I wasn't impressed with a friend's setup when I tried it on complete mortises, but for finishing corners only I think it would be suitable.

  5. #20
    Richard, I stand corrected. Thanks for the link.

  6. #21
    Quote Originally Posted by Kevin Jenness View Post
    Richard, I stand corrected. Thanks for the link.
    Whiteside also makes a 1/4” piloted spiral upcut bit.

  7. #22
    I have an original Multico Bench top mortiser which was made in England and I believe the basis for the for the bench tops made in Asia. The Multico produces very clean and accurate mortises. Because of the large number of mortises I have to make in large pieces, I now use a Powermatic 719. The two axis table on the Powermatic makes things easier and quicker, but the Multico produces equally accurate mortises every time.

  8. #23
    Quote Originally Posted by Rob Sack View Post
    I have an original Multico Bench top mortiser which was made in England and I believe the basis for the for the bench tops made in Asia. The Multico produces very clean and accurate mortises. Because of the large number of mortises I have to make in large pieces, I now use a Powermatic 719. The two axis table on the Powermatic makes things easier and quicker, but the Multico produces equally accurate mortises every time.
    Do the bits for the Multico (I think they were “Clico” branded) also work in the 719?

  9. #24
    Join Date
    Aug 2013
    Location
    Princeton, NJ
    Posts
    7,296
    Blog Entries
    7
    This is something I do very often. There is a solution for doing this quickly and very easily but getting there is neither easy nor quick.

    Stock must be accurate and square. If it’s not square the cuts won’t align.

    For my quarter inch hollow chisel I fitted the top of it eith a bearing to keep the auger in perfect alignment and reduce whip. The chisels are extremely sharp and slick on the faces. The auger is filed to be slightly smaller than the diameter of the amount that will put a c shape in the side of one edge. The auger is filed to be extremely sharp.

    I have a heavy cast iron mortiser which travels X accurately, the table is accurate, the fence is perfectly square and my setup stops also accurate.

    punch just past center, flip, and do it again.
    Bumbling forward into the unknown.

  10. #25
    Join Date
    Feb 2004
    Location
    Perth, Australia
    Posts
    9,494
    I echo Brian on working with squared stock. Do not expect accuracy otherwise.

    For through mortices, I would always work from both sides, regardless of using hand or power tools. This requires accurate marking out from a reference edge.

    My power tool of choice is a router, upcut carbide bit, and my faithful fixture (slightly modified version from FWW) ...


    You could rout from one side, then flip the piece, complete the routing from the other side.

    Regards from Perth

    Derek
    Last edited by Derek Cohen; 12-04-2020 at 12:52 AM.

  11. #26
    Join Date
    Mar 2003
    Location
    SE PA - Central Bucks County
    Posts
    65,875
    Something related to what both Brian and Derek mentions...if, for some reason, your components final shape will not be square/rectangular, do the mortises before you do the shaping.
    --

    The most expensive tool is the one you buy "cheaply" and often...

  12. #27
    Join Date
    Dec 2010
    Location
    South Coastal Massachusetts
    Posts
    6,824
    To buck the trend (and present an alternative) consider the necessity of M&T in construction.

    If the joint isn't intended to showcase your skills as a design element, a half lap or bridle joint covered by a banding can be durable, and mostly sawn (no chopping required).

    I'm unclear what the OP is building, but a mortise is a void which can be constructed by lamination.

  13. #28
    Join Date
    Jun 2017
    Location
    Landenberg, Pa
    Posts
    431
    This is more or less my setup - I don't use a sacrificial piece, I start on the show side of the through mortise and cut 1/2 to 3/4 of the depth, then flip the piece end for end and work from the other side to finish it off. Flipping end for end at least makes sure I retain one of the reference faces for both cuts. Tune with a float or chisels, and tune the tenon with a shoulder plane. I try not to rotate the piece like a bbq spit which would change two reference faces.

    Quote Originally Posted by ChrisA Edwards View Post
    A full through mortise will depend upon the thickness of the work piece and the width of the mortise you intend to make..

    With a mortise machine and a sacrificial piece, under your work piece, I don't see why you wouldn't get a clean mortise edge on both sides.

    This might help you decide.


    Here's the link if you can't see the video
    https://www.youtube.com/watch?v=jIJWNBAUtyk

  14. #29
    Join Date
    Apr 2018
    Location
    Cambridge Vermont
    Posts
    2,289
    If you are going 3/4 of the way through and flipping it over couldn't you go up one chisel size as long as it's hidden? That way you wouldn't need to be too precise or have to clean it up by hand afterwards?

  15. #30
    The hollow chisels usually crush some soft wood ,no matter how sharp they are. Only machine I 've seen that makes
    perfect mortise is the German Maka

Posting Permissions

  • You may not post new threads
  • You may not post replies
  • You may not post attachments
  • You may not edit your posts
  •