Page 1 of 2 12 LastLast
Results 1 to 15 of 20

Thread: Project for December?

  1. #1
    Join Date
    Jun 2010
    Location
    twomiles from the "peak of Ohio
    Posts
    12,169

    Project for December?

    had a stack of scraps left over from that Blanket Chest Project...over the past weekend, I sorted through the mess. Stuff that is in the "No Way" category was tossed into the firepit can. The rest was to be resawn...
    December project, thin stock.JPG
    Trying for 1/2" thick...may also keep the thinner stuff.....piled up on the bench...
    December project, start up.JPG
    Even on the bandsaw's table...
    December Project, tray parts.JPG
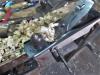
    Had one piece that wasn't flat, where the overlap of the tablesaw's blade was.."Off"....ran that back through....and as a reward...
    December project, flying object.JPG
    This laid over, caught the spinning blade just enough, to send it bouncing off of my stiff upper lip...no blood, though...

    Decided to joint a few edges...
    December project, jointer plane.JPG
    And try a few panel glue ups
    December project, 1st glue up.JPG
    Wound up with 4 such panels....
    December project, 4 sides glued up.JPG

    Today? Well yesterday was a Monday, so the shop was closed. Today being a Tuesday, will try to sort things out in the shop...
    November Snow, front yard.JPG
    Kind of snowed in, today, anyways.....that planter it 5" tall, BTW.....and I consider "Snow" to be a foul, 4 letter word. Time for a Brew-up, a cup of noodles...and see about building a few box-like contraptions.....might even try some of the left over red Cedar.....

    I might just get the hang of gluing up[ thin panels...
    Stay tuned...

  2. #2
    Join Date
    Jun 2010
    Location
    twomiles from the "peak of Ohio
    Posts
    12,169
    Panels came out of the clamps, yesterday...looking a tad bit..rough..
    December Project, out of the clamps.JPG
    Ends not square, different widths, and thicknesses....needed trimmed to a better length....

    60 grit on the beltsander to roughly flatten the high spots down to the low ones....clean up with the Junior jack plane...
    December Project, flatten a panel.JPG
    long length was set at 11", width on all 4 was ripped to 5".....length on the 2 short blanks was set at 5-1/2"....sawn edges were jointed, using the Junior jack.
    Thicknesses are now all 3/8"....ends are squared up..
    December Project, trimmed for size.JPG
    Sorted through 2 stacks of "parts"
    December Project, lid panel parts 1.JPG
    looking for enough matching slats to do a glued up lid with..
    December Project, lid glued up.JPG
    And set this aside..( usual joint the edges, ripped to a consistent width , glue, clamps and cauls)

    set out a few tools..
    December Project, tools laid out.JPG
    Blue handled 6mm chisel was used to set the spacings..
    December Project, finger lay out.JPG
    (that be both of the long side clamped in the vise)
    Drop the pair lower in the vise, and do a bit of handsaw work..
    December Project, sawn.JPG
    Same chisel to chop out the waste...
    Stay tuned..

  3. #3
    Join Date
    Jun 2010
    Location
    twomiles from the "peak of Ohio
    Posts
    12,169
    Do about halfway way on the "show side" face...ends the threat of a blow-out that will be seen..
    December Project, half chappoed.JPG
    Then flip the panel over, and complete the chops..
    December Project, all chopped out.JPG
    That plywood base? Was looking around for a bench top saver....plywood was a tad too long...a Disston D-115 soon fixed that..

    Use these "fingers to mark out the matching fingers on the end panel.....saw and chop the waste.....trying to LEAVE the lines, this time...
    December Project, 1st corner dry fit.JPG
    The more of the line I leave, the tighter the joint....remember the other long side I sawed with the first one? repeat the above....including laying out on the end panel...and try again..
    December Project, 2nd corner dry fit.JPG
    Corner #2 is on the right. Left all of the line, this time around....

    Later today, after Lunch settles, I can work on the other 2 corners. Then see about a groove to house the plywood panel for the bottom of this box. Maybe a 1/4" wide by 3/16" deep groove?
    We'll see how things go....might as well hide out in the shop...too cold, and too snow covered to go out anywhere...

    Stay tuned...

  4. #4
    Join Date
    Jun 2010
    Location
    twomiles from the "peak of Ohio
    Posts
    12,169
    managed to get corners #3 and #4 done. The way used to lay out the matching fingers...
    December Project, layout, 3rd corner.JPG
    No need for any blue tape....seemed to work, anyway..
    December Project, 4th corner.JPG
    At least all the corners are now done..
    December Project, dry fit last 2 corners.JPG
    Set up the Stanley #45...
    December Project, depth setting.JPG
    To plough a 1/4" wide by 3/16" deep groove..
    December Project, 1st groove.JPG
    To house the 1/4" Luann plywood bottom panel..
    December Project, test fit bottom.JPG
    Decided to go ahead and glue the main box up...
    December Project, enough clamps.JPG
    Cauls and clamps....will let this sit a day or so....while I work on a lid.....might even see about the tray.....

    Stay tuned

  5. #5
    Join Date
    Jun 2010
    Location
    twomiles from the "peak of Ohio
    Posts
    12,169
    Ok...Clamps came off slowly, today..
    December Project, clamps removal.JPG
    But, only one of the cauls was stuck to the box....simple whack with a mallet cured that...
    December Project, no more clamps.JPG
    Then over to the bench vise...for a bit of clean up
    December Project, joint clean up.JPG
    Some of the "fingers" were a bit proud....I also checked for square...
    December Project, checking for square.JPG
    Hmmm, got that fixed...
    December Project, one end done.JPG.

    And, checked for high spots along the sides...
    December Project, checking for high spots.JPG
    And fixed those spots..
    December Project, leveling the top edges.JPG
    Top edges were leveled, as were the bottom...
    December Project, outside is done.JPG
    Outside of the box is done. Shoptime started at 1300hrs on the dot....ended at 1800 hrs.

    The above took barely one hour....we have a lot more work to do, today...
    Stay tuned..

  6. #6
    Join Date
    Jun 2010
    Location
    twomiles from the "peak of Ohio
    Posts
    12,169
    Ok, part 2 of today's follies....the inside of the box got a bit of padding, and some supports..
    December Project, inside detais.JPG
    So a tray will sit inside this box....once I build the tray, that is....right now, I need to work on a lid..
    Cordless Mitersaw to trim frame parts for length...
    December Project, trimmed for length.JPG
    Checked for fit...
    December Project, checked for fit.JPG
    And trying to get a decent grain match....soon had two sides, and 2 ends..
    December Project, frame for lid.JPG
    Lengths were ok, thicknesses and widths were not...we have ways..
    December Project, thinned down a bit.JPG
    Widths were just a matter of jointing things even. Thicknesses...thicker in one spot than the rest....thicker on one end...that sort of thing...once that was done...finger joint time, again..
    December Project, fingers and tools.JPG
    Then a dry fit..
    December Project, dry fit, frame.JPG
    Which left the panel for the lid..
    December Project, lid blank.JPG
    As it also came out of the clamps, today.....we have work to do,,,,yet.

    Stay tuned...it was a very busy day......cussing WAS involved, too

  7. #7
    Join Date
    Jun 2010
    Location
    twomiles from the "peak of Ohio
    Posts
    12,169
    lid's panel.....needed flattened....
    December Project, flattening the lid.JPG
    Getting there.....needed both faces done....shoulders were getting a workout....next, trim for length and width...( was a hair off on width...rather have too much, than not enough..)
    December Project, lid trimmed to size.JPG
    Then set up to mill some rebates....
    December Project, rebate set up.JPG
    Cross grain first.....Stanley/Wards No. 78....still had it's spur rotated down....
    December Project, end grain rebates.JPG
    Methinks the spur is not as sharp as it needs to be.....both ends done, reset the spur ( and the jig set-up)...
    December Project, retract the spur.JPG
    Rotated up out of the way....otherwise it causes problems back in the corners...but...we do have a router, handy..
    December Project, long grain set up.JPG
    Just in case. Then, needed a place to house these rebates...
    December Project, groovy lid.JPG
    Stanley 45 was adjusted. Was almost done with all 4 grooves....had a corner bust off....seems the grain and the head of the screw did not play nice....
    Otherwise..
    December Project, test fit the rebates.JPG
    remember I had things a tad wide? Ran the 78 along a bit more....until things lined up at the ends.....thin sections were now too wide to fit all the way down into the grooves....jack plane removed a little bit..until no gaps were seen...


    I was going to repair that broken corner, and maybe glue the lid up......new bottle of glue was upstairs....I had about 5 hours IN the shop, was getting tired and sore...decided to close up shop for the day, go upstairs and call it a day....
    Maybe tomorrow, I'll remember the bottle of glue?

    Stay tuned..

  8. #8
    Join Date
    Jul 2014
    Location
    Edmond, Oklahoma
    Posts
    1,750
    Steven,

    You appear to be making good progress on the box. I like the way the finger joints came out after you planed them down.

    I like to follow your builds, and think I have learned things from reading them. I am getting fairly close to retirement, and am currently still working on restoring tools, etc. However, I hope to clear off a little room in the garage so as to have a small spot to work where the weather is not a big problem. I don't think I will need a big work area for now, since I will be working only on fairly small projects at first.

    I hope to get to work on building some of the things like tool boxes for my Stanley 45, etc. in the not too distant future, rather than just working on tools. Thus, your post on this box and the other tool storage things are helpful and appreciated.

    Thanks and regards,

    Stew
    Last edited by Stew Denton; 12-04-2020 at 11:42 AM.

  9. #9
    Join Date
    Jun 2010
    Location
    twomiles from the "peak of Ohio
    Posts
    12,169
    repairs have been made...some of the grooves needed a little extra work..
    December Project, groove cleaner.JPG
    Changed to a 1/4" cutter. was soon able to glue up the lid...
    December Project, lid glue up, underside.JPG
    Move this aside for a day....cut some parts for a simple tray....4 slats glued to a 1/4" plywood base....with a spacer inside, to prevent a clamp from bowing the sides in..
    December Project, Tray glue up.JPG
    Had a blank for a tray handle..
    December Project, tray handle blank.JPG
    And, wanted a pair of tray dividers with it..
    December Project, tray dividers.JPG
    Needed a way to join these 3 parts...
    December Project, divider joints.JPG
    Something like this? made a few cuts...
    December Project, joint details.JPG


    When I started to use a forstner bit to drill the grip out.....crack....so, now the handle is also sitting in clamps....until tomorrow

    Stay tuned

  10. #10
    Join Date
    Jun 2010
    Location
    twomiles from the "peak of Ohio
    Posts
    12,169
    Halftime...shoptime....
    Test fit of the tray, once the handle had been cleaned up...
    December Project, tray complete.JPG
    Tray itself was sanded down for a fit fit in the box.....tray is currently back in the clamps, getting the handle and dividers glued in place..

    The lid? Well, it came out of the clamps all right.....cleaned the fingers. Test fit show the lid was at least 1/8" narrower than the box! We have ways..
    December Project, thickened lid.JPG

    Back into the clamps. Intend to rip away the excess....once the glue has dried.....we'll see about the ends, later...

    Back to the game..

  11. #11
    Join Date
    Jun 2010
    Location
    twomiles from the "peak of Ohio
    Posts
    12,169
    Seems whenever halftime showed up, this weekend...I went to the shop for a bit...
    December Project, tray fits.JPG
    Tray came out of the clamps, got cleaned up...and checked for the fit....not quite a piston fit...but it doesn't rattle around...
    December Project, test fit tray.JPG

    Lid: Came out of the clamps fine. Set up the rip fence to take barely a blade's width.....kept adjusting both long sides, until it fit...
    December Project, test fit lid.JPG
    Ends were reduced a bit....then one of the cut-offs from the long sides was cut in 2 pieces, and glued and clamped in place....halftime was over..let the glue cure for a bit..


    Later...sanded the lid down, trimmed the edges...checked for gaps..
    December Project, lid test fit 2.JPG
    And making sure the handle of the tray doesn't hit the lid....
    December Project, looking for gaps.JPG
    jack plane will level things out, to remove the gaps..

    Today...halftime again....
    December Project, hinged up.JPG
    Hinges installed, and checked for operation..
    December Project, lid is attached.JPG
    Hardware sitting in the tray? Thought maybe using these to latch the lid...
    December Project, latches, maybe.JPG
    These had seen better days...so a pair of better ones was ordered today, from Hobby Lobby, along with a handle that will fold down.....more for the S&H that for the parts.

    Stay tuned....

  12. #12
    Join Date
    Jun 2010
    Location
    twomiles from the "peak of Ohio
    Posts
    12,169
    Kind of sitting around by the mail box....waiting on the new latches...and the handle....might just go ahead with a stain and varnish routine?

    I can also use up a stack of..
    Cedar Box, we have more.JPG
    1/4" Red Cedar.....work on a few small boxes? Shop even smells better...

  13. #13
    Join Date
    May 2004
    Location
    N Illinois
    Posts
    4,602
    Looking good, steve...
    Jerry

  14. #14
    Join Date
    Jun 2010
    Location
    twomiles from the "peak of Ohio
    Posts
    12,169
    Time for a PIP?
    December Project PIP, bottom stained.JPG
    Bottom has been stained ( brush on, wipe off)
    December Project PIP, end stained.JPG
    Then an end..
    December Project PIP, hinge side stained.JPG
    Then the back...then around the other end, and do the front..
    December Project PIP, Front stained.JPG
    Insides and the tray, too..
    December Project PIP, with the tray.JPG
    Awaiting a handle, and the pair of latches....and a coat of Clear Gloss Poly......bets are, the varnish gets done before the hardware arrives....
    December Project PIP, top stained.JPG
    And the top of the lid
    Last edited by steven c newman; 12-09-2020 at 5:09 PM.

  15. #15
    Join Date
    Jun 2010
    Location
    twomiles from the "peak of Ohio
    Posts
    12,169
    First coat of clear gloss varnish has been applied, today. hardware has made it to Columbus, OH....all the way from Oklahoma City, OK. Might be in my mailbox tomorrow or Saturday.....

    Stay tuned...

Posting Permissions

  • You may not post new threads
  • You may not post replies
  • You may not post attachments
  • You may not edit your posts
  •