+one on what Scott said, that box is great.
jtk


 Contributor
+one on what Scott said, that box is great.
jtk
"A pessimist sees the difficulty in every opportunity; an optimist sees the opportunity in every difficulty."
- Sir Winston Churchill (1874-1965)
Contributor
The stone is also let in to the bottom and there are end grain blocks also added a la Bill Carter. Rafael sent me update pics along the way and even a video. He worked entirely with hand tools, from mortising the stone recess and cleaning up with a hand router to sawing out and carving the scalloped base and beveling the top with a smoother. He has definitely inspired me to make more boxes for my oil stones.Originally Posted by scott lipscomb

Thanks.
Kevin
Last edited by Kevin Adams; 02-06-2021 at 8:31 PM.
[OP]
Contributor
What a beautiful holder. In the back of my mind I want to make one, but especially since I have never actually had one in my hands it is a bit daunting.
I assume that the bottom was cut on a band saw.
Getting the sides to perfectly match the stone seems tricky.
Is the stone bedded? This particular stone is flat on the bottom, so perhaps not as important.
 Contributor
Hmmm...
2 Stall Rust Hunt, 2 grit stone.JPG
Came home with me from downtown.....during the last rust hunt...coarse & fine grit oil stone....
[OP]
Contributor
Very nice Steve... Is it the same stone both sides, but a different finish on each side? I have heard of that being done with different grit carbides so that one side is finer than the other.
Contributor
two different grits....you can see the dividing line between them....I might try to make a cover for it....sometime...
Contributor
Andrew, the bottom was sawed out at the deepest parts and then chisels and rasps were used to blend in the curves. The stone is bedded into the bottom with end grain blocks at the ends. Rafael cut the recesses with chisels and then used a vintage Stanley router to smooth the recess. Youre right, its nice now having something to use as an example for me to make my own. Check out Bill Carters YouTube videos, too.
Thanks.
Kevin
 Contributor
You're welcome Kevin, glad you liked the box, it was fun to make. The Bubinga was a difficult wood but not too brittle or teary. It finished nicely. The details of the box construction can be gleaned from the Bill Carter videos, that's where I got the inspiration from.
Rafael
bbbbbbbb.jpg
The recesses were carved with chisels and finished with a hand router.
aaaaaaaa.jpg
The bottom outlines were drawn on the sides and cuts were made with a back saw. Then the waste was removed with a bench chisel and mallet. A lot of the work using an inexpensive Harbor Freight chisel. Finished with a rasp and sandpaper.
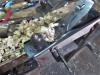
ccccc.jpg
Bottom part before installing the end blocks.
Contributor
Hi Andrew, I outlined the sides of the recess using the stone and a knife.
The side walls were cut after most of the waste was removed, then the stone was fitted by paring until achieving a nice tight fit.
ccccc.jpg
The scribed lines are visible here, the side walls were cut after the interior waste was removed.
Rafael
[OP]
Contributor
Thanks, appreciate the detail.
Kind of blows my mind how you did that underside. I thought for sure a band saw and was amazed at that thought. Even more amazed given how you did it; using tools that I own.
Excellent! :-)
Member
I use these. They never have any issues.
https://www.bestsharpeningstones.com...waAnNKEALw_wcB
 Posting Permissions

 Reply With Quote