Page 1 of 4 1234 LastLast
Results 1 to 15 of 49

Thread: Christmas Present Build time, again...

  1. #1
    Join Date
    Jun 2010
    Location
    twomiles from the "peak of Ohio
    Posts
    12,169

    Christmas Present Build time, again...

    So...Grandpa Steve has a project to do....build a Blanket/Hope Chest for eldest Grandson's "Better Half".....

    have recently brought home about 25bft or so of Quarter sawn Ash....3/4" x 6" planks...
    Ash Lumber supply, full stack.JPG
    random lengths...11 boards in all ($20!) and figured I could build a little bigger box with these...
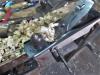
    Ash Lumber supply, grain details, snipe.JPG
    mostly the grain looks like this....though there is a few knots to work around..

    Just got done watching Norm Abram's New Yankee Workshop, Season 1, Episode 4, Blanket Chest.....hmmm...will see how I can build it in MY shop....being mostly hand tool shop...

    And..have it all built, and finished and ready for Christmas Day Delivery?

    Frame & Raised Panel sides? Raised part to show? Bread Board Lid? 22" tall? Around 3' long.....16" front to back?

    Single Brain Cell Sketch Up is now hard at work.....need to start cutting and ripping.....

    Stay tuned....( BTW: have a Cardiac Stress Test this coming Friday morning...)

  2. #2
    Join Date
    Jun 2010
    Location
    twomiles from the "peak of Ohio
    Posts
    12,169
    Kind of sore, right now...area right between the shoulder blades is hurting...was a BUSY afternoon..
    Blanket Chest Project, busy day.JPG
    All shavings from pushing the Stanley #45 around.....Ash does NOT like it....
    hauled 2 planks to the shop, and got out a few tools, for now..
    Blanket Chest Project, tools.JPG
    marking out for leg blanks....3/4" x 2-5/8" x 23" strong....had a few knots to work around
    Blanket Chest Project, knots 2.JPG
    One is in the burn pile...have a way to work around the other..
    Blanket Chest Project, bye bye knot.JPG
    other end?
    Blanket Chest Project, knots 1.JPG
    Might get a couple rails in there? tablesaw to rough cut for length, then set up the rip fence..
    Blanket Chest Project, rip fence.JPG
    Thought I could use the Stanley #45 as a Tongue & Groove plane.....tried at least...will have to see IF it needs a lot of sharpening...couldn't get anything to cut right....didn't even like going with the grain...

    set up the tablesaw instead,,ripped the tongue wannabee off, and made 3 other blanks to match...
    Blanket Chest Project, 8 feet.JPG
    Stay tuned...

  3. #3
    Join Date
    Jun 2010
    Location
    twomiles from the "peak of Ohio
    Posts
    12,169
    Ok, corners are made by a T&G joint..
    Blanket Chest Project, corner joint.JPG
    Got things milled for this...then, the edge where a raised panel will fit was milled next..
    Blanket Chest Project, panel groove, leg.JPG
    Yep, helps when I go WITH the grain, and use the old candle to make things slide better..had 4 rails cut to length....that also needed a groove milled...on just one edge..
    Blanket Chest Project, grooved rail.JPG
    And..another use for the tool well....run a clamp from it to the side of the bench...Just have to watch the clamp clears the Stanley 45's fence...
    And, this is what I managed to get done...
    Blanket Chest Project, 1st day's results.JPG
    Not too bad? may be able to glue up a few panels? As soon as I find out what sizes I'll need...

    Stay tuned..

  4. #4
    Join Date
    Nov 2019
    Location
    Big Bend/Panhandle, FL
    Posts
    122
    Looking forward to following the build, Steven.

  5. #5
    Join Date
    Jun 2010
    Location
    twomiles from the "peak of Ohio
    Posts
    12,169
    hauled another plank to the shop today....start time was 1100hrs....quitting time was 1430hrs....
    Cross cut the plank...2 for the long rails, 2 for dividers between those rails..
    Blanket Chest Project, Day 2, cross cuts.JPG
    Then rip cuts for all 3 boards...at 2-5/8" wide..
    Blanket Chest Project, Day 2, first rips.JPG
    First set wasn't too bad...even kept the 1 x for later....the second set of rails?
    Blanket Chest Project, Day 2, 2nd rips.JPG
    Which more or less determined how long the rails will be....
    Blanket Chest Project, Day 2, cut to size.JPG
    By the time one end was squared up, and all matched for length...wound up at 24" long...One of the dividers has a knot....almost right where a groove will be going

    Reset the tablesaw to do the tenons...took a couple test runs, to get them just about right...
    Blanket Chest Project, Day 2, tenons 1.JPG
    If you look at the one end, you'll see where I was going too thin....corrected that, and started running all the tenons
    Blanket Chest Project, Day 2, divider tenons.JPG
    Dividers got theirs done..
    Blanket Chest Project, Day 2, long rails tenoned.JPG
    next up? need to set up the bench clamp..
    Blanket Chest Project, Day 2, bench clamp.JPG
    And get ready to mill some more grooves...
    Stay tuned, part 2 is coming right up..

  6. #6
    Join Date
    Jun 2010
    Location
    twomiles from the "peak of Ohio
    Posts
    12,169
    Ok, grooves, as the Stanley is still set up. But first..
    Blanket Chest Project,Day 2, edge clean up.JPG
    I thought I wanted a level playing field...as some of the edges are a bit too rough...then the groove can be ploughed,,,
    Blanket Chest Project, Day 2, rail grooved.JPG
    Top edges of the grooves were looking a bit ragged...
    Blanket Chest Project, Day 2, bevel edges.JPG
    The Wards 78 was sitting there, anyway..so I ran it down the groove, adding a slight bevel...
    Blanket Chest Project, Day 2, long rails done.JPG
    Long rails are now milled...tenons and grooves...next the 2 dividers...
    Blanket Chest Project, Day 2, knot groovy.JPG
    And..that knot, again....Dividers get a groove along both edges...
    Which brings us to part 3 of today's shoptime...mortises...for that I'll need a jig...
    Blanket Chest Project, Mortise jig.JPG

    Stay tuned...

  7. #7
    Join Date
    Jun 2010
    Location
    twomiles from the "peak of Ohio
    Posts
    12,169
    Mortises....Jig is set up..
    Blanket Chest Project, Mortise jig ready.JPG
    And ready to chop? Not quite...these will be laid out for Haunched Tenons....
    Blanket Chest Project, Day 2, Haunched tenon.JPG
    As I have a groove to fill up....chopped out for the actual tenon...and try a dry fit....only to find out, that the tenon is a hair too fat...we have ways...
    Blanket Chest Project, tenon too fat.JPG
    Wards 78...planes the cheeks down a bit....trying for Mallet Tight...not Split out the side Tight...
    Try again..
    Blanket Chest Project, Day 2, mortise test fit.JPG
    Nice for the top of the leg..but..as the bottom rail does not go all the way to the bottom of the groove....needed to do a bit of trim work..
    Blanket Chest Project, Day 2, step details.JPG
    Saw cut across right where the rail will stop...then a chisel....and then the dry fit..
    Blanket Chest Project, Day 2, step fitted.JPG
    Gives it a nice little step detail....Stiles to rails were now done...
    Blanket Chest Project, Day 2, frame dry fit.JPG
    This will be either the Front, or the Back of the chest....depends on what the other looks like..
    next, those dividers needed to be centered in the rails....they also don't need a haunch....as the raised panels will fill the grooves nicely..
    Blanket Chest Project, Day 2, dividers fitted.JPG
    Time for a full dry fit?
    stay tuned..

  8. #8
    Join Date
    Jun 2010
    Location
    twomiles from the "peak of Ohio
    Posts
    12,169
    Full dry fit..still need to glue up a few panels....just needed to know how big to make them..
    Blanket Chest Project, Day 2, front frame fitted.JPG
    A few marks here and there, to get the sizes needed...

    I did find out about having sharp, square corners...in Ash...
    Blanket Chest Project, Day 2, OUCH.JPG
    Ouch!...Not sure which corner got me....was during all that mortise chopping....

    Tomorrow? Day #3....I need to build the other 3 frames...and maybe start some panel glue ups...
    May need a pair of Kevlar gloves?
    Stay tuned...

  9. #9
    Join Date
    Jun 2010
    Location
    twomiles from the "peak of Ohio
    Posts
    12,169
    Laundry Detail tonight....2 more Mortises done...Mortise chisel was taken to the stones for a refresh....will see how long that lasts...
    Stay tuned...

  10. #10
    Join Date
    Jun 2010
    Location
    twomiles from the "peak of Ohio
    Posts
    12,169
    Still on laundry Detail...clothes have gone into the dryer....and 4 more Mortises are done....and so am I....will see what Thursday brings....

  11. #11
    Join Date
    Jun 2010
    Location
    twomiles from the "peak of Ohio
    Posts
    12,169
    Stashed out of the way, for now, couple of clamps to hold it..
    Blanket Chest Project, frame 1.JPG
    And, by the time the dryer was done...second frame was too...and measured to find out how big the make the panels for the glue ups,,,,
    Blanket Chest Project, frame 2.JPG
    Stay tuned...right now? Lunch...

  12. #12
    Join Date
    Jun 2010
    Location
    twomiles from the "peak of Ohio
    Posts
    12,169
    had a decent plank to haul to the shop, this evening 70" long...one small knot...IF I have to duck going to the shop..so did this board...laid it on the tablesaw...
    Blanket Chest, day 3, long plank.JPG
    Now..I need a couple panels...3/4" x 10-3/4" x 12-3/8"....i figured I can cut enough pieces (6) at 11" long...
    Blanket Chest, Day 3, ex-long plank.JPG
    And leave just enough to square the ends....shortest one IS 11"..but, by the time I rip the edges straight and square...if I glue up just 2 boards...5-3/4" does not add up to 12-3/8"...hmm...reset the rip fence a few times..
    Blanket Chest, day 3, straight edge rip.JPG
    Wanted one straight edge to start..reset again to 3-1/2"...and run these through again...with the just sawn edge against the fence....which left..
    Blanket Chest,day3, 6 fillers.JPG
    about 1-3/4" wide "fillers" I can then lay out three wide parts and a filler..
    Blanket Chest, day3, panel part.JPG
    And, line up fot the best grain match..
    Blanket Chest,day 3, first panel laid out.JPG
    same 4 boards...

    Stay tuned..more to come...2 hours of shoptime, tonight..

  13. #13
    Join Date
    Jun 2010
    Location
    twomiles from the "peak of Ohio
    Posts
    12,169
    So, all set to glue a panel? happened to have some dowels handy...they can raised the board up a bit, to make clamping a little easier..
    Blanket Chest, day 3, glue upaids.JPG
    Stand up all but the far one...add a bead of glue to each board, lay it down, and moosh the glue a bit..until all the parts are ready for some clamps..
    Blanket Chest,day 3, 1st panel glued up.JPG
    Do 2 clamps, roll the panel over, add the middle clamp....and set the panel aside to cure....repeat for panel #2...and set it aside..
    Blanket Chest, day 3, 2 panels glued up.JPG
    And let these sit overnight....also, the first two frames were sat down in front of these...to be out of the way....

    Decided to work on the frames for the ends....
    Blanket Chest, day 3, corner marking.JPG
    getting better at this....was a bit of a brain...cramp....until I got things straightened out as to who goes where...and in what direction...was trying to install a rail bass-ackwards...
    Also...a few extra cuts were made...mainly at the foot details...got rid of that sharp cornered step....will get the burn marks sanded off later..
    Blanket Chest, day 3, better fit.JPG
    Getting a better fit with the haunch, too....bottom rail done on the side, turn things around...and do the top of the leg..
    Blanket Chest, day 3, top done.JPG
    And, since I was on a roll, I also did the other leg of this frame...
    Blanket Chest,day 3, end #1 done.JPG
    And set this aside....was starting to have issues with the chisels.....
    Blanket Chest, day 3, quitting time.JPG
    got to about here, on the other ( and LAST) frame....2 hours was just about enough....closed up the shop for the day

    Tomorrow afternoonish? may try again....need 4 more panels glued up, and that last frame assembled....

    Stay tuned..

  14. #14
    Join Date
    Jun 2010
    Location
    twomiles from the "peak of Ohio
    Posts
    12,169
    Day #4.....the Shed/Tent out in the backyard..
    Shed vs wind, south side.JPG
    Now has a new "roof", as I replaced it with a better tarp....took about an hour, since I was the only one working on it....took a short break..then hauled some planks to the shop...some were "Good"
    Blanket Chest, Day 4, another plank.JPG
    The plank behind it was was so bad..
    Blanket Chest, Day 4, Scraps.JPG
    These were from the ends of it....and the third plank?
    Blanket Chest,Day 4, ugly plank.JPG
    Not the greatest looking board...set these 3 aside for a bit....sharpened the Mortise chisel up....and changed the bandsaw blade..
    Blanket Chest, Day 4, new blade.JPG
    New blade doesn't burn....Mortise chisel chops a lot better..
    Blanket Chest, Day 4, mortise chopping.JPG
    And..doesn't get stuck, either...managed to get the last frame done...
    Blanket Chest, Day 4, last frame done.JPG
    And stashed it over with the rest of the frames...a front, a back, and now two end frames..
    Blanket Chest, Day 4, parts bin.JPG
    Which meant the rest of the 2 hour shop time was spent milling parts to make 4 more panels...
    Stay tuned....

  15. #15
    Join Date
    Jun 2010
    Location
    twomiles from the "peak of Ohio
    Posts
    12,169
    Second "half" of Day #4....
    Cross cut those 3 planks down...throwing out the bad parts...until I had 12 of these.
    .Blanket Chest, Day 4, one dozen blanks.JPG
    Was trying to get them about 11" long....then chose an edge that LOOKED straight...set up the rip fence to about 5-1/2" from the blade...and rip off the wavy edges...marking that freshly sawn edge...then reset to3-5/8" width...and run them all through...with the freshly sawn edge riding the fence..stashed the 1 x 2s aside...first 3 boards and a 1 x 2 were arranged for best grain match..
    Blanket Chest, Day 4, panel #3 laid out.JPG
    had a few small gaps...we have ways..
    Blanket Chest, Day 4, glue joint jointing.JPG
    Was mainly the first edge....jig does have other uses besides mortises...
    to get the panel glued up, first I needed some clamps...emptied some clamps..
    Blanket Chest, Day 4, Panels 1 and 2 done.JPG
    Stashed Panels #1 and #2 over on the bench..while I glue up Panels #3 and #4
    Blanket Chest, Day 4, clamps and cauls.JPG
    Needed cauls, this time around...but, not enough clamps for Panels #5 and #6..
    Blanket Chest, Day 4, panels 5 and 6 ready.JPG
    So these 2 will have to wait, until tomorrow...
    Blanket Chest, Day 4, mortise done.JPG
    BtW: this is a clean mortise in my shop....and a nice, snug fit, too

    Will be working on panels next...
    Stay tuned..

Posting Permissions

  • You may not post new threads
  • You may not post replies
  • You may not post attachments
  • You may not edit your posts
  •