Results 1 to 10 of 10

Thread: New Rabbit plane

  1. #1
    Join Date
    Dec 2006
    Location
    Warwick, RI
    Posts
    804

    New Rabbit plane

    A little back story, I once had a Veritas Skewed Rabbit plane that sat on my shelf and collected dust so I sold it. Not because I didn't like, it was awesome but I'm just not the kind of woodworker that makes a lot of rabbits, I build musical instruments. I also can't afford to have that kind of money sitting on a shelf so I sold it and bought a bunch of tools I use all the time, luthery tools.

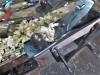
    I've recently got interested in trying my hand at some joinery and furniture making. I was supposed to start off with a computer desk which I haven't gotten past the drawing. Those darn YT videos get me thinking all the time and, look a squirrel, yeah that's how it goes. After watching some videos on making moldings where they are usually begun with a rabbit plane so I thought, I'll start there, hence my new toy. I think it says Sandusky tool Ohio. With shipping it cost me 1/10 of the cost of the Veritas. I can let this collect dust for a long time if need be. Hopefully it won't.

    A secondary reason for the purchase is an interest in building molding planes. They're pretty simple but I felt it would be a good idea to have a model in hand for when I chase that squirrel.

    Rabbet Plane.jpgRabbetPlane3.jpg

  2. #2
    Join Date
    Aug 2019
    Location
    Pittsburgh, PA
    Posts
    850
    I've also bought a few rabbet planes. I did some initial refurbish, but it don't think i tuned them properly yet. Let us know what your experience is.

    (on a side note, have you heard of a Badger plane?)

  3. #3
    Join Date
    Dec 2006
    Location
    Warwick, RI
    Posts
    804
    So after sharpening it cuts alright but I don't think I have it set right. The blade appears to be homemade and is short. The wedge sticks above the blade so settings are difficult. I'm thing of making a new wedge or cutting this one below the blade.

    Another thing is the sole edges are rounded and the sides may not be flat and 5he blade sticks out 9n bothe sides. That probably doesn't matter and gives some metal to tap on. I want to master this do any help you can offer will be much appreciated.

  4. #4
    Join Date
    Jun 2010
    Location
    twomiles from the "peak of Ohio
    Posts
    12,169
    The corners are rounded,(from wear?) because..to start a rebate with one of these, you leaned the plane over, so a corner of the iron would dig into the line you want to plane to...as each pass gets a bit deeper, you then leaned the plane back up, a little bit at each pass, until the final pass the plane is vertical..

    Some like the corners to stick out a bit...some don't....I have an Auburn Tool Co. of Auburn NY. No. 181....a 1.25" wide skewed rebate plane...Next time I am in the shop, I will get a few photos of mine.
    IMAG0004.JPG
    Sitting in it's recessed spot in the lid. 2 walnut keepers lock it in place. I have to rotate the keepers up, so the plane can be removed.

  5. #5
    Join Date
    Aug 2019
    Location
    Pittsburgh, PA
    Posts
    850
    Quote Originally Posted by Richard Hutchings View Post
    ... The blade appears to be homemade and is short. The wedge sticks above the blade so settings are difficult. I'm thing of making a new wedge or cutting this one below the blade.

    Another thing is the sole edges are rounded and the sides may not be flat and the blade sticks out on both sides. That probably doesn't matter and gives some metal to tap on. I want to master this do any help you can offer will be much appreciated.
    If the plane is an old one, the blades are hand made. You'll have to figure out the best way to be able to tap the iron when adjusting.

    Rounding of the sole is not critical as long as it is not excessive. What's critical is to have the right side of the plane and the sole at 90 degrees. Also, ensure the right side of the plane is straight and has no winding.

    20201031_142842.jpg

    Right side of the plane. It has to be 90 degrees to the sole.

    20201031_144346.jpg

    Checking for wind. This one has a minor wind.

    20201031_142822.jpg
    Left side of the plane. This side does not need to be messed with, since it does not make contact with the work.

    20201031_142957.jpg

    This is the iron for this plane. The corner on the right side is the business end. As you can see it's chipped. I'm going to have to remove quite a bit of metal to get an acute angle. You will also note that the right side of the iron is also beveled, that allows clearance for the iron so it fits close to the corner of the rabbet. This side must also protrude from the side of the plane very slightly. So, the iron will be slightly wider than the width of the plane. If the iron does not protrude, then after every pass the cut will move away for the wall of the rabbet.

    Finally, this particular plane of mine is skewed, so the iron edge has to have a particular shape so it is coplanar to the plane sole. That takes some trial and error. My plane is not fully refurbished as you can see, but I will get it to work eventually.

  6. #6
    Join Date
    Sep 2007
    Location
    Longview WA
    Posts
    27,437
    Blog Entries
    1
    Quote Originally Posted by Richard Hutchings View Post
    So after sharpening it cuts alright but I don't think I have it set right. The blade appears to be homemade and is short. The wedge sticks above the blade so settings are difficult. I'm thing of making a new wedge or cutting this one below the blade.

    Another thing is the sole edges are rounded and the sides may not be flat and 5he blade sticks out 9n bothe sides. That probably doesn't matter and gives some metal to tap on. I want to master this do any help you can offer will be much appreciated.
    A lot of old planes have blades that may look homemade. It may have been made by the local blacksmith to replace a worn out original blade. From your description of the plane's corners being rounded it may have been a much used plane.

    There are a few remedies available for your wedge before making a new one. One would be to shave off a little material from the top or bottom of the wedge to make it seat deeper. This might require re-working the tip of the wedge at the blade end. Make sure to keep any angles consistent with what is already there unless they need correcting.

    Another remedy would be to cut a hollow in the back of the wedge at the top so the iron can be tapped without striking the wedge. This would likely only need to be about an inch long by maybe an eighth of an inch into the wedge.

    It is also important to remember that tapping the wedge can advance the blade. Tapping the blade can loosen the wedge due to the blade being tapered.

    Here is an old post of mine on wooden bodied planes that includes trimming and making wedges > https://sawmillcreek.org/showthread.php?242156

    The sole can also be handled in a few ways. One would be to plane it down to square. This could cause problems with a wide mouth or the blade being too long to fit properly. If that is the case a new sole could be attached. Another way would be to rabbet out the corners of the edge and install 'boxing' or other hardwood to make a new corner.

    For setting the blade at the side a method that works for me is to set the side of the plane defining the edge of the rabbet on a clean area of the bench and press. This always leaves a clean cut wall on the rabbet in my work. Too far out and the rabbet can start moving in. Too far in and the rabbet wall starts to lean.

    It is also important the edge of the blade sits parallel to the sole after setting the blade. It should be this way no matter which side of the plane is being used against the wall of the rabbet.

    The edge of the blade should have a slight bevel and be free of nicks. It should be honed but doesn't need to be super sharp. It is parly there to keep the wall clean and to be a bearing surface of the plane.

    It seems like there is a lot going on, but once it is done a few times it all comes together.

    jtk
    Last edited by Jim Koepke; 10-31-2020 at 3:30 PM. Reason: It is also important…
    "A pessimist sees the difficulty in every opportunity; an optimist sees the opportunity in every difficulty."
    - Sir Winston Churchill (1874-1965)

  7. #7
    Join Date
    Jun 2010
    Location
    twomiles from the "peak of Ohio
    Posts
    12,169

  8. #8
    Join Date
    Sep 2007
    Location
    Longview WA
    Posts
    27,437
    Blog Entries
    1
    Quote Originally Posted by steven c newman View Post
    [edited]
    And...shavings...
    Auburn 181, making shavings.JPG
    They do tend to ball up, though...
    Changing the shape at the end of the wedge will help to divert the shavings out the side to avoid the jamming and balling.

    jtk
    "A pessimist sees the difficulty in every opportunity; an optimist sees the opportunity in every difficulty."
    - Sir Winston Churchill (1874-1965)

  9. #9
    Join Date
    Dec 2014
    Location
    springfield,or
    Posts
    644
    Quote Originally Posted by Rafael Herrera View Post
    Finally, this particular plane of mine is skewed, so the iron edge has to have a particular shape so it is coplanar to the plane sole. That takes some trial and error.
    I haven't been able to figure out the geometry to sharpen mine yet. It's more difficult than it first seems.

  10. #10
    Join Date
    Aug 2019
    Location
    Pittsburgh, PA
    Posts
    850
    I follow this procedure: I paint the flat side with some ink, set the iron so it protrudes its whole length and then score it with a knife using the sole as a reference. That will give me a line that I can use to gring the bevel.
    20201102_225225.jpg

    With the bench grinder I first take out the edge and then work on the bevel until I'm close to the line. I also work the relief bevel on the right side of the iron, I want only the bottom corner to protrude on the right side of the plane. If you can visualize it, the side of the iron and the side of the plane form a very acute angle.

    I used a coarse crystolon to work out the bevel until I got a burr. Then finished it on a honing stone.

    I had to go back and forth the crystolon stone to get the edge coplanar to the sole and protrude slightly on the side. I kept getting the right corner sticking out too much.

    20201102_224712.jpg

    20201102_224558.jpg

    20201102_231959.jpg

    It's now cutting a decent rabbet, but I think it needs a little bit more tuning.

    This is my way of handling this, it may not be the best, I'm open to suggestions.

Posting Permissions

  • You may not post new threads
  • You may not post replies
  • You may not post attachments
  • You may not edit your posts
  •