Results 1 to 13 of 13

Thread: First Plane Restoration

  1. #1

    First Plane Restoration

    This is my first neander-post, and really my first exposure to hand tools. I normally spend my time in the Turning section.

    My dad passed away a couple of months ago. He liked to make things, but "woodworking" probably doesn't explain what he did. He had a whole garage filled with various tools. Some useful, some not so useful, but if someone needed a tool he either had it, or would buy it so they could use it. Even if he never needed it again.

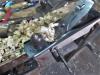
    I was really hoping to find some quality hand tools. Saws, planes, chisels, files, etc. My first pass through the garage yielded little, but as we've pared away most of the junk I was able to find a few old saws with the Warranted Superior badges, and this old Stanley #3. I'm pretty sure it is a type 12. It was in OK shape, and actually made some shavings, but after watching numerous videos over the last year or so, I really wanted to take one apart and restore it. So that's what I did.

    I'm happy with the way it turned out, and though my sharpening skills (and equipment) leave much to be desired, it made some really nice shavings. I have no memories of this plane, so I'm not sure where or when my dad acquired it. I doubt he used it much, since he was much more into getting the job done quickly.
    20201008_162136_resized.jpg20201008_162146_resized.jpg20201008_162702_resized.jpg20201008_162714_resized.jpg20201017_171554_resized.jpg
    Attached Images Attached Images

  2. #2
    Join Date
    Jun 2010
    Location
    twomiles from the "peak of Ohio
    Posts
    12,171
    Looks good to me!

  3. #3
    Join Date
    Sep 2007
    Location
    Longview WA
    Posts
    27,441
    Blog Entries
    1
    Looks like a great job on the restoration.

    I'm pretty sure it is a type 12
    A low knob and small depth adjuster indicates it is a type 11.

    A type 12 would have a tall knob and the depth adjuster would be 1-1/4" across.

    BTW Wes, welcome to the Cave by the Creek.

    jtk
    Last edited by Jim Koepke; 10-19-2020 at 3:52 PM. Reason: BTW
    "A pessimist sees the difficulty in every opportunity; an optimist sees the opportunity in every difficulty."
    - Sir Winston Churchill (1874-1965)

  4. #4
    Join Date
    Jul 2014
    Location
    Edmond, Oklahoma
    Posts
    1,750
    Hi Wes,

    One more welcome to the creek, and one more very nice job on the restoration.

    Also, one more "it's a type 11." Only type 11s have three patent dates between the tote and the back of the frog.

    By the way, two of the best plane restorers on the creek, Jim and Steven, have just given you approval on the restoration job. Still, there are quite a few other good restorers here on the creek too, a lot of us tend to go that route.

    For what it's worth, your type 11 is probably the most desirable type of all of the Stanley Bailey planes. (The Stanley Bedrock planes are also much desired by some of us.) Many of us will agree on the type 11 being perhaps the most desired Stanley Bailey type, although most of us like a range of the types. Exactly which is the "best" type number of the Baileys will generate some differences of opinion. (For me, the range I like are the late type 10s to the type 14s or 15s or so. The low form knob on the type 11s and a bit earlier types are much approved of by many of us.)

    (I guess my post is almost a dead copy of the one by Jim above on the first three key points!) At any rate, congrats on the nice plane and the nice restoration job.

    Regards,

    Stew
    Last edited by Stew Denton; 10-19-2020 at 9:40 PM.

  5. #5
    Quote Originally Posted by Wes Mitchell View Post
    This is my first neander-post, and really my first exposure to hand tools. I normally spend my time in the Turning section...

    ...and this old Stanley #3. I'm pretty sure it is a type 12. It was in OK shape, and actually made some shavings, but after watching numerous videos over the last year or so, I really wanted to take one apart and restore it. So that's what I did.
    Looks good to me! How did you clean it up? Particularly the wood handles? I'm curious about the process. I used evapo-rust on a hand drill restoration recently. But there was no finish/japanning/etc that I needed to worry about on it, so other than the wooden bits all the parts went into the evapo-rust tank.

  6. #6
    Nice job on the restoration. Like Jim and Stew said it is a Type 11 because of the low knob, 3 patent dates, and smaller adjustment nut. However, both Type 11 and Type 12 had 3 patent dates behind the frog. They are essentially the same plane. The difference is that the Type 12 has the taller knob and a larger blade adjustment nut (1-1/4") while the Type 11 had a smaller (1") adjustment nut.

    I like both the Type 11 & Type 12 my only Stanley Bailey is a Type 12 #5.

    See these two sites for type studies
    https://virginiatoolworks.com/tools/...dentification/
    https://woodandshop.com/types-11-and-12/

  7. #7
    Join Date
    Sep 2007
    Location
    Longview WA
    Posts
    27,441
    Blog Entries
    1
    This is my favorite type study site for all the images > http://www.rexmill.com/planes101/typing/typing.htm

    Some like the quick chart at > http://primeshop.com/access/woodwork...e/pftsynch.htm

    There are a few anomalies in the type studies because Stanley never knew there was going to be type studies and some parts got mixed at the transitions.

    Type 9 is one with variations posted here > https://sawmillcreek.org/showthread.php?131234

    Some of the late type 11s came with tall knobs.

    There were some planes between type 6 and type 7 with a dot in the casting instead of being plain like a type 6 or with an S like a type 7.

    As long as they take shavings to the user's desire, the type isn't significant to many users.

    jtk
    "A pessimist sees the difficulty in every opportunity; an optimist sees the opportunity in every difficulty."
    - Sir Winston Churchill (1874-1965)

  8. #8
    Jim,

    Didn't Stanley regularly, when they introduced a new type, put on the left over knobs, totes, etc. from the previous type on the new type.

  9. #9
    Thanks all for the clarification. I wasn't at home when I did the research, so I couldn't measure the knob to see if it was 1" or 1-1/4" so I guessed.

    Erich, I was able to put the front handle on my lathe to sand it down a little. The rear one I just hand sanded through the different grits, which took a while. Then I finished with BLO. I was suprised just how dark they turned out, but I like the look. I soaked the metal parts in vinegar for a bit, then was able to brush off most of the rust. I sanded the rest off.

  10. #10
    Join Date
    Sep 2007
    Location
    Longview WA
    Posts
    27,441
    Blog Entries
    1
    Quote Originally Posted by Orlando Gonzalez View Post
    Jim,

    Didn't Stanley regularly, when they introduced a new type, put on the left over knobs, totes, etc. from the previous type on the new type.
    Yes, in some cases it was new parts were used on a base that was coming to the end or its use. That is why some of the early type 9 planes have lateral adjusters from a previous era. It is also why tall knobs ended up on type 11 planes.

    Quote Originally Posted by Wes Mitchell View Post
    Thanks all for the clarification. I wasn't at home when I did the research, so I couldn't measure the knob to see if it was 1" or 1-1/4" so I guessed.

    Erich, I was able to put the front handle on my lathe to sand it down a little. The rear one I just hand sanded through the different grits, which took a while. Then I finished with BLO. I was suprised just how dark they turned out, but I like the look. I soaked the metal parts in vinegar for a bit, then was able to brush off most of the rust. I sanded the rest off.
    BLO will often darken wood when it is applied. My preference is a furniture polish made of oils and beeswax.

    If you are going to fix up a lot of planes here are a few things that may be of help with restoring knobs & totes:

    Knob Mandrel.jpg

    This was fairly easy to make on the lathe.

    Tote Repair Clamp.jpg

    This works good as a clamp when gluing up a broken tote.

    Here is a good source for other information on repairing totes > http://www.rexmill.com/planes101/han...air/handle.htm

    Tote on Base.jpg

    Sometimes you may come across a plane that is cheap and broken. They are good sources of parts. They can also make a good mount for working on a tote with sandpaper or rasps.

    jtk
    "A pessimist sees the difficulty in every opportunity; an optimist sees the opportunity in every difficulty."
    - Sir Winston Churchill (1874-1965)

  11. #11
    Join Date
    May 2004
    Location
    N Illinois
    Posts
    4,602
    Nice work, Wes....Great results.
    Jerry

  12. #12
    Thanks, Jerry.

    Jim, that clamp would have been handy. This one did have a broken tote. I was able to clamp it into a vice at a good enough angle, but I'm sure that would have been easier.

  13. #13
    Join Date
    Jun 2010
    Location
    twomiles from the "peak of Ohio
    Posts
    12,171
    Sometimes, one can just wrap the bolt in tape, so the glue won't stick to it. Then, use the bolt as a clamp....just apply the glue to the break, assemble the tote to the plane, Bolt helps keep things aligned, and serves as part of a clamp, with the plane's bottom casting the other "jaw"...

Posting Permissions

  • You may not post new threads
  • You may not post replies
  • You may not post attachments
  • You may not edit your posts
  •