Why not just turn the square blanks down on the lathe?


 Contributor
Why not just turn the square blanks down on the lathe?
Contributor
Hold on a second, Sparkey......Originally Posted by Jim Becker

I've had 103 through my house in the latest 50 years of marriage, and I have tim e for woodworking AND a full time plus an on-call job.
Young enough to remember doing it;
Old enough to wish I could do it again.
 Moderator
That brings new meaning to "be fruitful and multiply"...
Two was enough for me and we skipped the diapers and went right to puberty. (Adoption ]
--
The most expensive tool is the one you buy "cheaply" and often...
 [OP]
Contributor
[OP]
Contributor
Kevin, one can and I have, but with dry Hard Maple there is the risk of an edge splintering and tearing off. Better to first remove the edge.
Regards from Perth
Derek
Contributor
I build a purpose built sled that has the bevel cut on the edge. This gets me enough surface to clamp to.
Moderator
Make a jig that will hold the blank in the proper orientation locked down on the slider if you really want to use that tool, but the bandsaw is quicker and more practical, especially given you'll be turning them round on the spinny thing...
--
The most expensive tool is the one you buy "cheaply" and often...
Contributor
Since you're putting centers in it for the lathe anyway, maybe some angle brackets with 'centers', and an angle plate to clamp to. Or a subplate as mentioned already.
Contributor
Last time I ripped the corners off a blank, the bandsaw was called to duty. A bench top Rikon to be exact. Since my machine is the older model, it does not have a fence. I used a guide clamp on the table, tilted the table to the desired angle and cut away. Safer than a table saw.
Contributor
One way to remove the corners safely is to add a sacrificial wood layer to the rip fence and raise the tilted blade up into it. Relieve the wood fence below the blade so the offcut is not trapped. This may not work well with your slider if there is a large gap between the slider and main table, but you could add a layer spanning the gap or make a zero clearance throat plate.
[OP]
Contributor
Great idea!
Regards from Perth
Derek
 Member
Never tried it, but my first try would be to mount it in "centers" on the slider carriage, set the blade at 22.5, and use the fresh surface each pass as the index surface on the carriage top. Could easily set your taper that way to I'd think.
Contributor
If I understand correctly you just want to clip off the corners, and end up with an octagonal piece to put on the lathe. If this is the case, you will still have flats on each original side that can ride on your original jig.
I would just cut the square pieces a couple inches long, drill holes near the ends, screw the piece to the jig...cut, readjust, and repeat. Screwed down, the small flats on the original piece should be enough to align and hold it.
Then again, I may be misunderstanding the problem.
Rick Potter
DIY journeyman,
FWW wannabe.
AKA Village Idiot.
 Contributor
I would probably cut the bevels on the shaper (or router table) with a 45 degree bevel cutter. I have one for each tool.
Contributor
I've made octagons on the table saw using a sled with a V cut out of it.
IMG_3913.jpg
To use it safely, I used a featherboard to keep the sled against the fence and a push stuck to hold down the workpiece.
screenshot2.jpg
It's not obvious from the photo, but the groove is at a slight angle. This is because it was for making tapered legs. (Note that the legs already had a taper before these bevels were cut.) I made the sled by first cutting the groove straight, and then sending the sled through the table saw with a shim taped to the fence side.
I now have a jointing/tapering sled with hold downs for the table saw, so if I were to do this today, I might not make the V-groove sled with an angle. Instead, I'd probably make a sled with a straight groove, and then clamp it down to the tapering sled at an angle.
I initially used the sled on the band saw, but it left a pretty rough cut, so I moved it to table saw, which was faster and left a cleaner surface, so I didn't have to do as much clean-up work with hand planes. I made a lot of legs, so I wanted to make the process as efficient as possible!
stool-legs-1.jpg
Last edited by Winston Chang; 10-17-2020 at 10:26 AM.
[OP]
Contributor
Thanks Winston, I shall make up a fixture similar to that for the slider after this bunch of stools. There are likely to be many occasions in the future to make use of one.
In the meantime I used the scrub plane ...
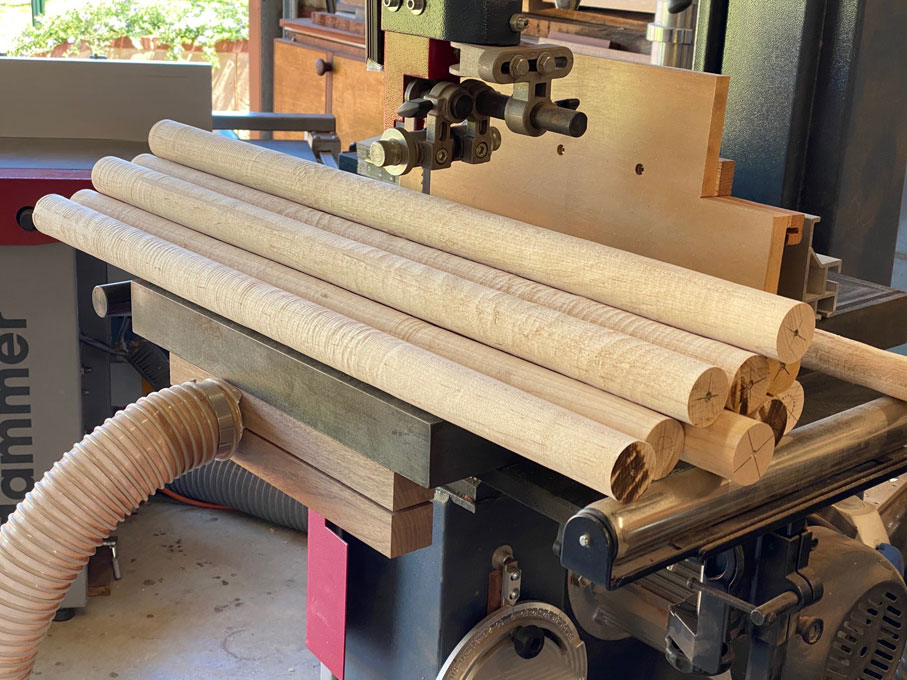
Here you can see the corners removed and the round being turned. Dry Hard Maple is not the most fun to turn, although it finishes well.
And enough legs for three stool. All rough turned at this stage.
Regards from Perth
Derek
 Posting Permissions

 Reply With Quote