Results 1 to 13 of 13

Thread: Plane till build

  1. #1
    Join Date
    Jul 2019
    Location
    Northeast WI
    Posts
    571

    Plane till build

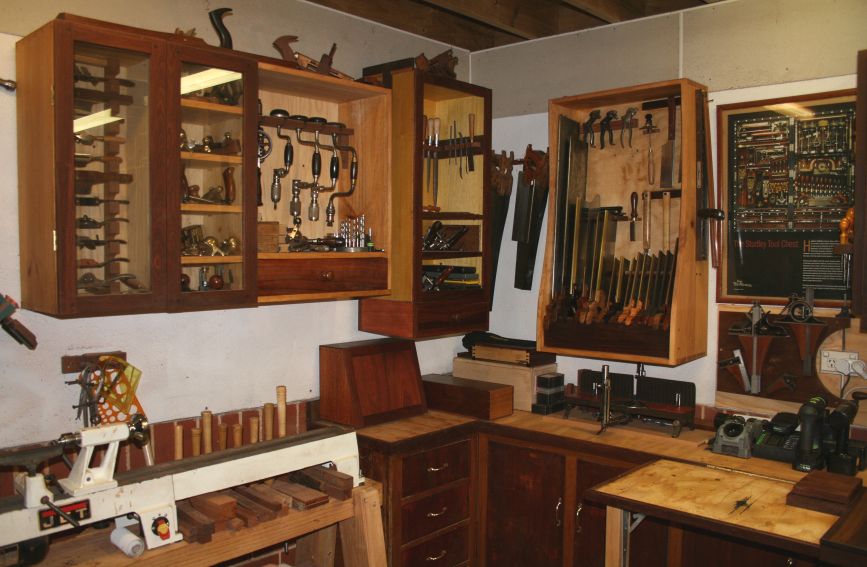
    I previously posted a few pictures about the dovetail carcass but here is a glimpse of the build. I started with 1x8 pine and made the carcass 36" x 36". Kind of big but i needed the room. The carcass is held together with dovetails and glue, with the tail boards being the vertical sides.
    IMG_20201004_152405906.jpgIMG_20201004_161700683.jpg

    A dado was cut in the side boards to hold a divider. This will be the bottom of the main till and there is plane storage underneath for my specialty planes. I cut down to depth using my Great Grandfather's back saw, chiseled out most of the waste, and then used my Stanley 71 1/2 router plane to get the bottom of the dado flat. This was a fairly quick process and i forgot to take pictures.

    I was originally going to use a french cleat, but I decided against it. I mounted a 1x4 flush with the back and this is what will attach it to the wall. I pre-drilled holes, countersunk, and then used brass screws to hold this board in place. I used a millers falls no 1 eggbeater for the pilot hole, a brace and bit for countersinking and screw driving, and some london pattern turn screws for the final seating.
    IMG_20201009_203848632.jpgIMG_20201009_203838550.jpg

    And they had dewalt impact drivers at the turn of the century right? In all seriousness i went modern here and drove some 3" screws right into the studs to mount this bad boy.
    IMG_20201009_210331996.jpg

    I loaded up a few planes just for fun and it seems solid. Tomorrow i have to run to the home center and pick up some wood to make the plane bed and some lips to keep the planes from accidentally falling out.

    All in all this was a very educational build for me. It is far from perfect but I was able to practice and build skills and its just a shop project right?

    Im debating adding one more divider in-between the bottom shelf and the bottom. It would be narrow and able to hold cigar boxes with extra parts and accessories.

    Thanks for reading!

  2. #2

    Another approach

    Here is another way of doing it. Made all with hand tools.
    Attached Images Attached Images
    Dave Anderson

    Chester, NH

  3. #3
    Join Date
    Jul 2019
    Location
    Northeast WI
    Posts
    571
    Dave,

    Im curious, do the top panels with the spokeshaves and planes lift up for storage underneath? I noticed some handles there

  4. #4
    Join Date
    Jun 2010
    Location
    twomiles from the "peak of Ohio
    Posts
    12,181
    Plane Til, project post, both doors opened.JPG
    open and shut case...
    Plane Til, project post, 1.JPG
    The bad part about open tils..
    Plane Til rework, start up.JPG
    They tend to get covered in dust....

  5. #5
    Join Date
    Feb 2004
    Location
    Perth, Australia
    Posts
    9,494
    Quote Originally Posted by Dave Anderson NH View Post
    Here is another way of doing it. Made all with hand tools.
    Dave, for so long yours has been the standard by which we measure our!

    Regards from Perth

    Derek

  6. #6
    Join Date
    Feb 2004
    Location
    Perth, Australia
    Posts
    9,494
    Quote Originally Posted by Jason Buresh View Post
    I previously posted a few pictures about the dovetail carcass but here is a glimpse of the build....

    All in all this was a very educational build for me....
    Jason, keep that last comment in mind when building for the shop. Some love to build only for the shop. I only build for the shop out of necessity, and save my good wood for furniture for the house. Shop furniture is then a time to try out new methods and techniques, and try out new tools.

    I stick to Pine and spice it up with some trim (as I like a good looking shop). My stuff is pretty pedestrian, and may get replaced if the design does not work well. All a bit higgeldy-piggeldy

    A far corner of the shop .... Taken several years ago ...


    Regards from Perth

    Derek
    Last edited by Derek Cohen; 10-10-2020 at 9:22 PM.

  7. #7
    Join Date
    Jul 2019
    Location
    Northeast WI
    Posts
    571
    And here is a picture of the finished product. Im pretty happy with how it turned out. I just finished putting the moulding on the bottom so the specialty planes wont accidentally fall out. Theres a little lip to catch them.

    IMG_20201011_162739846.jpg

  8. #8
    Join Date
    Apr 2007
    Location
    Columbus, Ohio, USA
    Posts
    3,441
    Well done Jason, looks good. I have to admit that pretty much all of them put to shame what I have, which is a "plane" drawer in a cabinet that I built.

  9. #9
    Yes Jason, the area under the spokeshaves lifts up and has 2 shelves. The area under the plane ramp also lifts up for storage.
    Attached Images Attached Images
    Dave Anderson

    Chester, NH

  10. #10
    Join Date
    Dec 2019
    Location
    The old pueblo in el norte.
    Posts
    1,903
    Your till looks great Jason, I really miss being able to easily get white pine.
    ~mike

    happy in my mud hut

  11. #11
    Join Date
    May 2004
    Location
    N Illinois
    Posts
    4,602
    Nicely done Dave....Good work!!!!
    Quote Originally Posted by Dave Anderson NH View Post
    Here is another way of doing it. Made all with hand tools.
    Jerry

  12. #12
    Join Date
    Nov 2007
    Location
    Edwardsville, IL.
    Posts
    1,673
    I always enjoy looking at other's saw and plane tills, as well as tool cabinets in general. Some day.

  13. #13
    Join Date
    Sep 2008
    Location
    N. Idaho
    Posts
    1,621
    Jason, looks great! And Dave, your's is definitely inspiring! Mine's not so fancy, but I did make some improvements this weekend.

    IMG_8173.jpg
    "You can observe a lot just by watching."
    --Yogi Berra

Posting Permissions

  • You may not post new threads
  • You may not post replies
  • You may not post attachments
  • You may not edit your posts
  •