Page 1 of 2 12 LastLast
Results 1 to 15 of 28

Thread: Morris chair

Hybrid View

Previous Post Previous Post   Next Post Next Post
  1. #1
    Join Date
    May 2015
    Location
    Ingleside, IL
    Posts
    1,417

    Morris chair

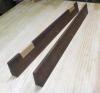
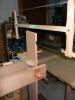
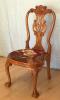
    Moving along on the chairs, even tho pre-finishing has presented some unique problems. Working on the arms and sides and was wondering if anyone ever makes a physical connection between the 2 other than the thru mortises, which, as you can see, are not part of the assembly. Yet. What I was thinking of doing was to make a long 1/4" mortise in the top of the upper side rail and a corresponding mortise in the bottom of the arm and assembling them with glued loose tenons. I'm just kinda curious what others have done with this.

    20200930_162727.jpg 20200930_163044.jpg
    Last edited by Bill Carey; 09-30-2020 at 6:18 PM.
    Stand for something, or you'll fall for anything.

  2. #2
    Join Date
    May 2015
    Location
    Ingleside, IL
    Posts
    1,417
    So, anyway...........

    I decided the arms did need a mechanical connection, which also serves the purpose of aligning the arm with the side assembly. Made the jig you see in the pics with some plexi and jointed poplar blocks and it'll come in handy on many more projects I think. After routing the side rails, and gluing in some loose tenons, I routed the underside of the arms to give me an 1/8" overhang on the legs. Once the arm and side were assembled, I could drill and mortise for the loose tenons thru the arms and into the legs. I couldn't do thru tenons because the legs were laid up around a core or poplar. I'll put a kerf in these tenons before I glue and drive them home so I can wedge them tight to the arms. All this so I can avoid finishing an assemble piece. LOL. And I gotta say, cutting the arc on the side assemblies after they were assembled (and of course finished) was an interesting chore. But i got to use my compass plane again, so there's that.

    20201001_115629.jpg 20201001_121823.jpg 20201001_150540.jpg 20201002_123406.jpg 20201002_131017.jpg 20201002_131058.jpg
    Stand for something, or you'll fall for anything.

  3. #3
    Join Date
    Mar 2015
    Location
    SE Michigan
    Posts
    3,225
    Looking great, Bill. I too go through a few hurdles to pre-finish when I can...I still think it’s worth it, but can add a challenge here and there. Look forward to seeing the rest of the build.

  4. #4
    Join Date
    May 2015
    Location
    Ingleside, IL
    Posts
    1,417
    Got a chance with the backs of these chairs to use my new Ron Bontz tenon saw. What a nice tool. Cuts easily, straight and well. A real pleasure to use. I cut the shoulders on the table saw first, then cut the cheeks with the Bontz saw. Doing this was way more fun than using the tenon jig on the table saw, and better exercise as well.

    20201010_125053.jpg 20201010_125603.jpg 20201010_125757.jpg 20201010_154705.jpg

    They are coming together well. I dry fit them together to get the numbers for the back rest width, and I was more than a little surprised that the distance between the arms at the back rest were identical to a 32nd. So surprised that I did the dry fit twice. Another serendipitous moment was when I was complaining about having to work on a moving blanket because the pieces were all pre-finished and I didn't want to scratch anything, and SWMBO suggested I cut up some of the old bathroom mats. These are great: they are soft on one side and have a rubber non slip surface on the other. A vast improvement when working with pre-finished parts.

    20201005_133107.jpg

    Since I don't have a working lathe, I figured on using 5/8" oak dowel rods as pins, but they'll look kinda plain. Was thinking of getting some 1" or 1 1/4" dowel in contrasting wood to make caps for the pins. Dunno yet.
    Stand for something, or you'll fall for anything.

  5. #5
    Coming along nicely Bill!
    One of these days, I'll spring for a Bontz saw. But first, I've got a jones to buy an original Independence Tool backsaw - again, someday!
    "All that is necessary for the triumph of evil is that good men do nothing."

    “If you want to know what a man's like, take a good look at how he treats his inferiors, not his equals.”

  6. #6
    Join Date
    Dec 2010
    Location
    South Coastal Massachusetts
    Posts
    6,824
    Quote Originally Posted by Bill Carey View Post
    Got a chance with the backs of these chairs to use my new Ron Bontz tenon saw. What a nice tool.

    20201010_125603.jpg 20201010_125757.jpg

    You suck.

    Nice chair, impeccable work - but still.

  7. #7
    Join Date
    May 2015
    Location
    Ingleside, IL
    Posts
    1,417
    Quote Originally Posted by Jim Matthews View Post
    You suck.

    Nice chair, impeccable work - but still.
    at least I didn't include a pic of my Bad Axe dovetail saw.

    The day the Bontz arrived I lost my job and was going to send it back, but the LOML said it was too pretty to send back and she insisted I keep it.
    Stand for something, or you'll fall for anything.

  8. #8
    Join Date
    Jun 2017
    Location
    Landenberg, Pa
    Posts
    431
    Moving right along! Very nice. I’ve done three Morris chairs, I loved working on them. Nice material you have too. What is your finish regimen?

  9. #9
    Join Date
    May 2015
    Location
    Ingleside, IL
    Posts
    1,417
    Quote Originally Posted by William Chain View Post
    Moving right along! Very nice. I’ve done three Morris chairs, I loved working on them. Nice material you have too. What is your finish regimen?
    Thanks gents.

    William:
    I'm not a big fan of the typical dark Mission finish, so I generally do the following on all my QSWO pieces:
    Varathane Dark Walnut gel stain, sanded to 320;
    2 coats of Amber Zinnser Shellac,
    scuffed between coast with purple 3M pad,
    1 coat of 1lb dewaxed blonde shellac (Wellermart), scuffed,
    then about 6 to 10 coats of wipe on poly scuffed with purple pads between coats. Everything is put on with pads - no brushes.

    I aim for something like this, or a tad lighter.:

    20181010_170313.jpg
    Attached Images Attached Images
    Stand for something, or you'll fall for anything.

  10. #10
    Join Date
    May 2015
    Location
    Ingleside, IL
    Posts
    1,417
    Thought I deleted the dark picture. Oh well
    Stand for something, or you'll fall for anything.

  11. #11
    Join Date
    Jun 2017
    Location
    Landenberg, Pa
    Posts
    431
    Nice. I achieved that sort of color with a fuming tent chased with amber shellac. I might go back some time and hit it with a dark paste wax but for now the “customer” is happy

  12. #12
    Join Date
    Dec 2004
    Location
    Cincinnati, OH
    Posts
    924
    Looks like you are mastering the Morris! Beautiful wood and tools and what appears to be excellent joinery. Thanks for sharing.
    Rustic? Well, no. That was not my intention!

  13. #13
    Join Date
    Jan 2007
    Location
    Michiana
    Posts
    3,083
    Quote Originally Posted by Bill Carey View Post
    Thanks gents.

    William:
    I'm not a big fan of the typical dark Mission finish, so I generally do the following on all my QSWO pieces:
    Varathane Dark Walnut gel stain, sanded to 320;
    2 coats of Amber Zinnser Shellac,
    scuffed between coast with purple 3M pad,
    1 coat of 1lb dewaxed blonde shellac (Wellermart), scuffed,
    then about 6 to 10 coats of wipe on poly scuffed with purple pads between coats. Everything is put on with pads - no brushes.

    I aim for something like this, or a tad lighter.:

    20181010_170313.jpg
    Looks like what Stickley calls Fayetteville. Nice finish.
    Sharp solves all manner of problems.

  14. #14
    Join Date
    May 2015
    Location
    Ingleside, IL
    Posts
    1,417
    Finally got one chair done and ready for the upholstery genius in Kentland. These 2 chairs have really kicked my ass. They are very big (and clumsy and heavy) for a small crowded shop and an old fart, so after walking around the first one, I think I'll take the parts for the second one upstairs for assembly, and then call the sons in law to carry it down. Down where I'm not sure cuz the LOML says we have no room for what she calls 2 monstrously big chairs. I may wind up giving them away or selling them. Dunno yet. But it has been a lot of fun crossing it off the old bucket list.

    2020-11-18_21h37_40.jpg
    Stand for something, or you'll fall for anything.

  15. #15
    Join Date
    Apr 2017
    Location
    Clarks Summit PA
    Posts
    1,747
    You did it Bill! A kingly chair...post some picks with some cushy upholstery when you can.

Posting Permissions

  • You may not post new threads
  • You may not post replies
  • You may not post attachments
  • You may not edit your posts
  •