Results 1 to 10 of 10

Thread: Pipe Taps & Die Box

  1. #1
    Join Date
    Jun 2010
    Location
    twomiles from the "peak of Ohio
    Posts
    12,182

    Pipe Taps & Die Box

    Ok...main Tap & Die Box is completed....stowed away. Which leaves a set of T&Ds for threading Pipe...
    Thursday rehabs, pipe cutters.JPG
    From 1/8" (3) up to that huge 1" monster. Sorted through the extra taps....retired 2 of the 1/8" taps, and a 1/4". Tried to work out a way to store all of the "good" ones..
    Pipe tap box, space for the die.JPG
    Came up with this "rack"....strips of pine glued to a Poplar base. One piece of Pine needed to be cut at an angle...to match the "stair-stepped" line up...
    Pipe tap box, big angle finder.JPG
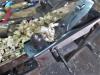
    This seemed to have enough reach.....bandsaw to make a bunch of cuts.
    Pipe Tap Box, cleaned up.JPG
    After this came out of the clamps, this morning.....then some more fitting was done. Chisels to adjust the fit as some spot were a tad tight....pads were added, to raise the smaller taps up a bit. Pipe Tap Box, tap pads.JPG
    But not full length.....so when I push down on the end of a tap...
    Pipe Tap Box, tilt a tap.JPG
    The other end will pop up enough that I can then grab it.

    More crosscuts and rip cuts...
    Pipe Tap Box, blanks for the sides.JPG
    4 blanks for the sides of a box. Intend to groove for a plywood bottom the rack will sit on....and a raised Poplar panel for a lid....will saw the lid free of the box, line it with a black, rust-resistant foam( drawer liner for a tool box)so the foam will just touch the taps. Usual small bits of hardware. There is enough room that I can add any other dies to the box....besides the 1/8" one I do have. Wrenches are in the other Tap & Die Box.

    Need to head to the shop tomorrow, and start the dovetail routine, again.
    Stay tuned

  2. #2
    Join Date
    Jun 2010
    Location
    twomiles from the "peak of Ohio
    Posts
    12,182
    Going to be a "Lay-out Day", today......need to figure out how wide/high to make the four sides of the box....and allow for a saw kerf or two....a couple 1/4" x 1/4" grooves.....a foam pad under the lid....and a raised panel for the lid.....THEN start on through dovetails, once the sides are cut to height needed...Do I split the lid off before...or after the dovetails are done.....

    May take more than one Diet Mountain Dew (sugar free !) to solve all these "problems" , today...

    Stay tuned.....cussing may be involved.....ear plugs may be needed.

  3. #3
    Join Date
    Jun 2010
    Location
    twomiles from the "peak of Ohio
    Posts
    12,182
    Hmmm, may have to lower that huge tap a bit..
    Pipe Tap Box, side laid out.JPG
    And maybe the 3/4" tap beside it.....we'll see....
    Pipe Tap Box, Pins cleaned up.JPG
    Pins are done first..
    Pipe Tap Box, tails done.JPG
    Easier for me to lay out, cut and chop the tails....
    Pipe Tap Box, first corner dry fit.JPG
    Dry fit...need 3 more just like this...
    Pipe Tap Box, 2 corners done.JPG
    Stopped to make sure the rack still fits in there
    Pipe Tap Box, 4 corners done.JPG
    Yep, still fits. The get the Stanley 45 set up....
    Pipe Tap Box, set up for grooves.JPG
    As I have a bunch of grooves to mill...tomorrow.

    3 hours in the shop, today. I think that will just have to do....always tomorrow, right?
    Stay tuned...

  4. #4
    Join Date
    Jun 2010
    Location
    twomiles from the "peak of Ohio
    Posts
    12,182
    Stanley #45 was put to good use..once I set it up...depth stop was a tad too deep...swapped the #18 cutter for the #12 cutter, reset the fence, and the sliding stock..
    Pipe Tap Box, Plough Plane.JPG
    Run all the grooves.and then see how they match up...
    Pipe Tap Box, Groovy.JPG
    One set for the plywood bottom panel to sit in, the other for a raised panel....which I had to mill, this morning..
    Pipe Tap Box, BUSY morning.JPG
    Set up a jig to hold the Poplar panel still for a bit, and round up couple tools..
    Pipe Tap Box, raise a panel 1.JPG
    Idea is to have a stop line to show where to stop a bevel at..
    Pipe Tap Box, a STOP line.JPG
    Going at a diagonal to the grain, a bevel appears....keep going until the grooved part will fit all the way in..
    Pipe Tap Box, fitting a groove.JPG
    Do both end grain ends first, so that any edge tear out will be removed by the time the long grain bevels are done..
    Pipe Tap Box, sharp corner details.JPG
    And you get a nice, sharp corner detail....once all the bevels are milled, and they all fit the grooves...try a dry fit..
    Pipe Tap Box, dry fit raised panel.JPG
    This is the second try....first was a little too long...trimmed the excess off, re-did that bevel. Once I go back to the shop (Lunch Break!) I can fine tune the bevels, cut the plywood panel to size, then a few other items..before any glue up is done.....have to mark where to split off the lid.
    Stay tuned..

  5. #5
    Join Date
    Jun 2010
    Location
    twomiles from the "peak of Ohio
    Posts
    12,182
    Lets see, while watching the Furnace Repair Tech work on my furnace....I managed to get the 1/4" Plywood cut to size, and test fitted. Hole drilled to hold the single die ( plenty of room left for the next ones that may show up) and use that 1" Forstner bit to lower the two larger taps down a bit....bit excavating a trough for them to sit in. Sorry, left the camera upstairs...

    Oh, and found out where to make the cut, to split off the lid...once the box is glued up....Might get the glue bottle out, later?

    I also back beveled the raised panel's edges....better fit that way. Not much of a bevel, maybe an 1/8" wide, or so....

    Stay tuned

  6. #6
    Join Date
    Jun 2010
    Location
    twomiles from the "peak of Ohio
    Posts
    12,182
    Larger taps are now sitting a bit lower...
    Pipe Tap Box, lowered taps.JPG
    Die has it's own spot to call home..
    Pipe Tap Box, dry fit everthing.JPG

    So...I wound up getting out the glue bottle, and a few clamps..
    Pipe Tap Box, glue up 1.JPG
    I think 8 clamps should do the trick...
    Pipe Tap Box, 8 clamps.JPG
    Find out tomorrow. Then cut the lid off the box...maybe add a pair of hinges...and a latch...

  7. #7
    Join Date
    Jun 2010
    Location
    twomiles from the "peak of Ohio
    Posts
    12,182
    Well, this will be a two-parter post....clamps came off about 1400hrs this afternoon....
    Pipe Tap Box, Clean up tools.JPG
    Looking a bit rough around the edges.....planes were on hand to do the clean up thing...
    Pipe Tap Box, side clean up.JPG
    Tried the square plug trick again....wasn't working out the way I wanted it to, so..
    Pipe Tap Box, hole repairs.JPG
    3/8" forstner bit to make the holes round, then a round plug was glued in, and planed flush....makes the corners look like they were "pinned" together...

    Next, was time to split the lid off of the box. Lay out line was 3/4" down from the top edge of the box....checked the bandsaw...had to raise the guide all the way up. Checked if the blade and the table were squared to each other, and lined up with the cut lines on the box....fixed that...then it was all on the Operator to saw the line...
    Pipe Tap Box, sliced.JPG
    At least they will match up when the lid is closed.
    Pipe Tap Box, opened.JPG
    Will work better when I install some hinges, right?
    Pipe Tap Box, hinged.JPG
    And, maybe a latch to keep it closed?
    Pipe Tap Box, Latched.JPG
    Ok...part 2 coming up..

  8. #8
    Join Date
    Jun 2010
    Location
    twomiles from the "peak of Ohio
    Posts
    12,182
    Unlatch the lid, we have work to do..
    Pipe Tap Box, unLatched.JPG
    Spread some glue onto the tap holder, slide it into place, and press down
    Pipe Tap Box, rack installed.JPG
    Lid needs a padded lining...knife to trim it to size, then glue it in place...
    Pipe Tap Box, padded lid.JPG
    Finish sanding and block planed the sharp corners a bit....open the can of Gunstock stain....stain the bottom of the box, first..
    Pipe Tap PIP, bottom stained.JPG
    Turn back over, do the ends, then the back of the case..
    Pipe Tap PIP, hinge view.JPG
    Open the lid...and stain the insides, except for the padding..
    Pipe Tap PIP, inside stained.JPG
    Close the lid, do the front..
    Pipe Tap PIP, front view.JPG
    And then the top..
    Pipe Tap PIP, Top stained.JPG
    Then use a rag to wipe it all down...and let it sit overnight....

    Stay tuned....may try to add a top coat, tomorrow...we'll see...

    Trying to decided on a label holder...the only area bi enough is the lid's raised panel.....have decided against any handles, this time..

  9. #9
    Join Date
    Jun 2010
    Location
    twomiles from the "peak of Ohio
    Posts
    12,182
    Going to try later today, to brush on a coat of clear gloss poly...after I install a card holder on the lid...we'll see.

    Still haven't got the parts to fix the furnace, to be able to have heat in the house....a little nippy in here, this morning....had frost outside...currently in the 40s, outside...

  10. #10
    Join Date
    Jun 2010
    Location
    twomiles from the "peak of Ohio
    Posts
    12,182
    Had a bit of trouble, getting the lid to open, today....spot of varnish..
    Tool box Project Post, opened lid.JPG
    Added a card holder to the lid ( only place large enough...)
    Tool box Project Post, Front view.JPG
    IF you look at the back of the box....
    Tool box Project Post, hinge details.JPG
    hard to see where the line is....had a fine tooth blade on the bandsaw..
    Tool box Project Post, end details.JPG
    That a little better?

    This is part of a set..
    Tool box Project Post, full set.JPG
    Mainly small tools and such....keeps them from getting lost down in the shop...
    Tool box Project Post, label holders.JPG
    Thanks for looking in...

Posting Permissions

  • You may not post new threads
  • You may not post replies
  • You may not post attachments
  • You may not edit your posts
  •