Hello
Material deflection is what I'm guessing what's happening.
Watch Mr Charlesworth's demonstrations.
Honesty is important, and David doesn't shy away from things in this regard.
Have fun
Tom


 Member
Hello
Material deflection is what I'm guessing what's happening.
Watch Mr Charlesworth's demonstrations.
Honesty is important, and David doesn't shy away from things in this regard.
Have fun
Tom
 Member
Originally Posted by Jim Koepke

Jim,
I agree. There is another problem doing two boards faceing, what if you plane a hump in the middle which is easy to do. Then you have two boards with a middle hump, not good. Get a longer plane and check often with square and straight edge.
ken
 Contributor
Been edge jointing by hand for many years. When I am doing a lot of work, I amaze myself with how square my edges are. If I am rusty & having a bad day, my edge trimming plane ( Veritas or LN ) saves the day and makes the edge dead square. Dead square.
Contributor
I have a Veritas jointer fence that I can use on my Veritas low angle jack or bevel-up jointer, but I've often been frustrated by it because to use it, you have to put sideways pressure on the fence, and that's very awkward when using big planes like those.
BUT, this mention of the edge trimming planes gives me an idea. I can just make my own fence from a block of wood with a rabbet, and then clamp it to the side of a small plane. Even a block plane should work.
Then I can use the jointer plane to straighten the edge, and then use the block plane plus fence to make sure the edge is at a right angle to the face. I might try this out tonight.
Contributor
Winston, that will work...this from "Tables" by Anthony Guidice.
jointer jig.jpg
Contributor
I’m really good at taking a 90 degree edge and changing its angle. I use a no 5 for edge jointing, but most panels I glue up are 30” or less. My blade has a tiny bit of camber, just from putting pressure on one side or the other as I finish honing it.
I’ll keep my left hand low, with my thumb on the front of the plane and my fingers as a fence against the piece. I alternate keeping my right hand on the handle or dropping it low around the plane. Not sure which I prefer. Once I get the edge close to straight I just keep checking for square. I don’t try to angle the plane, I just keep it as level as I can and shift it toward the high side. I’ll take a 1/4 width shaving, then 1/2 width, then 3/4 width, then full width. As I get closer I reduce the depth of cut and for the final fine tuning just do 1/2 width then full width.
i definitely think that edge jointing is tricky and takes practice. Sometimes I get it right really quick, and sometimes it seems like I chase the angle back and forth a few times before I get it right.
Contributor
Do a search for David Charlesworth and edge jointing using a cambered blade. A fence can also help: I have used this approach and it does work. Here is one link I found to David's approach:
https://www.youtube.com/watch?v=y1ztIO6RAYU
 Member
Matchplaning is also the way I was taught.
I like to leave a slight gap in the center of the span, with both ends touching.
Search : sprung joint

 Contributor
BEFORE you run the plane along an edge.....lay the straightedge along the side, and draw a straight pencil line, on BOTH faces of the board. Start from the same point at each end, so the lines will be parallel to each other.......plane along until you barely nick the pencil lines, then check where you missed the lines.
Clamp the board as low as you can....hard to stay level with your elbows flapping in the breeze at shoulder height. The wrap your thumb over the edge of the plane, instead of around that knob....The other 4 fingers are under the plane, use those as your fence..as you can feel any tilting going on.....do not try to go the entire length in one pass, if you have to move your feet to do so, stop, move your feet and then start pushing again....
I have a habit of resting my right elbow on the heel of the plane....I find I can keep pressure there better, when I am near the "far end"......elbow also helps when I lift the plane up to bring it back to the start point.
Take a couple passes, stop, look at those lines, check with the straight edge on top of the edge...looking for gaps. Have been known to just lay a 48" level on the edge....to check for low spots...high spots are easy to find, a finger on each end, and press down.....if you get a see-saw effect....high spot is the pivot...
Sometimes...you can actually use too long of a plane.....where it will only cut the 1 or 2 high spots, and miss everywhere else....in that case, a smaller plane to lower just those high spots, then a pass or 3 with the long plane to finish it up. Plane until you just nick the lines.
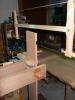
Contributor
Well, that was easy. I had this scrap of baltic birch laying around. I planed one side to get it really flat, cut a rabbet on that side, and then used a router plane to ensure the rabbet and face were parallel. (Of course, even if they're not exactly parallel, or if your plane has sides that aren't quite square to the sole, you can compensate by adjusting the blade laterally.)
Not the prettiest thing in the world, but it seems to work pretty well for squaring an edge square to a face.
IMG_3570.jpg
Like I said earlier, I have a fence that I can use on my big Veritas planes, but I've always found it difficult to keep enough sideways pressure on it so that the plane stays in the correct orientation. If you've tried to use a fence on a big plane, you probably know what I mean. It doesn't help that my workbench is viseless, so I have to use other fixtures to hold a board standing on edge.
Anyway, this seems to work in my quick testing: plane the edge straight using a jointer plane, and make it close to square to the face. Then use this small plane plus fence to get it really square. In some cases the edge might need another pass from a jointer plane to make sure that it's still straight, but if the plane is adjusted well, that shouldn't put it out of square to any significant degree.
 Contributor
There are ways to hold a workpiece securely on edge without a vise:It doesn't help that my workbench is viseless, so I have to use other fixtures to hold a board standing on edge.
In To The Claw.jpg
A batten parallel to the front edge with another piece at an angle secured by dog holes can also be a way to hold pieces on edge. Depending on the set up a wedge may be needed.
These alternate ways can be handy when doing a lot of edge planing since it is much faster to change out a piece than having to work a vise every time you change the workpiece.
jtk
"A pessimist sees the difficulty in every opportunity; an optimist sees the opportunity in every difficulty."
- Sir Winston Churchill (1874-1965)
 Contributor
Don't know if this helpful or not but I try to match plane all the edges I can. Seems to eliminate certain a certain class(es) of problem.
[OP]
Member
Gonna try some of these ideas this weekend. To clarify, I'm trying to decide if I want/am good enough to be a neanderthal. The way I read it, if I can mostly make the 409 work, then it's time for me to pick up a #7 or a #8. I don't want to spend money to compensate for a deficiency in technique. Another thing I should mention....I had carpal tunnel surgery 2 years ago. While I can now drive a keyboard (my day job) with no pain, I lost a significant amount of wrist strength and hand endurance. That ship has already sailed and its not getting fixed. I can earn a living but have limited endurance for holding a 5lb plane level while shoving it back and forth. Do you think bookmatching (in effect widening the surface I'm jointing) might help me out here? On another note it looks like I can get into a class in April 2021! I've been obsessively lurking the online and estate sales...no planes worth anything have turned up in months, and bad experience in the past prevents me from going the ebay route to get a jointer.
Member
How are you holding the work?
Nothing to stop you planing edges on the flat when you need, just like a shooting board.
I do this for narrow stock.
Raise the work up off the bench a bit to centre the edge with the camber and clamp the work down.
You could go all fancy and make a long edge shooting board something like what Derek Cohen has, the principal is the same.
All the best
Member
Thomas,
I do not have carpal tunnel and metal #7 or #8 planes are too heavy and hard for me to push around. My answer is wood stock planes, much lighter and easier to push across wood. The thought of actually using a LN #8 for more that a couple or three passes would make me run to my machines to do the job. If the job calls for a plane longer than a #5 the wood stocks come out to play.
ken
 Posting Permissions

 Reply With Quote