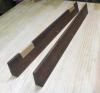
Results 1 to 12 of 12

Thread: Another installment of the Demilune table

  1. #1
    Join Date
    Mar 2015
    Location
    SE Michigan
    Posts
    3,225

    Another installment of the Demilune table

    It’s been months since working on this. Covid held me up in sourcing wood for the legs. I could have mail ordered, but I really wanted to see it live before committing. I was walking through the local Woodcraft and saw a nice 12/4 piece of Brazilian Cherry that had some nice rift sawn edges. I thought it would match well with the Brazilian Rosewood top and aprons.

    Anyway, I’ve posted before on the top, steam bending, and making the sand shaded ovals and fan.

    After plenty of procrastination, I decided to tackle the bridle joints for the leg/apron.

    The apron was marked out, taped and the usual saw kerfs, chisel chopping to get to rough size.

    37BD2226-D45C-4494-85F6-F2230F11A3BF.jpg 4D2EA16F-0C70-465B-9B4C-3ECC9D6780EF.jpg

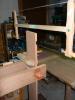
    I then made a cardboard template to help mark the lines for cutting the legs, that would give me the outside reveal I wanted (showing it after the fact, didn’t get a before pic)

    C7114604-9C54-4EA7-BF2D-38879C0CDD30.jpg

    I thought about a Japanese saw, but ended up finding a western rip saw worked best.


    88D0DEB9-FCFF-4E2D-8EFD-552407FC8412.jpg

    Then a quick cut with a fret saw and clean up the base with a few chisels

    0A5CB062-EA8D-431A-B661-9B8D5AB98C26.jpg

    I found a good use for my plane float...did a great job fine tuning the “tenon”

    9A0041A5-65F4-45B6-A3F2-72808EE109DF.jpg

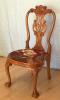
    Not perfect, but not bad results.

    4316066F-3C00-4DF6-A760-9523939F5816.jpg

    Lots of work left to do. Back legs next, then tapers, then inlays, then....

  2. #2
    Join Date
    Apr 2017
    Location
    Clarks Summit PA
    Posts
    1,744
    It is starting to come together Phil, and I get the feeling it will be splendid when finished. Keep us posted.

  3. #3
    Join Date
    Dec 2010
    Location
    South Coastal Massachusetts
    Posts
    6,824
    I would be reluctant to mar that perfect curve, too.

    This will be a beauty.

    Kudos

  4. #4
    Join Date
    Mar 2015
    Location
    SE Michigan
    Posts
    3,225
    Thanks gentlemen. Jim, it’s why I procrastinated so long...I really didn’t want to have to make another apron!
    Not sure if it was noticed, but my original picture had the left side leg inserted backwards...glad it wasn’t being glued up.

    Here’s a corrected photo

    1876112A-3299-41EC-8B75-309EEB8D8B7B.jpg

    Let me add also, that this is one of those projects where you think about what has the highest risk of error. For the legs, I have plenty of material to redo. For my experience and skill, I was most concerned with the bridle joint, as I have never done that before...so if I messed up a leg, I wasn’t too far along to make a new one. Next up is to M&T the back two legs and make the back apron. Then, I think, is to carve the recess for the oval fan inlays. But then again maybe shape the legs first (taper and bottom detail). Bottom will be similar to this profile (middle one):

    D40A2C76-86CE-4185-959C-853FB5709406.jpeg

    Plenty of opportunity to mess that up as well. Looks like a lot of chisel work to fine tune the taper and transition to the bottom profile. It’s feeling like another opportunity for massive procrastination
    Last edited by Phil Mueller; 09-24-2020 at 9:42 AM.

  5. #5
    Join Date
    Jun 2012
    Location
    Lubbock, Tx
    Posts
    1,490
    It’s looking really great!

  6. #6
    Join Date
    Feb 2011
    Location
    Carlsbad, CA
    Posts
    2,230
    Blog Entries
    2
    Looking great Phil. You’ve pick a real classic design and I look forward to eagerly following you r progress. Thanks for posting!

  7. #7
    Join Date
    Dec 2010
    Location
    South Coastal Massachusetts
    Posts
    6,824
    Quote Originally Posted by Phil Mueller View Post
    Plenty of opportunity to mess that up as well.
    You won't. That's your common sense, cooling your jets.

    Quote Originally Posted by Phil Mueller View Post
    It's feeling like another opportunity for massive procrastination
    Again, this is an ambitious project that rewards the cautious and methodical.

    It's also why I'll never build one!

  8. #8
    Join Date
    Mar 2015
    Location
    SE Michigan
    Posts
    3,225
    Belated thanks all! The snow is starting to fall, so shop time is in order. I got around to fitting the ovals into the legs. I found it best to tape the end, mark the center points and then knife around the oval. The tape edge is much easier to route to than a pencil line. Burned a few electrons roughing out the majority with a trim router, then free hand up to the tape edge with a dremel. A little fine tuning and a pretty good fit. Any gaps will eventually be filled with either the hyde glue or hot melt shellac.


    355FF7D2-EFDC-4B89-8CD1-FFACA9C9C5E0.jpg 7D1369AE-6584-4726-9686-F1836BE017BA.jpg DD50AE86-DD8A-40C0-AF39-FC222768306D.jpg A9FD85D9-5823-456C-8D67-3543411C9A78.jpg

  9. #9
    Join Date
    Sep 2008
    Location
    N. Idaho
    Posts
    1,621
    Looks good Phil, glad to see you back in the shop. And the magic of blue tape never ceases!
    "You can observe a lot just by watching."
    --Yogi Berra

  10. #10
    Join Date
    Jul 2015
    Location
    Broadview Heights, OH
    Posts
    714
    Phil,

    Is that a regular dremel with some sort of precision aftermarket base? Interesting way to solve that problem.

  11. #11
    Join Date
    Apr 2017
    Location
    Clarks Summit PA
    Posts
    1,744
    Fine detail work Phil. Thanks for showing your methods.

  12. #12
    Join Date
    Mar 2015
    Location
    SE Michigan
    Posts
    3,225
    Hi Pete, yes, it’s a base from Stew Mac that is made to fit/screw onto a regular dremel. Stew Mac also offers router bits with the dremel size shanks. I used a 1/16” bit. It makes it nice to dial into a precise depth. But, let’s just say you don’t want to have too much coffee before free handing it.


    53645584-E97C-4A41-B1E0-454D5508F427.jpeg

    Thanks Christopher and Mark...slowly but surely moving forward. Enjoying the zen detail work.
    Last edited by Phil Mueller; 12-01-2020 at 5:44 PM.

Posting Permissions

  • You may not post new threads
  • You may not post replies
  • You may not post attachments
  • You may not edit your posts
  •