Phil: thanks for the kinds words. Phil
Originally Posted by Phil Mueller


 Contributor
Phil: thanks for the kinds words. Phil
Member
Thanks, Phil. I was mostly being self-deprecating for the sake of humor.
Your piece is gorgeous and gives us something to aspire to.
Great work.
Contributor
Nathan: thanks again: humor went way over my head. Phil
 [OP]
Contributor
[OP]
Contributor
Phil, great work, particularly with the grain selection and finish. And enjoyed seeing the process on that other forum.
I'm finally getting the shop put back together. I made a coat rack out of walnut and old-stock brass hangers. Laid out for 6 hangers and then discovered I only had 5! The rack is shorter now... The only other part worth a mention is the walnut is screwed to the wall and two of the coat hangers cover the screws, so it will be a challenge to take down unless someone figures out the 'secret'.
I've replaced the climbing wall and rearranged the tool wall as well, including building another panel for chisels and my cheesy plane till and cubbies. Starting to come together finally
IMG_8173.jpg
IMG_8167.jpg
"You can observe a lot just by watching."
--Yogi Berra
 Member
Chris,
Looks great but what is this looking so organized and clean?
All I can say is your Mamma taught you well.
ken
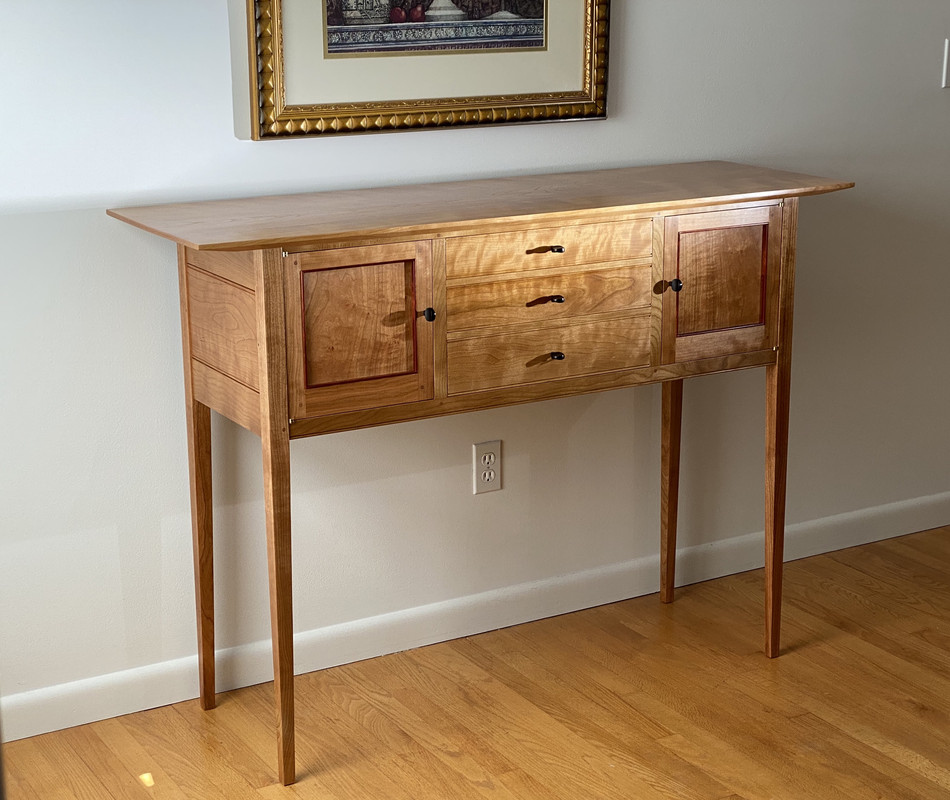
Absolutely fantastic- one of my favorite designs! I love the contrasting beading, pulls and pegged M&T's. Is that Birch? Garret Hack would be very proud!
Moderator
Phil: You should start a separate thread for this. Would like to know more details. That is just marvelous. It's exactly the type of work I respect most: great wood choice, tight joints, and subtle details that don't jump out at you but still indicate the extra care taken: knife hinges, beading. Long under bevel on the top.
Contributor
Prashun: Thanks much! I chronicled this build over at woodnet (over 16,000 views to date). Yes I would be happy to post with some details. Give me some time to put something together. Best Phil
 Contributor
Almost done with the next box..
Chisel bos stained, hinge side.JPG
Chisel box stained, handle end.JPG
Chisel box stained, latch side.JPG
Chisel box stained, lid view.JPG
Just to hold these...
Chisel box stained, inside done.JPG
Waiting on the stain to dry, before a clear gloss top coat can go on....wood is Poplar, BTW...
Contributor
Almost ready to paint. I need to let the glue set up on the last two drawer pulls, then I can flush them up and do the final sanding, easing edges, etc. I left the drawer faces just a tiny bit proud of the face and put a little bevel around them. I think I like that detail and Ill keep doing it when Im doing simple flush drawers. I thought I had a big enough piece of plywood for my drawer bottoms, but it turned out 1/2 too short in either direction for my last drawer. So, Ill have to get another piece. This also means I have a lot (for me) of 1/4 ply laying around. I may make some little trays and boxes to organize camping gear or tools and use up the ply.
Im planning to take the bottom slats off and paint the main body and drawer faces with blue milk paint. Ill probably just oil the slats with boiled linseed oil and call them good. When I put them on I made little spacer blocks to get consistent gaps. I worked in from both sides and stopped when I was halfway done. My little errors had added up enough that I could tell the last few slats would have a visibly different spacing (probably about a 1/8) so I made some slightly bigger spacers for putting in the last half of the slats. If I had it to do over again I would start in the middle and work outwards, so any little errors that added up would just end up in the gaps outside of the outermost slats.
I have some 6/4 maple for the top. I may be able to get enough width from one board cut into three. If that leaves me a little bit short Ill use a fourth plank at the back and probably stand it on edge to give myself a 1 lip at the back to keep things from rolling off the back.
C193B86A-C07C-4E74-B8F5-582FD3ABA3CA.jpgBEFB9543-E033-4137-9712-787F494C00AF.jpg
Contributor
All done. The top glued up pretty nicely and didn’t take too long to get flat enough and pretty enough for a work bench (table?). The board had a long curve in it, so I had the middle piece flipped opposite of the two outer pieces. They counteracted each other and the overall top was pretty straight when I took the clamps off. Edge jointing a 42” top with a #5 takes a little care. I had to do a couple rounds of checking the edges against each other and taking out high spots. I had a slightly sprung joint that tightened up nicely with the clamps.
i painted it with two coats of milk paint then finished with BLO. I’m becoming a big fan of that finish. I can just see the grain poking through in spots, but for something like this I kind of like that effect. For something more polished I’d put on another coat or two to get a more consistent color. I just oiled the top with mineral oil. I mixed the milk paint powder at 1:1 with water, but I may try mixing it a little thinner next time. I may also do more stirring and less shaking. It is pretty foamy and I liked the consistency of it much more when I did the second coat. The paint had time to sit longer and I stirred it before starting the second coat, instead of shaking it.
now I can open my toolbox all the way! Before it was sitting on wire shelves and I couldn’t open the top compartment all the way. Having a few drawers to organize odds and ends will also be nice. I had one board that was just long enough to use for some shelves that will go over this. I’ll finish them up and get them hung in the next day or two.
04113E03-AA3A-4B58-93AA-8F2950A5AFAB.jpgA23D4571-A574-43BF-8EEC-9040FCF6FEB4.jpg
Contributor
Nicely done.
Member
Very nice Ben
 Contributor
That's a nice slab of Red Oak!!!! ENVY here.
Jerry
Member
I'm making a model of the Treasury Building of Petra, Jordan for the MN State Fair 2021. It was for 2020 but I pulled the crew (me) when that was cancelled. Approximately 20 X 30", it is the right size for my diminished strength.
 Posting Permissions

 Reply With Quote