


I just finished up a counter/sink combo for outside next to the BBQ grill to make grilling a little easier. Less running into and out of the house.
Its all cedar, which I had never worked with before. Im sure it will take a lot of dents, which Im not particularly thrilled about, but it will hold up to our weather which is hot and ridiculously humid summers and snow in the winter. Because of the pandemic I was limited to what I could get at the local home center, so this is what I went with and it was relatively cheap which is always one in the plus column.
The build is fairly self-explanatory just looking at the finished project (see last pic). Its all M&T with pins on the tenons because I dont fully trust TBIII to last all that long out in the weather (although it will have a cover when not in use). A rabbet for the bottom shelf, and wood buttons to hold the top down. I dont have too many pics, but I have a few that might be of interest.
First is that, because its just cedar and theres a sink on one side (which could get heavy filled with water), I needed a center support piece. I chose to do that with a stopped dado that goes halfway down the front/back skirts (skirt is 3-1/2 inches or close to it). The center brace has the corresponding notch. Because this creates a weak spot in the groove for the buttons that hold the top, I glued in little strips to fill in the groove on either side. The groove was done with a shopmade grooving plane that cuts a ¼ wide by ¼ deep groove that is ¼ away from the edge. The nice thing about that is that if you need to fill in a groove (or plug a through dovetail on a box), you just grab a scrap and cut a groove on two surfaces and bingo, you have a ¼ x ¼ strip of wood that pops out and fits perfect.
sink 1.jpg
The dado will support pressure from above, but I also put a groove in the center support to keep the top from separating in the middle. That would be really annoying if I were chopping veggies and hearing the top slap against that support. So the top is also button clipped to the center support and that means I needed a way to keep the center support from being pulled up and theres only a tiny little area for long grain to long grain glue. This pic doesnt show it very well, but you can see that I added some glue blocks to the center support at the very very top center of the pic. Anticipating absolutely ridiculous amounts of wood movement, I made them very short as they are cross-grain.
sink 2.jpg
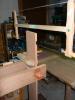
Cutting the sink hole was a real head scratcher for a while because I dont have a keyhole type saw (well, I do, but it is absolutely worthless and I dont know why I havent thrown it out). But just when I was about to cave in and plug in a jigsaw, I discovered that my turning saw could just barely clear the edge on three sides! For the interior side I was able to cut far enough in that I was able to finish with a small Japanese pull saw.
sink 3.jpg
The bottom slats fit in a rabbet that runs along the stretchers. I did the two outside edges with a rabbet plane and then for all the ends I did them like a half-tenon meaning that I cut down to the line and then split off the waste with a chisel. It was a lot faster than setting up the combo plane. The slats have large gaps so that no leaves or other crap can get caught in there rotting away. The slats are about three and a half inches wide and, again anticipating ridiculous wood movement due to living outside in our wild weather swings between summer and winter, I only glued them for about an inch in the center and then drove little brad nails on either side. In theory the brad nails will easily bend if and when necessary.
sink 4.jpg
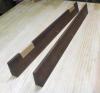
The finish was spar urethane for the elasticity and the ends of the legs have a solid 1/8 of epoxy to keep them from wicking up water. As added safety for the legs, they sit on stubby little plastic feet. We get wicked downpours here that easily flood the patio so I just tried to do everything I could to protect the end grain. I keep mentioning wood movement, but I was so concerned about it I coated EVERYTHING with spar urethane to try to keep things from warping.
sink 5.jpg
Here it is hooked up and once the wife gives final approval on location Ill cut all the plumbing to length and dress them as best I can. Its a fairly simple design as I didnt want to put too much effort into an outdoor piece that will have a limited lifespan; but Im very happy how it turned out and it looks better than I initially envisioned.
sink 6.jpg

 Reply With Quote


 I wish I would have thought about an outdoor plumbing hookup when we had our house built. It looks great!
