Results 1 to 15 of 15

Thread: Confirmation of my process??

  1. #1
    Join Date
    Jan 2017
    Location
    Texas
    Posts
    36

    Confirmation of my process??

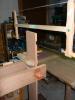
    Despite thinking I was careful with my clamping pressure, I ended up with cupping in my desktop, as shown in the picture, so I plan to:
    1. Continue with my no. 7 across the grain until I get full shavings from one long edge to the other then
    2. Diagonal passes in both directions? With the no. 7? I also have a no. 62 LA jack plane? Then
    3. Passes with the grain until I get full shavings with each pass? No.7 or no. 62? Then
    Do I flip it over and go through all the same steps? Will these steps cause excessive thinning in areas? Or should I be more focused on perfectly flat surfaces more so than worrying about thinning areas too much?
    Can I get a finish ready surface with the no. 62?
    I don't have a smoothing plane and would rather not spend the $300 or so for a no. 3 or 4 at this time if I don't have to.
    This is my first attempt at hand planing on something that isn't scrap and I'd like it to not become scrap when done.
    Any confirmation on the above steps or suggested changes are truly appreciated.
    Jeremy
    Attached Images Attached Images

  2. #2
    Join Date
    Oct 2004
    Location
    SoCal
    Posts
    866
    If clamping for a day or two between cauls does not flatten the top and you do not feel as though the top will be flat when mounted, this is what I would do.

    Start on the high (convex) side and mark the high spots. Plane off the high spots with your hack plane. Rinese and repeat until you cannot find more high spots. Then use your jointer to achive final flatness. Flip the top and repeat the process. Then kee[ the top stickered and/or cl[am[ed between cauls until ready to mount.

    At some point, you need to acquire a smooth plane - # 3 or # 4. Read Christopher Schwarz' "Coarse, Medium, Fine" for a superb description of each plane's role,

  3. #3
    Join Date
    Mar 2006
    Location
    Austin Texas
    Posts
    1,957
    What Curt said will work. I believe you can get a finish surface with ether the #7 or the 62 as long as you get it sharp-sharp and set it for a very light cut. Basically, that is what you do with a smoother. I suppose you could get something too thin with your plan, especially if you have a bad bow and are determined to get it dead-on flat both sides. Looking at your photo, it is difficult to guesstimate the amount of bow. IMO, it is not always necessary to get all of the bow out on a table top because nothing is going to be joined to it. If it is a noticeable bow that you want to remove, I would work it cross ways first, then (if it was not all that much off) go ahead with the #7 following the grain. I'm thinking a full bore crossways-diagonal both ways-jointer with the grain regimen on both sides could get you in the too-thin territory. The too-thin needs to be avoided on the edges where it will show. If the bow is centered down the middle of the entire top, maybe take some/most of the bow off with some cross work, then have a look at it and see if the remaining bow is noticeable. I definitely would not get hung up on a few thousandths out.
    David

  4. #4
    Join Date
    Dec 2010
    Location
    South Coastal Massachusetts
    Posts
    6,824
    Before you do anything else to the top, have you already built the rest of the desk?

    My experience with hand made panels is that they're unstable for several days when humidity is high.

    If the rest of the desk is yet to be built, leave the top somewhere on "stickers" to normalize.

    ****

    There's a strain of woodworking that attempts to emulate machining metals, a degree of precision that is geometric in ideal, but may not be practical.

    TL;DNR - if a pencil doesn't roll on your desktop, it's flat enough to use.

  5. #5
    Join Date
    Jan 2017
    Location
    Texas
    Posts
    36
    Thank you Curt

  6. #6
    Join Date
    Jan 2017
    Location
    Texas
    Posts
    36
    Thanks Jim.
    This isn't a "normal" desk. My wife wanted steel forged legs that she found online.
    It will just be this top on the legs. No drawers or anything else.
    Based on your thoughts though, I think I'll stop planing and get the legs all but attached then finish the planing and apply the finish and screw in the legs. While working with the legs I'll clamp it down as Curt suggested.
    Thanks again for your reply.
    Depending on how it looks maybe I'll post a finish picture.

  7. #7
    Join Date
    Sep 2007
    Location
    Longview WA
    Posts
    27,430
    Blog Entries
    1
    This is also my thoughts on this. Sometimes glue can cause swelling at the joint line which could be the cause of cupping. Let it set a few days before doing anything.

    jtk

    Quote Originally Posted by Jim Matthews View Post
    Before you do anything else to the top, have you already built the rest of the desk?

    My experience with hand made panels is that they're unstable for several days when humidity is high.

    If the rest of the desk is yet to be built, leave the top somewhere on "stickers" to normalize.

    ****

    There's a strain of woodworking that attempts to emulate machining metals, a degree of precision that is geometric in ideal, but may not be practical.

    TL;DNR - if a pencil doesn't roll on your desktop, it's flat enough to use.
    "A pessimist sees the difficulty in every opportunity; an optimist sees the opportunity in every difficulty."
    - Sir Winston Churchill (1874-1965)

  8. #8
    Join Date
    Jan 2017
    Location
    Texas
    Posts
    36
    Thanks david and jim k as well. So much great information. this site is great!
    Will look for Schwarz' book too.

  9. #9
    Join Date
    Apr 2015
    Location
    New England area
    Posts
    588
    It's most important to get the side that registers to the aprons or undercarriage out of twist and flat. If you try to mount the top and the bottom of the top is not flat then you will likely pull the understructure into twist. If the article doesn't have drawers it's not as big a deal, you'll have legs to trim to make it sit flat on the floor. But, if there are drawers, shelves, etc. you need to top to go down flat. If getting the bottom of the top flat doesn't leave you with enough thickness to flatten the top of the top (tongue twister alert!), it would look ridiculously thin, then the only thing to do is make another.

    Go through the whole exercise, it'll benefit you later even if you end up having to make a new top.
    Last edited by Charles Guest; 06-22-2020 at 7:33 AM.

  10. #10
    Jeremy, your process is guaranteed to take off more than necessary. Here is an example:

    Suppose the board has a slight wind and the near right and the far left corners are low. Then planing the high corners diagonally would be helpful. Planing the low corners diagonally would make it worse. Your scheme to plane both diagonals will certainly take off wood where it is already too low.

    Planing cross grain leaves a rough surface that needs more planing just to clean up the mess. You propose planing cross grain until there are continuous shavings. In other words you are planing even the low spots with rough planing so that they need to be made even lower to clean it up.

    These kinds of schemes are made up by people who are used to machine processes.

  11. #11
    Join Date
    Feb 2004
    Location
    Perth, Australia
    Posts
    9,491
    Quote Originally Posted by jeremy romoser View Post
    Thanks Jim.
    This isn't a "normal" desk. My wife wanted steel forged legs that she found online.
    It will just be this top on the legs. No drawers or anything else.
    Based on your thoughts though, I think I'll stop planing and get the legs all but attached then finish the planing and apply the finish and screw in the legs. While working with the legs I'll clamp it down as Curt suggested.
    Thanks again for your reply.
    Depending on how it looks maybe I'll post a finish picture.

    Jeremy, I suspect that the table your wife saw had a top made from veneered manufactured board (MDF or Ply). Solid wood will move unless reinforced, and a table made of a thin top without any support is just waiting to twist or cup. So, even if you flatten it, it is not going to remain that way.

    I suspect that the best you could do is glue and screw hardwood cross pieces at each end (note that the braces would need to be deeper than wide to resist bending). Preferably, the cross brace would be held with a sliding dovetail, but I am not sure if you will have the thickness for this. The legs could attach to the cross braces.

    Regards from Perth

    Derek

  12. #12
    Join Date
    Apr 2013
    Location
    Stone Mountain, GA
    Posts
    751
    Agree with those that said to let the table rest on stickers/cauls for a few days and then assessing how bad the cup is. It's difficult to get a wide panel like this truly dead flat across, and then they don't like to stay that way. If the cup can be easily pressed out with hand pressure then I'd usually assume the frame it is attached to will keep it flat enough.

    If you decide you need to flatten it, think about what Warren wrote above. Figure out where the high spots are and plane those, stay away from the low areas. Plane along the grain mostly, you can still take out cup this way by planing the high edges (or high center on the reverse side). This will save you the step of having to come back and remove cross-grain furrows and tearing. Another tip is to use little wedges to support the high areas while you are working, where the underside is not touching the benchtop. If you don't support those areas the panel will flex under the plane and you won't be able to remove wood where you need to.

  13. #13
    Join Date
    Aug 2012
    Location
    Missouri
    Posts
    2,152
    Jeremy
    4 things I would suggest: Never let a glue up dry laying in full contact on any surface even if a flat surface. As Warren said, work the high spots not the whole top. Work the bottom side at the same session as the top. When you get it done sticker it so you get air circulation all around.
    it doesn’t look to be very far off from your photos.

  14. #14
    Join Date
    Mar 2015
    Location
    Virginia
    Posts
    1,211
    Quote Originally Posted by jeremy romoser View Post
    Can I get a finish ready surface with the no. 62?
    I don't have a smoothing plane and would rather not spend the $300 or so for a no. 3 or 4 at this time if I don't have to.
    Jeremy
    You don’t have to spend 300 dollars. You can get a decent smooth plane for a lot less than that.

    I have never used the low angle planes. Unless you have cambered the iron for your No. 7, you can set that up to leave a pretty good finish. Get it sharp, set for a fine shaving, and go.

  15. #15
    Join Date
    Jun 2007
    Location
    SCal
    Posts
    1,478
    Good comments on waiting, thats always the least painful way out, if it works...
    If that fails... I think Dereks suggestion is best.... just be sure you use a really hard wood to resist IT from flexing. There has been times I use thick angle iron if it will not be seen. It is super strong. Of course, if the wood grain and how joined is not favorable, and the wood wants to move bad enough, if the angle iron wins, the wood will crack, the stress must go somewhere. Even if you use straightner, drill way bigger holes vs. the screw width, to allow movement to occur...the goal is to keep it flat, not keeping it in a fixed position.

    Dont feel bad, this is a hard task. Wood is not our friend quite often, it loves to move, the larger the board or panel, the worse it gets.

    But for something like this, wood selection is the key...near perfect 90 deg end grain vs. the flat sides, i.e. rift sawn should be mandatory if you really want long term success.
    then, dowel between the boards for glue up, as the dowels are NOT needed for strength but for long tops like you have made, tight dowels are incredibly effective at preventing bowing when clamping pressure is applied.
    Next, if you have them, long cauls or even better, angle iron clamped down across the glue lines...then enough clamping pressure to get seamless joints, no more. And even if you succeeded, it can move long after...but IMO, that would be your best chance if your desire is to stick with real wood.

    As Derek mentioned, here is the wonders of MDF and veneers. Getting creative with the edging can create some gorgeous outcomes and dead flat tops for years n years.

    BTW, I dont see how a smoother can benefit you here. IMO, for large panels like this, your jack should be your smoother, you need as much reference surface as possible. Sharp blade and thin shavings, is the smoothing process.

Posting Permissions

  • You may not post new threads
  • You may not post replies
  • You may not post attachments
  • You may not edit your posts
  •