Page 2 of 3 FirstFirst 123 LastLast
Results 16 to 30 of 36

Thread: unboxing a heavy contractors sawstop and getting on the stand by myself

  1. #16
    Join Date
    Apr 2018
    Location
    Cambridge Vermont
    Posts
    2,290
    I picked up one of those 2 ton engine lifts from HF after years of not wanting to store one. What I found was that it's very useful. I was in the process of putting mobile bases under my equipment but now I just use the engine hoist. I just lift up the tool in question and then put a couple of 2x4s on the legs and set it down so I can roll it where I want it. Since finding this works for my I modified the folding legs to make it easier to lift up equipment. My question would be is this going to be a one time thing or will you find more uses for it.

  2. #17
    Join Date
    Dec 2005
    Location
    West Lafayette, IN
    Posts
    6,530
    You should post a pic of it how it is now. The whole saw only weighs 225 pounds.

  3. #18
    Join Date
    Apr 2013
    Location
    Kansas City
    Posts
    2,667
    I used chains and a hand operated chain hoist from Harbor Freight, I think it was $50-60, attached to an I-beam in my basement. Lifted the motor assembly into the housing, then onto the leg assembly which was in the mobile base. Lots of maneuvering to line things up. I understand the thing about the dust collector housing sticking out.

  4. #19
    Join Date
    Jan 2010
    Location
    Tampa Bay, FL
    Posts
    3,928
    I bought a Harbor Freight electric hoist and mounted it on the ceiling, screwing it to joists. Then, with a few straps, push of a button, and it lifted up quite nicely. I used that hoist so much, that when I moved, I had my electrician install 3 additional hoists in my new workshop (better quality, not HF, higher lifting capacity). Thrilled that I have them. I actually keep my heavy, large crosscut sled hanging from the hoist over the outfeed table of my ICS. When I need it, I just lower it. No manual lifting of the bulky, 50 lb crosscut sled.

    Of course, installing the hoist on the ceiling is no joy, but a lot less heavy than the Sawstop contractors saw.

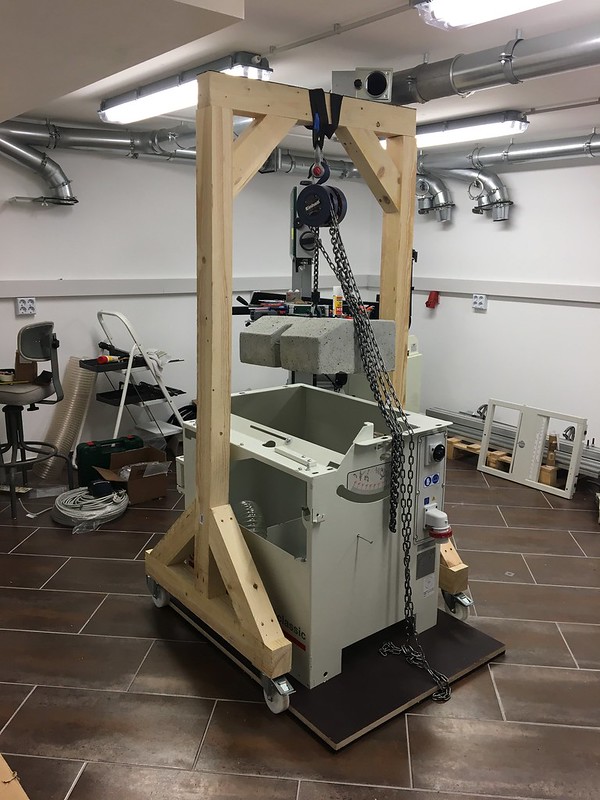
    One thing I used for the Jet Air cleaners was to hook up chains from the ceiling hooks to the screw eye bolts on the Jet. One by one I went corner by corner and reduced the chain length one link (or a few) with caribiners. Then the other 3 chain links. Before you know it (actually it takes a while, but you don't have to go up to the ceiling), you've lifted it up.
    - After I ask a stranger if I can pet their dog and they say yes, I like to respond, "I'll keep that in mind" and walk off
    - It's above my pay grade. Mongo only pawn in game of life.

  5. #20
    Join Date
    Dec 2006
    Location
    Corcoran, MN
    Posts
    372
    I have the same problem. I'm old and weak. A few years ago I bought a chain hoist and suspended it from a joist in the shop to permit me to lift a Ridgid jointer a few inches to a platform on wheels. I used nylon slings as I recall. It worked well and neither my pride nor myself was damaged.

  6. #21
    I had to tackle this very problem a month or so ago. I ended up using some well secured ratchet straps that were wrapped around the exposed ceiling joists of my garage. I set up the straps so when they were tightened it lifted one end off the styrofoam. Once it was mostly lifted I just tilted it a little bit and it stood upright. I didn't have a pully/winch at the time so this worked well enough for me.

  7. #22
    Join Date
    Nov 2007
    Location
    NW Indiana
    Posts
    3,086
    I have a HF engine lift and straps. It folds up nicely and works very well. I got it on sale and has been worth every penny.

  8. #23
    Join Date
    May 2014
    Location
    Alberta
    Posts
    2,162
    Have you thought of just assembling the base to the saw upside down ? Then it would be just a matter of tipping it in two stages to get it upright.

  9. #24
    I am 64 and refuse to admit being weak. But the surgeon that repaired my last hernia (over 10 years ago) cautioned me to be more careful. He said I am all meshed now and there isn't much they can do if I overdo it and get another. Long way of saying I limit myself to 100 lbs consistent with his guidance.

    I got my PCS on a pallet in my trailer which was pulled by my convertible. I set it up by myself. I partially unboxed it in the trailer. I built a mobile base for it to get it to a more comfortable height (38 inches) so I tilted the cabinet out of the trailer onto the mobile base. From there I could walk it into position. I had to remove it from the base a couple times to address issues so I walked it onto the crate it same on and then back onto the mobile base. Wasn't even that hard. Putting the cast iron extension tables by myself was harder but I managed.

    I'm not sure how I would do the contractor saw but I think I would attach the base to the upper part while it is still in the carton. You have 4 faces so you should be able to pick one for it to lay on that would not damage anything. The styrofoam of the container should help. If you are planning a mobile base I would put that on before tilting it up. Definitely I would attach the rails and extension tables after it is vertical to lower the weight. It really shouldn't be that bad. The rails are heavy and if you have cast iron extension tables those are really heavy (probably 50 lbs apiece). Leave that weight off until you are ready for it.

    An engine lift was my backup plan. My son has one so all I had to do was drive 1.5 hours each way to get it. But I did not need it.

  10. #25
    Here's a lifting technique that doesn't require any special, new tools. Years ago, I had a Craftsman radial arm saw that I needed to raise and place on a stand. I had no help at the moment. After thinking it over, I used a pile of boards to raise the saw to a height that allowed me to slide it onto the stand. You just need to be able to tip the saw about the height of one board. You can do that by lifting or using a pry bar under any part of the saw that sticks out (you can use another block of wood to make the tip onto the pry bar accessible). You just need to do this twice on either side. Once you start getting the blocks under the edges, then all sides are accessible. Then proceed methodically to tip and add boards or larger pieces of wood or even bricks. As long as you have a firm wide base under the saw, you aren't risking a catastrophe. Tipping the saw just enough to get one board underneath doesn't take that much strength...just do it a few dozen times.

  11. #26
    Quote Originally Posted by Floyd Mah View Post
    Here's a lifting technique that doesn't require any special, new tools. Years ago, I had a Craftsman radial arm saw that I needed to raise and place on a stand. I had no help at the moment. After thinking it over, I used a pile of boards to raise the saw to a height that allowed me to slide it onto the stand. You just need to be able to tip the saw about the height of one board. You can do that by lifting or using a pry bar under any part of the saw that sticks out (you can use another block of wood to make the tip onto the pry bar accessible). You just need to do this twice on either side. Once you start getting the blocks under the edges, then all sides are accessible. Then proceed methodically to tip and add boards or larger pieces of wood or even bricks. As long as you have a firm wide base under the saw, you aren't risking a catastrophe. Tipping the saw just enough to get one board underneath doesn't take that much strength...just do it a few dozen times.
    I used to use this technique to remove and replace the engine in my Volkswagen bug. To remove it, I'd put pieces of 2x4 under the engine, then unbolt the engine and slide it back. Then remove one piece of 2x4 at a time until the engine was on the ground. Then jack up the back of the car and pull the engine out.

    Putting it back in was the opposite. That was one thing about the bug engine - you could work on it under a shade tree. You didn't need a lot of special tools and equipment. That was in the late 1960's and early 1970's.

    I threw a rod in it one time and replaced the crank, the rod and put new bearing inserts in the engine, all under a shade tree.

    Mike
    Go into the world and do well. But more importantly, go into the world and do good.

  12. #27
    I have lifted 48” commercial walk behind mowers with one of these https://www.amazon.com/dp/B001EV6WZG/ref=emc_b_5_mob_i
    we mounted a heavy boat cleat on the wall to tie it off. Definitely want to stay out from under anything lifted in this manner until it’s blocked up. Works good for deer too lol

  13. #28
    Join Date
    Jul 2016
    Location
    Lebanon, TN
    Posts
    1,722
    A lot of references to using a ceiling joist, if that's not an option, it's easy to build a 6'-8' high frame out of a few 2" x 6" or 2" x 8" and use a hoist on that.

    Also, change your profile and put in your location, even with Covid, 10 min.
    utes with proper PPE, and that saw could be picked up and in place with a helper

  14. #29
    Quote Originally Posted by ChrisA Edwards View Post
    A lot of references to using a ceiling joist, if that's not an option, it's easy to build a 6'-8' high frame out of a few 2" x 6" or 2" x 8" and use a hoist on that.
    That's what I did to assemble my saw. My friends helped me move the big pieces, but I assembled it by myself using leftover bits from the move. The frame is made from construction timber and held together will long screws. Each of the two vertical timbers has a 10mm lag stud screwed in the top that mates with holes in the top horizontal piece for a little more stability.

    I later used the same rig to lift and move the assembled saw with no problems. I ran long straps under the saw to the hoist and raised it a few inches to reposition the isolating base. The saw weighs about 650 pounds with everything attached, but I think its about 400 pounds with just the chassis, weight, and table. The wood didn't even creak when the saw left the floor.


    This is the concrete weight for the saw being lowered in place. It took two of us to get it to the basement, but I had to use this frame to move it around by myself. I removed the weight and the table from the chassis while the saw was still in the garage by using the chain hoist attached to the main beam in the garage.


    This is the cast iron table and saw motor assembly ready to be lowered in place.


  15. #30
    Join Date
    Jan 2010
    Location
    Tampa Bay, FL
    Posts
    3,928
    Pretty awesome, Mike. But isn't that a chicken and egg scenario? Don't you need a saw to cut the lumber to make the jig to assemble the saw?
    - After I ask a stranger if I can pet their dog and they say yes, I like to respond, "I'll keep that in mind" and walk off
    - It's above my pay grade. Mongo only pawn in game of life.

Posting Permissions

  • You may not post new threads
  • You may not post replies
  • You may not post attachments
  • You may not edit your posts
  •