Great build along, Jim, and another worthwhile improvement to the homestead.
John


 Contributor
Great build along, Jim, and another worthwhile improvement to the homestead.
John
 [OP]
Moderator
[OP]
Moderator
Yes, I'm enjoying this one, John. Something new always brings something to learn.
-----
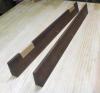
I didn't really do any work in the shop today...there was planting and weeding and some other things on the table, but I did remember to measure the sill angles so that I can cut the bottoms of the windows to that angle before slipping them in.
Wixley to the rescue.
IMG_7693.jpg
Looks like I need to do about a 10º cut on the bottoms. It's stuck on the rule to even out the surface since the sills are somewhat rough from weathering. Doing this cut "close" is good enough.
--
The most expensive tool is the one you buy "cheaply" and often...
[OP]
Moderator
I was "in a mood" today that was not amenable to doing some of the landscaping things I should have been doing...constant calls coming in about my mother's health challenges...so I spent some time in the shop killing a roll of masking tape protecting the areas on the grids and frames that will have to be glued later after priming and painting. Like anything, the first one was a little slower, but the other three took a fraction of the time. I also applied some filler to any small gaps. The plan is to start priming all the hidden and hard to paint areas tomorrow. The grids will essentially be pre-finished before final assembly with the glass as I previously mentioned...can't paint the back of them with the glass in the way. They will also be two-tones...white on the inside facing surface and the outside trim color on the remainder. I'm debating on spraying these, but have not made up my mind yet.
IMG_7699.jpg IMG_7700.jpg
--
The most expensive tool is the one you buy "cheaply" and often...
[OP]
Moderator
Got started on the pre-painting of components today, priming all the places that will not be reachable after the glass is in and the windows are assembled. Tomorrow I'll do the same for the exterior trim color in the same areas. I suspect the glass will arrive on Wednesday; Thursday at the latest, so having this work completed before that means I can assemble these things into actual windows by the end of the week and hopefully get to installing them in the house next week. (Probably only two at first because the second room needs a lot more work and it will be easier to do the windows when it's all cleared out for plaster repair and a new floor)
Today's work required separating the frames back into the components after carefully marking everything.
IMG_7702.jpg
It was a gloriously beautiful day out, so advantage was taken to enjoy the shop being fully opened up and gaining some working space by setting up part of the painting just outside the door. The frame components were uber-easy to deal with this way.
IMG_7703.jpg
The grills were, um...less fun...and to keep the brush moving, lunch on the job happened. LOL
IMG_7705.jpg
The final result was everything primed in places that could be primed without interfering with later glue-up and the first coat of exterior white on the inside-side of the grills that face the interior of the house. Tomorrow I'll start tackling the exterior sides of the grills and the glass side edge of the rails/stiles. I'm seriously considering spraying the former to avoid drips on the white side surface of the grills. Shooting "downward" with the gun dialed down to detail level should do the job.
IMG_7706.jpg IMG_7707.jpg
--
The most expensive tool is the one you buy "cheaply" and often...
[OP]
Moderator
Look what showed up today...
IMG_7715.jpg
More painting today...the exterior trim color on the edges of the rails and stiles that will be on the glass as well as the exterior visible surfaces on the grids. The former was brushed. I decided that spraying was the best way to do the grids because it would allow me to get clean lines. Setting up with nothing of any kind of meaningful surface under them insured no spray bouncing up onto the white backside that will be facing the interior. Of course, one must also spray the correct face for this.Regrettably, I sprayed the wrong side of one grid due to a brain-fart and will have to redo the white on the backside tomorrow manually. Fortunately, I have just enough exterior white paint left to do the deed.
IMG_7716.jpg IMG_7717.jpg
This shows the nice clean line between the three "tan" exterior surfaces and the white back of the grid that was achieved by spraying.
IMG_7718.jpg
I may be able to start assembly tomorrow, depending on a brewing situation.
--
The most expensive tool is the one you buy "cheaply" and often...
[OP]
Moderator
Today was the "day of reckoning"...did I measure correctly?
But before that...there was the "great unmasking". A lot of tape gave it's life for these windows so far, but it was necessary to account for the need to pre-paint things that wouldn't be accessible later without getting paint in places that need to properly interact with glue later.
IMG_7721.jpg
With the tape off, a thin piece of ply with some 120 grit abrasive on it was used to clean and smooth the inside edges of the glass groove to insure any excess paint wouldn't interfere with the glass going into the frame components. It only took a few swipes to do that while not breaking through the primer.
IMG_7722.jpg
And then...the test fit. Sans Dominos. Snug as a bug in a rug, as the saying goes. There was just enough allowance in the width of the groove to accommodate the primer, etc., as well as for the depth. The glass company was spot on with the panels, too. Grid fit nicely, too.
IMG_7724.jpg IMG_E7725.jpg
Glue and Dominos back in place and the first window was glued up and caulked. Oh, my...these things are heavy!!
IMG_7726.jpg
While the glue was curing and the paint was drying on the one grid I accidentally sprayed the white side tan yesterday, I setup the saw to cut the angled bottoms that would match the sill angle. First the blade to 10º...
IMG_7727.jpg
I then created a test cut of some rail/stile scrap to judge the angle (tested it at the window) and then used that piece to put a pencil mark on the slider wagon on where the inside edge of the lower rail would have to be for the angled cut to not take off any total height.
IMG_7728.jpg
This shows what the cut line will be with the bottom of the window positioned accordingly.
IMG_7729.jpg
--
The most expensive tool is the one you buy "cheaply" and often...
[OP]
Moderator
Since I had to walk away from the saw for awhile until the glue was set, I left a love note reminding me that the blade was tilted.
IMG_7730.jpg
When the window glue was "dry enough", I brought the window to the saw and placed it on the outrigger so that the inside of the lower rail was on the line I previously drew...nice to be able to see through the glass to do this.
IMG_7731.jpg
Cut made...
IMG_7732.jpg
One down, three to go for this stage. After all of this, the next steps are to clean the glass including any extra caulk (clear paintable used), install the grids, level any irregularities where the grids mate the rails/stiles and then apply the beaded top layer that locks in the grids permanently and establishes the exterior look of the windows. From there it's paint and installation.
--
The most expensive tool is the one you buy "cheaply" and often...
[OP]
Moderator
Today's efforts after a Costco run made for the first window being finished other than paint. The work started out with carefully removing excess caulk and cleaning the window glass thoroughly.
IMG_7734.jpg
The grid was then glued in...the orange tape in the photo is "clamping" the grid into the recesses while the glue dries.
IMG_7735.jpg
I setup the sliding saw for mitering the top beaded trim layer and proceeded to cut that material. Getting one piece for a rail and one piece for a stile meant it was easy to do repetitive cuts simply by marking the sacrificial fence on the miter bar that was set to 45º to the blade. There was no point in setting up a hard-stop for this since any minor variations would get dealt with easily, but honestly, the windows are actually squared and everything fits almost perfectly with only hairline gaps.
IMG_7736.jpg IMG_7737.jpg
Dry fit
IMG_7738.jpg
Partially in the "act of gluing"...glue still to be spread with the brush before placing the workpiece and securing it with brads
IMG_7739.jpg
And voila! We have a completed (and very heavy) window, again, sans sanding filler, priming and color coating. Second one is already glued up and will get to this point tomorrow with number three glued up after that.
IMG_7740.jpg
The bead really adds a lot to the appearance of this assembly.
IMG_7741.jpg
--
The most expensive tool is the one you buy "cheaply" and often...
[OP]
Moderator
Today was the day I finished the build of these four windows...they just need final painting and then it's on to installation fun.
I decided to shave a sixteenth off the width to insure there would be no fighting with any of the window openings. I'd rather have to put a little caulk in behind the trim than risk having to "encourage" them with a mallet or something. Easy to do on the slider...
IMG_7757.jpg
And now it's time to paint...
IMG_7758.jpg
--
The most expensive tool is the one you buy "cheaply" and often...
[OP]
Moderator
I'm pleased to say that the physical construction of these windows is complete and they are fully painted and ready for installation...which should start tomorrow if things go well.
Primed...
IMG_E7759.jpg
Painted...
IMG_E7762.jpg IMG_7764.jpg IMG_7763.jpg
Time for a little fun, um...demolition...
--
The most expensive tool is the one you buy "cheaply" and often...
Contributor
Thank you for this excellent post. Love the craftsmanship, but perhaps even more grateful for the step by step detailed process of how it all came together. Your work is beautiful and so thoughtful.
[OP]
Moderator
Thanks, Ollie...I'm admiring your work in your thread, myself! (And the nice git-fiddle collection)
-----
Today was the day. I repeat: Today was the day. Window number one was installed. And holy-moly...it actually fit in the hole!
This was the starting point (the piece of trim hanging out was because I realized I wanted a "before" photo after I already started demolition)
IMG_7780.jpg
Prying off the trim was relatively easy. When Professor Dr. SWMBO took up beekeeping a few years ago, I had her order an extra "hive tool" for my own tool collection...it's basically a very thin pry bar with sharp edges on the business ends and perfect for this kind of delicate work. Once the rim was out, the old sashes came out with reasonable force and a little knife work on existing caulking inside and out. I parked the trash can next to the window for "convenience".
IMG_7781.jpg IMG_7782.jpg
After cleaning up the opening, the new window went in the hole. There was some minor "persuasion" required with a block of wood and a soft mallet and I'm glad I shaved that little bit off the edge as I did prior to painting. That option is still available should I get one that's a little two tight while putting the other three in. While the window was in pretty snug and up against the interior trim as intended (opening was caulked, too) I did screw a couple pieces of scrap in to absolutely insure it stayed in place while trimming this out.
IMG_7783.jpg IMG_7784.jpg
The new window was blocked in with 3/4" x 1" material and the piece on the bottom has a 10º angle to mate up with the sill angle. Caulk and 15 gage nails secured it in place.
IMG_7785.jpg
Primed...including some remedial work on the sill which takes the brunt of the weather...
IMG_7786.jpg
And....painted with two coats of color
IMG_7787.jpg
--
The most expensive tool is the one you buy "cheaply" and often...
[OP]
Moderator
So, one down, three to go. Number two will be more immediate as it's in the same room as this one was. The room will soon become Professor Dr. SWMBO's office so I can then replace the floor in the other room (currently her office) and do some remedial plaster repair. I may do something interesting with the fireplace that's in there, too. It's not usable but is a nice feature...with a stone face in a style that looks totally at odds with the rest of this 250 year old structure. One project begets another and then begets another.
At any rate, I'm pleased with the result here on the first window install and will post some final photos once the rest are all in place. It's pretty satisfying to actually make something like this, even though it's not fancy. But at about $800 in materials for four instead of $4000 for custom replacements...it was a good decision.
IMG_7788.jpg
Last edited by Jim Becker; 06-23-2020 at 8:49 PM.
--
The most expensive tool is the one you buy "cheaply" and often...
 Friend of the Creek
Well done, Jim. Looks great. Kudos to you for having the know-how to make and install a window (and have it fit in the opening!). I also like the fact that you left the existing sill and outside framing. Keeps the character in tact. I can sure relate to the one thing leads to another situation. We did a kitchen remodel one year and that lead to the foyer, living room, dinning room and up the stairs. Hope the final three go as well.
 Contributor
Fits right in Jim!
 Posting Permissions

 Reply With Quote