
-
Was a little cooler today....Needed a couple curves laid out and cut...
June Project, curve laid out.JPG
Then a spokeshave to level things out..
June Project, curve clean up.JPG
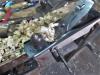
Seymour Smith & Sons.....then mill a dado across the bottom shelf....then I could attach the curved aprons...
June Project, apron installed.JPG
Was a bit trying, as I glued both aprons in place at the same time...then made sure the divider would still fit into the dado...
June Project, dado dry fit.JPG
Cleaned a couple more legs up..might as well install them..
June Project, 2 legs installed.JPG
Which was ....fun....") small clamps first, then the pipe clamp....needed a way to keep things plumb, and square to the shelf....also needed ends for the webframes....2 birds?
small clamps first, then the pipe clamp....needed a way to keep things plumb, and square to the shelf....also needed ends for the webframes....2 birds?
June Project, middle spacer.JPG
With a 3rd clamp right at the front corners...
Weight of the Ash and clamps...is as much as I weigh.....will let this mess sit a bit...will try tomorrow to get something done..
Stay tuned..
-
A little assembly work..one web frame..
June Project, lower web frame.JPG
Then an assemble "Table"
June Project, assembly table.JPG
Divider installed last legs installed, other 2 needed repaired..
June Project, a little assembly done.JPG
More plugs to mill....3 hour day.....
June Project, bottom shelf end cap.JPG
End cap for the bottom shelf....and a Gatorade....
June Project, enough for one day.JPG
Had enough fun, for one day.....
Stay tuned...
-
Great looking project Steven. Not sure how I have missed this till now.
-
Ok, for those complaining about too small of a shop...
June Project, roomy shop.JPG
This is what I had to work in, today...add in a 1 x 6 x 8' plank...
June Project, LONG plank.JPG
And then try to cross cut it down to the sizes needed....
there was an Assembly Area...
June Project, assembly area.JPG
I did get the drawer area worked on....a 1x across the top of the drawer, the end panels and a drawer front..
Drawer front fitted.JPG
End panels just got glued in place...
June Project, a bit cramped.JPG
Even if things were a bit...cramped...2 more planks hauled to the shop...one needed "quartered"
June Project, 4 quarters.JPG
Then 2 panels glued up from these parts..
June Project, door panel.JPG
The last plank I had was cut into 3 sections, and a filler added to them..to enclose the end of the door compartment..
June Project, end panel.JPG
Which wiped out any more work being done. I got 2 out of 4 corner blocks made...I use those to attach the top to the case. Need to add a kicker for the drawer's back to rub against.
Next lumber run will be to Blue Borg....1 x 6 x 8' Pine, 1/4" x 2' x 4' plywood ( drawer bottom) and a 3/4 x 2' x 2' plywood panel for the middle shelf....
Letting the panels sit overnight...will pick out the best of the 2 for the door. Need to square up all the ends, flatten the panels on the "show side". Next Wednesday will be the Borg lumber run.
Will wait until the Island is upstairs and finished..BEFORE adding the casters...
Stay tuned...
-
Nice work as usual Steven! Always enjoy following along as execute your projects.
-
Mondays should be banned. Just got done with 3 hours in the shop....film at 2300 hrs....
Sometime this coming autumn.....I change from being a Grandpa...to adding Great to the title....One of the oldest grandsons is going to be a Daddy.....
Sitting here having a couple COLD "Not your Father's Root Beers" to cool down....
-
Blank for the end of the Island was removed from the clamps....cleaned up, ends squared up...glue and clamps...
June Project, end closed up.JPG
Then one of the narrow panels was taken out of the clamps...a rebate milled along one edge...
June Project, back panel rebate.JPG
After the ends had been squared...then glue and clamps...
June Project, back panel installed.JPG
Back of door compartment is installed...
Needed the kicker installed....worked on a dovetail to the front...
June Project, kicker dovetail work.JPG
and to the back of the case...
June Project, kicker and dovetail.JPG
Before I could glue the back of the drawer compartment in place...
June Project, back assembled.JPG
Then drill and countersink the corner blocks...
June Project, corner blocks drilled.JPG
and then install them
June Project, Monday's done.JPG
Other than sweeping the floor....Monday's work was...done....
Still have a drawer and a door to do...have to leave something for the next day, right?
Stay tuned...
-
Not a lot got done, in the shop....was on Laundry Detail, anyway....
There was a blank to make a door with..
June Project, blank for the door.JPG
It needed to be flattened, trimmed for length, ripped for width..and another rebate made like the back had..
June Project, back panel rebate.JPG
Once that was done, a test fit was done..
June Project, door fitted.JPG
Rebate this time is on the right side. Looks like it fits. I went and dug up a couple things of hinges...
June Project, hinges and plugs.JPG
Just in case I need 3 hinges. The plugs? A Veritas 3/8" Tapered Plug Cutter was used. Had to slow the drill press all the way down, else the cutter will burn this Ash. First 30 weren't too bad, slow though, as I had to keep blowing away all the chips it made.....#31 lost a bit off the end....#32 got stuck in the cutter and snapped off...dug it out...may try to use it...
And that was it, for shop time, today...
Lumber run tomorrow...among other items.
Stay tuned..
-
Honey-do list this morning, bills to pay....buy new hinges for the back door's screendoor ( plastic one broke...but they came with the door)
1/4" Luann plywood for the drawer's bottom panel.....1 x 6 x 8' Pine board for one drawer back, and 2 drawer sides. 3/4" x 2' x 4' for the middle shelf....will edge it with Ash parts.
1 hour of sleep last night...no way am I heading to the shop. About all I got done was install the hinges on the screendoor...and throw the old plastic ones in the trash...
-
Well...I WAS just going to haul a board to the shop, and get set up for tomorrow....that WAS the plan....
Instead, the 1 x 6 was cut to make 2 drawer sides....they also needed slimmed down a bit..too wide....saved the 2 strips of 1x...trimmed for length..and now I have drawer guides..
June Project, drawer guide installed.JPG
One on each end...bead of glue, couple clamps...then the drawer front needed a hair less in width....then some pins were made...
June Project, drawer, pins first.JPG
Might as well do both ends...
June Project, drawer, all pins.JPG
Marked for "Top" , Bottom, and inside.....and number the ends to match the sides, so the tails will match up..
June Project, tails done.JPG
Once I got them milled....then sweep the floor, turn off the shop fan, close up shop...
Sometime tomorrow, I set up for grooves, and dados....and fit a back and the bottom to the drawer
Stay tuned...
-
Grooves? Used two very different planes...a Stanley No. 45..
.June Project, 45 shavings.JPG
and a G. Roseboom plough.
June Project, old plough.JPG
Except, the Plough has not depth stop...so, I got close to the depth, and finished up with the #45.
dados were milled a bit rough...we have ways..
June Project, dado clean up.JPG
of making things smooth...then the pilot holes and counter sinks...
June Project, pilot holes.JPG
Just how I do a drawer, YMMV, of course. I crosscut and ripped a pine back for the drawer. Then cut the 1/4" Luann Plywood to size for the drawer bottom....couple of LONG clamps, a few screws through the dados, a few dabs of glue...slide the bottom panel into place...check for square with a framing square..
June Project, drawer squared up.JPG
Once it showed things were squared up, a few screws were added through the bottom panel, and into the back of the drawer...
June Project, clamps and screws.JPG
And just leave things sit, until the glue dries...
Stay tuned..
-
Clamps came off this morning....drawer does fit it's opening....front is a tad loose, but will be ok.....at least it will not swell and stick....has enough room to swell, without any sticking shut going on....no need for a piston fit.
Maybe about 1300 hrs, before I head to the shop to start.....film at 2300 hrs...
-
Had to mail out a box of block plane parts...round trip to the Post Office is making the schedule get behind.....will try for 1400 hrs....Gatorade on ice, too..
-
Gatorade Break, and a LATE Lunch! Even with the shop blowing right on me...still soaked...
Door has been installed, even has a magnetic catch to keep it closed
Drawer is fitted, handles installed....
All counter-bores on the handle side of the Island now have plugs glued in place....
Need to clear off a space, and make the middle shelf, next....might even install the top of the island...
Stay tuned...
-
Ok, here we go...laid out hardware and tools for the drawer...
June Project, door, hardware, tools.JPG
Hinges installed..
June Project, hinge install.JPG
Drill pilot holes for the door's handle...
June Project, handle pilot holes.JPG
Door hardware installed..
June Project, door installed.JPG
Then the door latch...
June Project, door latch.JPG
Drawer fitted, it's handles installed, counter-bore holes plugged..
June Project, drawer handles, plugs installed.JPG
And then lay the panel for the top in place, to see how it will fit...
June Project, test fit the top.JPG
Later, I can attach the top....plug the counter-bores on the other side....and make the shelf....then, maybe a coat or two of that Witch's Brew?
Stay tuned..
 Posting Permissions
- You may not post new threads
- You may not post replies
- You may not post attachments
- You may not edit your posts
-
Forum Rules


 Reply With Quote