
I've been meaning to make a true ZCI for my SCM/Minimax S315WS slider for a LONG time but never got around to it. Until today. I had time on my hands while spraying finish on another guitar build in a different area of the shop and decided to finally take care of this simple task. I had a piece of thin purpleheart long enough for the job, so I sliced off a 55mm wide piece, thinned it down to about 4.3mm to match the thickness of the standard aluminum insert, using the planer and then the drum sander. Holes were drilled and chamfered. And then it was time to cut the narrow slots for the blades.
IMG_7543.jpg
The blade slots were as simple as could be since the piece is held in place by four fasteners...raise them up all the way while the machine is running (with the riving knife removed) and slots suddenly appear for both the main blade and the scoring blade.
IMG_7544.jpg
To accommodate the riving knife, the main blade slot needed to be extended. I put the OEM insert back in and clamped the new insert down on top, offset so that raising the blade up all the way again while running would extend the slot. By clamping things with the blade raised a bit (not running), the new cut was indexed to the existing cut so that the alignment was correct.
IMG_7545.jpg
The side of the insert along the slider wagon is unsupported, so I installed a piece of half-inch plywood scrap vertically to reinforce it to avoid any deflection
IMG_7546.jpg
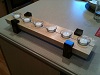
The end result from fabrication...
IMG_7547.jpg
Just to make it a little slicker, after sanding to insure it was clean and the edges were not splintery (a fun thing with purpleheart) I wiped on a little varnish to seal it up.
IMG_7548.jpg
I know this isn't an exciting thing, but since the sliding saws have different arrangements around the blade than North American style saws, I figured folks might benefit from the contrast. Different brands of saws have variations on the theme, of course, but in general, the insert on a slider is long and narrow.
I'll be doing another one to use as a dado insert since my particular saw supports that. I have an OEM version that I borrowed from Brandon Conover awhile back to use as a template and the rest of that piece of purpleheart, so that version should also go together with minimal fuss.


 Reply With Quote


 At this point, wood was good for a start with the edge reinforcement and I do fully intend to do an aluminum version on the CNC. For that one, I'll have to be "not quite" zero clearance. Not that the blade will get damaged by biting into aluminum, but I'd rather just not cut it that way. So I can cut the slot so it's a bout a half millimeter wider and leave a hair more at the riving knife for good measure. That's easier to do on the CNC than manually.