Results 1 to 10 of 10

Thread: Now what?

  1. #1
    Join Date
    Sep 2019
    Location
    Lafayette, CA
    Posts
    843

    Now what?

    As I continue my first halting steps toward dovetailing, I've run into a question. What I suspect is the answer would mean a little more work, so I'll submit to the genius of the Creek Mind.

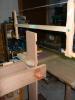
    I've settled, for now, on using a Dozuki for ripping the tails (beginner, remember?). It leaves a 0.015" kerf. To cope out the gross waste before chiseling, I've selected a Lee Valley coping saw with a Pégas skip-tooth blade. The coping blade is 0.020" thick and leaves a 0.025" kerf. See photo. The coping kerf (C) is on the left and the Dozuki kerf (D) is on the right.

    kerfs.jpg

    So how do I cope down a Dozuki kerf with a fatter coping saw without scraping into the sides of the tails? It feels like I have two options. 1) cope inside the Dozuki kerf (say, on the left of the waste) and wind over to the other (right) side of the waste, and then come back to meet the left side? Or maybe I can 2) start to cope at the top of the Dozuki kerf, but cope immediately away from the the Dozuki kerf for the first waste cut. Those seem to be the only ways without gnawing on the tail side, but it's not what YouTubers like David Barron seem to do when they use a Dozuki.

    Option 3: Use a Western style saw with a 0.026" kerf.

    Wisdom, please?

  2. #2
    I’ll be interested in responses. I always just coped a new kerf in the waste to curve my way to a corner. Then, another cut across the bottom to the other corner.

    Left click my name for homepage link.

  3. #3
    Join Date
    Dec 2010
    Location
    South Coastal Massachusetts
    Posts
    6,824
    What John said goes for me - cut a curve from the "meaty" part of the waste to the opposite corner.

    Chop out the base with care.

  4. #4
    Join Date
    Sep 2007
    Location
    Longview WA
    Posts
    27,427
    Blog Entries
    1
    The kerf can be widened with care by cutting down on the inside of the kerf to the base of the tail. Then cut across.

    In my case a fret saw is used. The blades may be thinner than coping saw blades.

    jtk
    "A pessimist sees the difficulty in every opportunity; an optimist sees the opportunity in every difficulty."
    - Sir Winston Churchill (1874-1965)

  5. #5
    Join Date
    Mar 2006
    Location
    Austin Texas
    Posts
    1,957
    What Jim says. If you use a coping saw, it can be lowered down through the original saw cut by starting a sawing motion when you first enter the cut. The coping saw will slightly scuff the side walls of your original cut, but not really affect it practically speaking. Start the sideways turn of the saw when you get close to the bottom of the cut. Admittedly, this old technique came about probably before the popular advent of Japanese saws with their fine set teeth, but the slight scuffing of the coping saw blade as it is taken down the cut does not appreciably change the original cut. Since fret saws with their thinner cut have become a little more available (or more prevantly advertised/touted), lots of folks have moved to using a fret saw for ease of insertion into the original cut. Old timers did successfully use a coping saw with a thicker blade than dovetail saws for years though. Try it and practice the turn into the horizontal cut mode so you have it figured out where to start the turn for how-close to the base line you want to be.
    David

  6. #6
    Join Date
    Feb 2004
    Location
    Perth, Australia
    Posts
    9,491
    Bob ...

    1. Tools For Working Wood sell a thin coping saw blade that may fit the kerf of your dozuki.
    2. Alternately, use a thicker bladed backsaw
    3. Or a fretsaw.
    4. Do not cut from the kerf, but from inside the socket.

    Personally, I use a backsaw and fretsaw, which enables easier waste removal kerf-to-kerf along the baseline.

    Regards from Perth

    Derek

  7. #7
    Quote Originally Posted by David Eisenhauer View Post
    What Jim says. If you use a coping saw, it can be lowered down through the original saw cut by starting a sawing motion when you first enter the cut. The coping saw will slightly scuff the side walls of your original cut, but not really affect it practically speaking. Start the sideways turn of the saw when you get close to the bottom of the cut. Admittedly, this old technique came about probably before the popular advent of Japanese saws with their fine set teeth, but the slight scuffing of the coping saw blade as it is taken down the cut does not appreciably change the original cut. Since fret saws with their thinner cut have become a little more available (or more prevantly advertised/touted), lots of folks have moved to using a fret saw for ease of insertion into the original cut. Old timers did successfully use a coping saw with a thicker blade than dovetail saws for years though. Try it and practice the turn into the horizontal cut mode so you have it figured out where to start the turn for how-close to the base line you want to be.
    I think David was writing this while I was taking a picture. Even though the coping saw kerf is noticeably wider than the dovetail saw kerf, it goes down easily in the kerf. Turning the saw with little radius takes some skill- you sort of take some strokes while leaning a little until the saw wears away space to turn. It happens so fast that it is difficult to analyze.

    Here are three kerfs in hard maple:
    A is dovetail saw
    B is coping saw (noticeably wider)
    C dovetail saw cut that has had the coping saw inserted; it is not much affected by the wider coping saw.
    dovetail kerf.jpg

  8. #8
    Join Date
    Dec 2016
    Location
    South West Ontario
    Posts
    1,503
    Bob, as you are learning and the Dozuki cut is the big part of that learning curve leave it alone. Cope from the top of the Dozuki cut across to the bottom of the opposite Dozuki cut, then drop the coping saw down in the gap and cope to the bottom of the other cut. Those two cuts won’t take long.
    The Dozuki saw gives great results with little practice, rather encouraging when you start out! By not interfering with that cut your understanding of fit will be clearer.
    Try just chiseling out the waste also as part of your introduction!
    ​You can do a lot with very little! You can do a little more with a lot!

  9. #9
    No one mentions the best option for sawing the waste between dovetails, one that works with either western saw kerfs or Japanese, Even better it cuts faster than either a coping or fret saw (12" of blade dontchknow) and the blades do not break. Go to the Tools for Working Wood site and look up the Gramercy 12" bow saw. There is not a better option for sawing out waste, it turns on a dime and is fast. It is a better option than any of the Knew Concept saws and cheaper than some of 'em.

    BTW, I do not use Japanese saws in general although I have several to use when needed. It has been a long time since the last time I used a Dozuki to cut a dovetail so I went to the shop to make sure what I'm posting is true. It is, the TFWW 12" bow saw blade slips into the Dozuki kerf and makes the turn with no problem.

    ken

  10. #10
    Join Date
    Sep 2019
    Location
    Lafayette, CA
    Posts
    843
    Quote Originally Posted by William Fretwell View Post
    Bob, as you are learning and the Dozuki cut is the big part of that learning curve leave it alone. Cope from the top of the Dozuki cut across to the bottom of the opposite Dozuki cut, then drop the coping saw down in the gap and cope to the bottom of the other cut. Those two cuts won’t take long.
    The Dozuki saw gives great results with little practice, rather encouraging when you start out! By not interfering with that cut your understanding of fit will be clearer.
    Try just chiseling out the waste also as part of your introduction!
    This looks like the winning recommendation for me, for now. Thanks to William and everyone who nudged me there!
    Last edited by Bob Jones 5443; 05-26-2020 at 2:51 AM.

Posting Permissions

  • You may not post new threads
  • You may not post replies
  • You may not post attachments
  • You may not edit your posts
  •