Page 1 of 2 12 LastLast
Results 1 to 15 of 20

Thread: End table and Ideation on the fly

  1. #1

    End table and Ideation on the fly

    Hi, back story on this project is as follows - I needed a drink supporting table for the patio area just outside the shop, where one might rest his weary bones with a drink after a day of work. I came into a stash of red oak, but the problem is I really don't care for the look of red oak either stained or natural. Plus going outdoors, I didn't want the finish to fade. And I wanted the look to co-exist with the existing patio lounge chairs and surrounding materials. And in the spirit of design, I wanted the table to have some identity and personality.
    I enjoy the challenge of design, and normally I labor over putting a plan on paper, full scale, sometimes even building a model mock-up, and trying desperately to stay accurate to the plan during the build.
    This time, I decided to be carefree and just design on the fly, with nothing other than an idea of footprint and table height in mind.

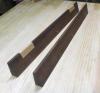
    So starting out, I glued up some oversized legs (give myself plenty of material to shape) and four aprons (which at some point early on I decided to angle for some interest).

    IMG_0309.jpg

    Pretty clunky, but let's start shaping:

    IMG_0310.jpg IMG_0312.jpg

    Not bad, but the thighs look a little large, let's go back and slim them down a bit, maybe 3/16"

    IMG_0326.jpg

    That looks a little sexier. Now about those aprons. Maybe they need more than just the angle and the bead. How about taking a gouge to them and texturing the surface?
    IMG_0327.jpgIMG_0329.jpg

    Now for the top, a simple square might look too plain with all this other action, so what if I carry on the texturing theme and cut a pattern into the surface. Since this is going outside, maybe something emulating a sunburst. Let's test the idea on a piece of mdf
    IMG_0332.jpg

    Due to posting limit, please see the Part 2 post for pictures of the finished project and ending to this story.
    Thanks,
    Edwin

  2. #2

    End table and Ideation on the fly - PART 2

    Hi,
    This is Part 2 to my earlier post.

    Final photos of the end table:

    4Y1A6753-crop.jpg4Y1A6755.jpg

    And a photo of this table's final home:
    4Y1A6808.jpg

    A few additional comments

    Joinery was all mortise and tenon. The finish I settled on was an ebonized chemical stain. I love how it looks. The ebonizing gave the oak a look reminiscent of Wenge. It's hard to put into words, but it is a very different look than I have been able to achieve with pigment or dye stains, kind of graphical. It's given me a whole new enthusiasm for a wood that I otherwise might have avoided. I am told that ebonizing is totally resistant to UV fading. We'll see over time if this is the case. I topcoated with several coats of gloss Epifanes, and a final wiped on coat of matte Epifanes.

    All in all, it was a lot of fun, even liberating to just design on the fly and treat the project with a cavalier attitude, freed from the shackles of a rigid plan. I hope you enjoyed the story,

    Edwin
    Last edited by Edwin Santos; 05-16-2020 at 4:58 PM.

  3. #3
    Join Date
    Jun 2012
    Location
    New Westminster BC
    Posts
    2,953
    Looks great all that's missing is a glass of your favorite beveridge.

  4. #4
    Join Date
    Apr 2013
    Location
    Kansas City
    Posts
    2,645
    Thanks for sharing your thinking process. So, now what is your ebonizing technique. I agree it made the red oak much more interesting.

  5. #5
    Quote Originally Posted by Stan Calow View Post
    Thanks for sharing your thinking process. So, now what is your ebonizing technique. I agree it made the red oak much more interesting.
    Stan,
    I washed out some steel wool really well in soapy water to wash away any oil, and then soaked the SW in white vinegar for about 3 days. Then brushed on the solution with a foam brush and let it do it's thing. I left out that I lightly sanded the ebonizing in a few places to give it some aged character, and because at that point I felt the ebonizing turned out too black, even purplish. But once I went over it with the Epifanes, the purple disappeared and more brown undertone showed up. If I had known that was going to happen I would not have sanded in spots.

  6. #6
    Man, that is REALLY a nice piece Edwin! It looks like it is in motion, sort of rotating. The shape of the aprons is a new idea to me (will try that) and texturing them really adds interest. I love the top, and it again contributes to the "in motion" effect. The finish is perfect for this piece and definitely adds to the overall design.

    I couldn't bear to put something that nice outside on the patio!

    Fred
    "All that is necessary for the triumph of evil is that good men do nothing."

    “If you want to know what a man's like, take a good look at how he treats his inferiors, not his equals.”

  7. #7
    Join Date
    Mar 2008
    Location
    SW Michigan
    Posts
    668
    Very cool with a whimsical element about it Edwin. I love the way the ebonized finish turned out. Did you apply more than one coat of the SW/vinegar solution and did the grain raise much from the application? I have a fairly large supply of 4/4 red oak from a dozen or so trees than were uprooted in a straight line wind storm 9 years ago, and not being a big fan of natural colored oak, I've ebonized some projects using India ink. I think I like the semi transparent look of your table more than the stark black of India ink.

  8. #8
    Quote Originally Posted by Jon Grider View Post
    Very cool with a whimsical element about it Edwin. I love the way the ebonized finish turned out. Did you apply more than one coat of the SW/vinegar solution and did the grain raise much from the application? I have a fairly large supply of 4/4 red oak from a dozen or so trees than were uprooted in a straight line wind storm 9 years ago, and not being a big fan of natural colored oak, I've ebonized some projects using India ink. I think I like the semi transparent look of your table more than the stark black of India ink.
    Hi Jon,
    Since you're asking about the ebonizing, let me share a second table with it's own personality that I built to accompany the first one. I think the ebonizing came out even better the second time. After one grain raise and sanding, what I did was use an HVLP sprayer to mist on a coat of strong tea stain (something like 5 or 6 tea bags in 1 1/2 cups of water). Once it dried, I brushed on one coat of the ebonizing solution. I feel the look of the second table is even more Wenge like than the first. Sometimes the ebonizing solution has difficulty getting into the pores of the oak. I have heard you can add a few drops of soap to help this but it didn't work for me. So when the solution was dry, after a sealer coat of finish, I brushed on a dark tinted glaze and wiped it totally off except what was left in the pores.

    One other thing I didn't mention before- when I applied the ebonizing solution to the first table, it dried to a look that was almost Halloween black, with a purplish cast. Horror. I then tried to lightly sand it in places to try and calm it down. Miraculously, when I started applying finish, the purple disappeared, and the brown undertone came alive. The places where I lightly sanded ended up looking a little burnished and aged, not a bad thing for the look of the first table. I let the second table be as it was, now having more confidence about the ebonizing, so you don't see any of the burnishing.

    BTW, I am now a big fan of Epifanes Matte.

    The achilles heel of ebonizing is that different boards will take it differently, and if you glue up a part from different boards, the ebonizing can turn out inconsistent. That wasn't too much of a problem for me here, but if it was, I think I would try using glaze to even out any inconsistencies.

    4Y1A6776-crop-2.jpg4Y1A6787.jpg4Y1A6804.jpg

  9. #9
    Join Date
    Mar 2008
    Location
    SW Michigan
    Posts
    668
    Both tables came out well. Epifanes is an exterior poly, no? I like the soft luster it presents over the ebonized oak. Did you spray it with an HVLP too?

  10. #10
    Quote Originally Posted by Jon Grider View Post
    Both tables came out well. Epifanes is an exterior poly, no? I like the soft luster it presents over the ebonized oak. Did you spray it with an HVLP too?
    Epifanes gloss is an exterior UV inhibited spar marine varnish, tung oil based. They describe Epifanes matte as a companion product the gloss just for the topcoat in cases where the high gloss is undesirable. I used in this way, applying it with a rag like any wipe on finish.

  11. #11
    Quote Originally Posted by Frederick Skelly View Post
    Man, that is REALLY a nice piece Edwin! It looks like it is in motion, sort of rotating. The shape of the aprons is a new idea to me (will try that) and texturing them really adds interest. I love the top, and it again contributes to the "in motion" effect. The finish is perfect for this piece and definitely adds to the overall design.

    I couldn't bear to put something that nice outside on the patio!

    Fred
    Thanks for your encouragement Fred!

  12. #12
    Join Date
    Apr 2017
    Location
    Clarks Summit PA
    Posts
    1,728
    Ed, that is a unique, eyecatching table. Well done!

  13. #13
    Join Date
    Apr 2013
    Location
    Kansas City
    Posts
    2,645
    Quote Originally Posted by Edwin Santos View Post
    ". . . soaked the SW in white vinegar for about 3 days . . ."
    Something that I've wondered about this process: why do you not have to neutralize the acidic vinegar on the surface after its dried? Doesn't the acidic salt have an impact on the topcoat? I realize vinegar is relatively weak, but I'm thinking of the opposite case, when I've used lye to color mahogany or cherry, and needed (following instructions) to rinse or neutralize (with weak vinegar) before finishing.

  14. #14
    All those tables turned out great!!

  15. #15
    Join Date
    Mar 2015
    Location
    SE Michigan
    Posts
    3,222
    You design very well on the fly! Turned out amazing. Thanks for posting.

Posting Permissions

  • You may not post new threads
  • You may not post replies
  • You may not post attachments
  • You may not edit your posts
  •