Results 1 to 9 of 9

Thread: Chair troubles

  1. #1
    Join Date
    Apr 2019
    Location
    Madison, Wisconsin
    Posts
    283

    Chair troubles

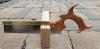
    I built an adjustable chair for our four year old in the style of the Stokke Tripp Trapp. It’s red oak finished with three coats of shellac. Sorry for the photo rotation; they’re correct on my computer but not here and I don’t see how to correct them. I’m happy with how it turned out; my first try with angled mortise and tenon combined with my first try with drawbore mortise/tenon worked out nicely.

    20200426_070606.jpg20200426_070532.jpg20200426_070516.jpg72865D9C-4FE4-45CB-A716-1F9AB1977464.jpg37B4BED5-00EB-4ED5-8DF5-0784367AE111.jpg

    He really likes it and says it’s much more comfortable than the booster seat it replaced. I deliberately overbuilt it because he’s quite active when sitting and I expected a bunch of squirming around, rocking, and so on. However, I very much underestimated his tendency to slide and kick the foot plate and slide the seat plate while sitting in the chair and I need to figure out a good way to lock them in place while maintaining adjustability.

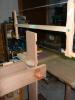
    Rabbets on the seat plate and foot plate sit in dados on the legs.
    8630C94E-D821-4A9A-8881-76979D1C5663.jpg
    0055B63A-36CF-45A4-80D5-468E55426953.jpg
    My first thought was wedge locks to hold the plates in place by applying side-to-side clamping pressure, but the legs are too flexible. I also thought about wedge locks that would orient the pressure across the width of the dado, but it’ll be difficult to adjust the dados for an even taper (i.e. same taper for every dado) now that the chair is built. My present thought is to drill a series of holes centered in the dados and matching holes in the plates to receive locking pins coming in from the sides.

    I’m not really happy with either option, so I figured it would be a good idea to submit the problem for suggestions. What are your thoughts?

    Thank you in advance.

    Michael Bulatowicz

  2. #2
    Join Date
    Dec 2016
    Location
    South West Ontario
    Posts
    1,503
    I would fill in the front rebate up to the leg, glue a strip back on. That removes the angular corners that will be held in use. The locking mechanism can work from the back. On an angle matching the leg remove an inch or more above the rebate in line with and tight to the leg. Make a matching piece for the ‘gap’. Drill and countersink the patch in the middle, this keeps the screw in the middle of the seat edge. Use a brass screw to hold the patch on. You could not countersink and use a head washer instead, they look good.
    You only need to unscrew and adjust the platforms as they grow, no big deal. The screw will be almost invisible behind the leg and the edge of the platform at the front more comfortable.
    ​You can do a lot with very little! You can do a little more with a lot!

  3. #3
    Join Date
    Sep 2007
    Location
    Longview WA
    Posts
    27,432
    Blog Entries
    1
    My thought was dowels with handles from the sides.

    If you have threading tools they could be made with threads. You would likely need to make extra because of a young one's enthusiasm.

    jtk
    "A pessimist sees the difficulty in every opportunity; an optimist sees the opportunity in every difficulty."
    - Sir Winston Churchill (1874-1965)

  4. #4
    Join Date
    Dec 2010
    Location
    South Coastal Massachusetts
    Posts
    6,824
    If there's sufficient clearance, a strip of rubber cut from a bicycle inner tube could be glued to the underside of each movable "stair".

    I'm with you - if looks sharp without any obvious hardware. If you want something slick (but with a high fiddle factor) button catches might serve.

    https://www.thehardwarehut.com/catal...p?p_ref=192093

  5. #5
    Join Date
    Feb 2007
    Location
    Libertyville, IL (Chicago - North)
    Posts
    360
    Small blocks glued to the bottom can be screwed to the vertical rails. No one would ever see them. Yes, the screws need pilot holes in the rails, but I don't see them as any more consequential than the dados. I would keep it simple. You only need to change the location on rare occasions. If the screw holes get worn out (by your boy's fifth child), he can replace the screws with bolts that will thread themselves right into that oak.

    Cool design. I appreciate that there is no hardware visible. Your lean toward wedges makes me think you might not want steel screws. So, to stay with wood I'd run a flexible dowel between both glue blocks and into shallow holes on both risers. To adjust, simply pull at the center of the dowel to bow it enough that the tips withdraw from the holes.

    Finally, I enjoy imagining what that heirloom piece will look like after decades of service being passed around your clan. There's nothing like grape juice in deep teething scratches to develop a patina. Wear will highlight your precise chisel work.

  6. #6
    Join Date
    Aug 2007
    Location
    Dickinson, Texas
    Posts
    7,655
    Blog Entries
    1
    You might try making a wood filler to level the slot and glue it in place.

  7. #7
    Join Date
    Apr 2019
    Location
    Madison, Wisconsin
    Posts
    283
    Sorry for not responding earlier; I wasn’t trying to neglect the thread but have been unable to get into the shop to work on this (too many other things on my plate at the moment). I was hoping to have something worthwhile to post, but I am just not there yet.

    Thanks, everyone, for your input and advice.

    As a stop-gap I tried the idea of a strip of rubber until I can build quick prototypes of other suggestions. That’s working for now, but helping rather than fixing the problem. I intend to try a couple of the suggestions here as well as a variation that one of the ideas inspired. I’ll post pictures when I can finally find time to get it done.

    Best regards,
    Michael

  8. #8
    Join Date
    Aug 2012
    Location
    Missouri
    Posts
    2,152
    Cut a small dado across the leg to let in a thin strip of oak. Drill through the leg in line with the inside dado. Drill into the seat side just a bit, maybe 1/4”. Make a dowel to glue into the the strip of oak. Attach the dowel and attach the opposing end of the strip to the leg. The strip will act like a spring. Pull on the strip to get the dowel out of the seat to adjust. Drill more holes in the seat at points of your choice for adjusting. An 1/8” strip an inch wide should be enough to hold and work easily.

  9. #9
    Join Date
    Apr 2019
    Location
    Madison, Wisconsin
    Posts
    283
    Thanks again, everyone, for the suggestions.

    After a couple of prototypes, I went with something inspired by Bill's suggestion.
    20200601_195447.jpg

    20200601_195432.jpg
    I wanted to make it adjustable for my wife and myself, but not for our son. So, the dowels are taper fit into the blocks (which are themselves set in shallow mortises). The pins are tight enough that I have trouble removing them without grabbing pliers. They fit into blind holes in the risers, and the seat and foot plates lock securely into place.

Posting Permissions

  • You may not post new threads
  • You may not post replies
  • You may not post attachments
  • You may not edit your posts
  •