Page 1 of 3 123 LastLast
Results 1 to 15 of 33

Thread: Clamping odd angles

  1. #1
    Join Date
    Sep 2018
    Location
    South Carolina
    Posts
    121

    Clamping odd angles

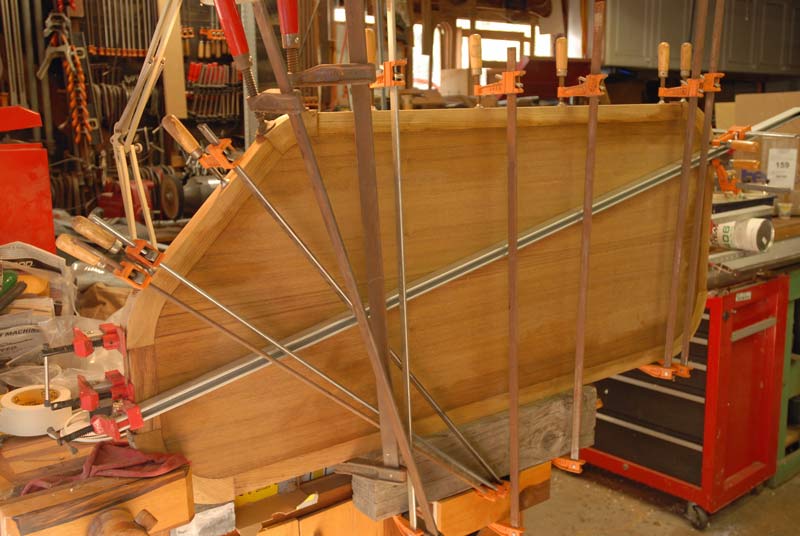
    I am working on a chair project and the angles are not 45deg. I tried the painters tape glued to painters tape with the cutoffs but it did not hold. I them tried clamping the cutoffs to the members to then clamping against across the assembled piece. It worked ok but not great. I have seen people use the old wooden clamps as blocks to clamp against so I may try that next, if I can find mine (never actually used them after dad gave them to me). I have the Rockler and Woodpecker 45deg clamp blocks, but they will not really help here. Any suggestions?

  2. #2
    Join Date
    Oct 2008
    Location
    Columbus, OH
    Posts
    3,064
    You can glue blocks to your work to provide something for clamps to grab on to. Then you pare off the blocks with chisels, block plane, etc.
    Brian

    "Any intelligent fool can make things bigger or more complicated...it takes a touch of genius and a lot of courage to move in the opposite direction." - E.F. Schumacher

  3. #3
    Join Date
    Mar 2009
    Location
    Red Deer, Alberta
    Posts
    918
    Depending on how much and how long, but black electrical tape pulls tighter than you would imagine - just stretch it good while you wrap it on...
    Funny, I don't remember being absent minded...

  4. #4
    Join Date
    Oct 2019
    Location
    Whitehorse, Yukon
    Posts
    72
    If a large amount of force isn't required to close the joints, I've found regular old hot melt glue with mdf blocks to work well.
    It's fairly easy to pop the mdf blocks off, but be sure to remove all traces of the hot melt glue, as it can get into the pores of the wood.
    The glue can cause problems with staining and finishing if not removed completely.

  5. #5
    Join Date
    Jan 2017
    Location
    Marina del Rey, Ca
    Posts
    1,938
    Sometimes you have to get creative with clamp placement.

    "Anything seems possible when you don't know what you're doing."

  6. #6
    Paul, I cant quite visualize your glue up. Could you make use of surgical tubing in some way.? LINK This stuff helped with a chair I needed to repair. It will let you cover a lot of oddball angles and it's pretty strong.
    "All that is necessary for the triumph of evil is that good men do nothing."

    “If you want to know what a man's like, take a good look at how he treats his inferiors, not his equals.”

  7. #7
    Join Date
    Dec 2007
    Location
    Valrico, FL
    Posts
    62
    Paul,

    I am in the process of glueing up bases for a pair of serpentine dressers with mitered and scrolled, 45 degree legs.
    An outstanding article by Steve Latta, FWW #204 May/June 2009 "When Clamps Fall Short" has been very helpful.
    There are numerous ideas including the use of packing tape which might help you in solving your problem.

    John J

  8. #8
    A picture would help define the problem.

    It sounds like you are trying to clamp a curved surface using clamped-on bandsawn offcuts, which is a valid approach. You may improve your chances by gluing sandpaper to the offcut to prevent sliding, or tacking the offcut with hot melt glue or yellow glue with brown paper between the parts. Sometimes it helps to add a flange to the offcut and clamp it to the adjacent surface, again with added sandpaper. Directing the clamp force at right angles to the glueline works best, so saw a ledge in the clamping block at the correct angle and centered on the joint.

    Stretchy stuff can work wonders. Stretch wrap is something I keep on hand.

  9. #9
    Join Date
    Mar 2006
    Location
    SoCal
    Posts
    22,512
    Blog Entries
    1
    Another vote for surgical tubing for odd-ball glue ups. Chairs are not that odd-ball. Watch some Fine Woodworking videos on chair making for examples. Strap clamps can come in handy for those of us who don't make enough chairs to qualify the time for making a lot of custom cauls. I use custom cauls for a lot of things besides chairs; the caul is cut to nest the odd part and provide an opposing clamping surface. Oddly, I have a ton of pictures of stuff in the shop and not one of a shaped caul being used(?). I hope you get the idea from my text.
    "A hen is only an egg's way of making another egg".


    – Samuel Butler

  10. #10
    Join Date
    Aug 2017
    Location
    Arlington, TX
    Posts
    452
    I would find those wooden hand screw clamps.

    That's what I have used to re-glue stretchers that have slipped out of their sockets. Their wooden bodies are good for creating temporary blocks to clamp onto (or create stops to keep band clamps from slipping up the legs.)

    Clamp one across the stretcher, near the socket, and another from the leg to the body of the other clamp.

    -- Andy - Arlington TX

  11. #11
    Join Date
    Mar 2003
    Location
    SE PA - Central Bucks County
    Posts
    65,885
    Quote Originally Posted by Brian Tymchak View Post
    You can glue blocks to your work to provide something for clamps to grab on to. Then you pare off the blocks with chisels, block plane, etc.
    This...and in many cases, you can use the super glue and painters tape trick to avoid actually gluing the wood together. Another technique is to leave material on the components at the angle necessary for "square" clamping and remove it after the fact. Many ways to accomplish this task and they may be different for alternative designs.
    --

    The most expensive tool is the one you buy "cheaply" and often...

  12. #12
    Would not the long jaws of parallel clamps help with this? When I worked in a cabinet shop, one of the guys used duct tape to glue odd pieces. He wrapped the stuff on, and pulled tight at each corner. Really worked well.

  13. #13
    Join Date
    Sep 2018
    Location
    South Carolina
    Posts
    121
    Rubber hoses sound like fun...oh wait, wrong forum. They actually do sound like an option, I will check into them.

    I have seen people glue Cutoffs to the work piece but I am hesitant to do that, too afraid I will ruin it when I remove the cutoff. I guess I need to do some practice pieces and find my wife’s hot glue gun.

    Leaving excess material on the work piece sounds like an option too. I would have to put the template back on to route it off so I would need to be careful.

    I have some of the Woodpecker Miter Clamping Tools that i did not even think about since they are intended for 45s, but they would probably work well for this.

    Below is a picture of how I clamped it. It worked ok, I just figured there would be a better way.
    Attached Images Attached Images

  14. #14
    Quote Originally Posted by Paul F Mills View Post
    Rubber hoses sound like fun...oh wait, wrong forum. They actually do sound like an option, I will check into them.

    I have seen people glue Cutoffs to the work piece but I am hesitant to do that, too afraid I will ruin it when I remove the cutoff. I guess I need to do some practice pieces and find my wife’s hot glue gun.

    Leaving excess material on the work piece sounds like an option too. I would have to put the template back on to route it off so I would need to be careful.

    I have some of the Woodpecker Miter Clamping Tools that i did not even think about since they are intended for 45s, but they would probably work well for this.

    Below is a picture of how I clamped it. It worked ok, I just figured there would be a better way.
    Paul,

    Seeing your project, I think your clamping approach could be improved, and you should consider something like the photos below:

    fw_cleverclamping_3-700x654.jpgmaxresdefault.jpg


    Since your angles will not be 45 degrees (i.e. a 90 degree workpiece joint), you can alter the angles of the clamping caul blocks accordingly, or you could use thin wedges to change the angles. The goal is for your clamping pressure to be across the joint. Use coarse sandpaper under the cauls to increase grip.

    Another way is shown below with glued on blocks that are easy to knock off after clamping. Some people glue a piece of newspaper under the blocks to make removal easier, but I did not find it necessary to do that. This was for a dovetailed mitered case thus the clamping blocks needed to be narrow to go in the spaces between the dovetails.

    DSC02019.jpgDSC02020.jpg
    Attached Images Attached Images
    Last edited by Edwin Santos; 04-29-2020 at 9:36 AM.

  15. #15
    Join Date
    Sep 2018
    Location
    South Carolina
    Posts
    121
    Quote Originally Posted by Edwin Santos View Post
    Paul,

    Seeing your project, I think your clamping approach could be improved, and you should consider something like the photos below:

    fw_cleverclamping_3-700x654.jpgmaxresdefault.jpg


    I really like the looks of that. I could cut a number of them for different builds.
    I may try the gluing blocks on that you and others have mentioned, but I think your other suggestion is what may work best for me at this point.

    Thank you to all of you for the suggestions.

Posting Permissions

  • You may not post new threads
  • You may not post replies
  • You may not post attachments
  • You may not edit your posts
  •