I just built my new bench which is my second hand tool bench. My first one was built when I knew nothing of hand tools it was intended for a different purpose, but I was able to convert it into a very serviceable hand tool bench when I caught the hand tool bug. Prior to that I was basically a homeowner with some tools that I needed for taking care of the house. That bench had a lot of flaws, but it served me well for three years and I built a lot of great stuff on it. For the past year Id been planning for a replacements and meticulously going over exactly what I wanted. Its finally done and Ive been using it gloriously for the past week.
Its a split-top Roubo and measures 42 tall and 26 wide (Im six and a half feet tall). Including the outer chop on the end vise its 67 long (77 with the tool tray). Its as big as I could possibly get away with in the space I have available for woodworking. After a lot of thought, I made it out of doug fir. I have an oak wall bench that I used for all kinds of homeowner stuff and much preferred the previous hand tool bench I had that was made from construction lumber. The vise is made from ash.
I did the bulk of this with hand tools and thanks to a busted right elbow I've been slowly working on it since December.
1 bench front.jpg
2 bench front end.jpg
3 bench front.jpg
4 bench back end.jpg

 Reply With Quote
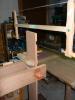


 .
.