Page 1 of 3 123 LastLast
Results 1 to 15 of 40

Thread: Project: New Main Bench Top (build)

  1. #1
    Join Date
    Mar 2003
    Location
    SE PA - Central Bucks County
    Posts
    65,859

    Project: New Main Bench Top (build)

    The time has come to replace the top of my main bench...it's beyond salvage physically and doesn't meet my current needs like it once did. The current top is a commercial maple piece that I bought at the same time I acquired my original Noden Adjust-A-Bench. It's warped, twisted, cracking and well...needs to go.

    So this is the saga of building this new benchtop for my main/primary workbench:

    IMG_7195.jpg

    Given the current state of suppliers being completely closed, this project is utilizing material I have on-hand, including a hefty block of 8/4 purpleheart that was gifted to me many years ago by a neighbor, some cherry slab cutoffs from a recent table top build and a piece of wide 5/4 cherry I acquired something like 15 years ago. Two pieces of white oak also joined the party, cut out of an OLD slab-like-thing I was gifted by Robert Tarr when he was moving to Idaho and cleaned out his shop here. As with my dedicated guitar bench, this new main bench top will have both a 96mm grid of 20mm holes as well as regular provision for .75" holes to support my beloved Gramercy hold-fasts. The end result will be something like this and is approximately 1600mm x775mmx80mm:

    MainBenchTop.jpg IMG_7060.jpg

    Since I'll cut the holes using my CNC, that software was the logical place to do the design...

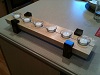
    The first components I worked on were the pieces of the 8/4 cherry cut-offs that would make up most of the heavy end of the bench where my vice will live.

    IMG_7058.jpg

    When using reclaimed material, sometimes some minor repairs are necessary....

    IMG_7059.jpg

    Ya know...milling up lumber tends to result in multiples of this...

    IMG_7061.jpg

    And continually makes this bigger. LOL If only we could easily glue it all back together to make more boards!

    IMG_7062.jpg

    The purpleheart was ripped on the bandsaw and then also milled to dimension. All of the components are 80mm tall and 45mm wide.

    IMG_7064.jpg
    Last edited by Jim Becker; 04-17-2020 at 6:35 PM.
    --

    The most expensive tool is the one you buy "cheaply" and often...

  2. #2
    Join Date
    Mar 2003
    Location
    SE PA - Central Bucks County
    Posts
    65,859
    With material sized, it was time to lay things out to ascertain size for some subsequent components

    IMG_7090.jpg IMG_7091.jpg

    As you can see, the full length rails are purpleheart and the rest is cherry with one piece of white oak in each side to fill out the width I needed/wanted. It would have been nice to use cherry instead of that white oak, but I didn't want to cut up a nice slab that's more suitable for a future project...the idea being using scrap and other things for this project.

    Something like this is best assembled from components, so the first glue-up was for the two sections at the heavy end that would be between the purpleheart rails.

    IMG_7094.jpg

    I used some 10mm Dominos to act as vertical alignment tools to be able to join the two glued up components to the center purpleheart rail.

    IMG_7095.jpg

    I cut two 150mm long 10mm Dominos for this task. As you can see, they pass through the center rail and absolutely line up both sides with the top as a reference point. The mortises were cut with the loose setting so there was play to line up the ends of everything even. You'll note that I'm using the CNC bed for these glueing operations....why? Because it's flat. That's kinda important here...I want the new benchtop to be assembled as flat as possible and then only a quick, light pass or two through a wide sander will be required to finish things up later.

    IMG_7097.jpg

    Test fit

    IMG_7098.jpg

    Glued up

    IMG_7099.jpg
    Last edited by Jim Becker; 04-09-2020 at 7:54 PM.
    --

    The most expensive tool is the one you buy "cheaply" and often...

  3. #3
    Join Date
    Mar 2003
    Location
    SE PA - Central Bucks County
    Posts
    65,859
    The last operation for the day was to first confirm the exact width needed for the 5/4+ cherry panels that will comprise the rest of the bench. That was done by clamping the side rails to the glued-up center portion so both sides could be measured.

    IMG_7101.jpg

    After straightlining the available 5/4+ cherry, I did determine that I had to shave just a little off each side of the glued up portion just because of actual yield from the available board. About 1mm shaved off was necessary and that was done on the sliding table saw.

    The cherry panels will have a "waterfall" end to have a clean appearance while still paying homage to wood movement. This bench will not have any cross grain so it can move seasonally across the width without any artificial hindrance. So the final act of the day was to glue on the waterfall ends (shown upside-down)

    IMG_7102.jpg

    Tomorrow, I'll use these pieces to finalize the length of the two side rails, get things setup with Dominos for alignment to the top surfaces and then glue up the entire assembly. From there, it will be to do a little structure on the bottom that's necessary for a mount point to the Adjust-A-Bench base, use the CNC to cut the holes, etc., and then hope that the nice folks at Bucks County Hardwoods will soon be able to make their sander available, although they are currently closed being a non-essential business. I can still mount the bench to use it until then, however, I'm going to wait on the vice install until after final sanding.
    Last edited by Jim Becker; 04-09-2020 at 8:04 PM.
    --

    The most expensive tool is the one you buy "cheaply" and often...

  4. #4
    Join Date
    Apr 2017
    Location
    Clarks Summit PA
    Posts
    1,744
    That is going to be a solid bench top Jim, and colorful!

  5. #5
    Join Date
    Mar 2003
    Location
    SE PA - Central Bucks County
    Posts
    65,859
    Yes, it is, Mark!
    -------

    Speaking of which... lots of progress today.

    The panels with the waterfall ends turned out really nicely...

    IMG_7105.jpg IMG_7106.jpg

    With those built, I could use them to make a final determination for length of the rails

    IMG_7107.jpg IMG_7108.jpg

    It was then back to the saw to trim them to exact length...well just a smidge over so I can bring the flush in the end. I will mention here that it was very nice to have a 12" blade for that cut on the rail already sandwiched in cherry.

    IMG_7109.jpg IMG_7110.jpg

    And then it was dry fit time and time to mark for Dominos that would insure everything stayed on the same level relative to the "top". The sander was just holding that center rail down flat while I did the marking...the piece of wood under the glued up end was a hair too thin and it was tipping up a hair.

    IMG_7114.jpg IMG_7112.jpg
    --

    The most expensive tool is the one you buy "cheaply" and often...

  6. #6
    Join Date
    Mar 2003
    Location
    SE PA - Central Bucks County
    Posts
    65,859
    From there, a whole bunch of Domino mortises got cut...again, in the wide/loose fit configuration because they are primarily for vertical alignment and this will be tricky to assemble even with some wiggle room.

    IMG_7115.jpg IMG_7118.jpg IMG_7119.jpg IMG_7120.jpg

    And then it was time to start gluing this sucker up. I chose to use Titebond III because it has a little more open time than the TB-II and TB-I and I knew this was going to be, um...fun...particularly because of having the tenons on both the end of the panel and on the sides at the center rail. The first side I ended up putting the Dominos along the rail in from the other side. First glueup was the (right side in the photos) panel to the center rail

    IMG_7121.jpg

    After the glue set for a bit, I added the outside rail on that side and re-clamped.

    IMG_7122.jpg

    THe process was then repeated for the other side of the bench after the glue sat for about an hour on the first side. In order to get this panel in, I had to lengthen the mortises enough to allow the end to slip in place straight. This isn't an issue, however, because the purpose of the Dominos is again, for vertical alignment. Copious amounts of glue are what is making the real joint and there will be some minor reinforcement on the bottom side eventually, too.

    IMG_7123.jpg.
    --

    The most expensive tool is the one you buy "cheaply" and often...

  7. #7
    Join Date
    Mar 2003
    Location
    SE PA - Central Bucks County
    Posts
    65,859
    Like previously, the panel was installed and clamped for a bit before the side rail was glued on.

    IMG_7124.jpg IMG_7125.jpg IMG_7126.jpg


    And....Houston, we have a bench top...

    IMG_7130.jpg

    The last thing I did today...after the delicious short ribs I prepared for family dinner...was to use this cute little heavy scraper from StewMac (a guitar building supplier) to scrape down the glue joints.

    IMG_7131.jpg IMG_7132.jpg

    The next time I work on this, I'm going to sand the living daylights out this top and then get the ten billion little holes cut using the CNC before flipping it over to do any minor reinforcement and make accomodation for attaching to the Noden Adjust-A-Bench base it will be living on. I'm going to hold off installing my vice for now other than drilling some holes while the bench is flipped over. I'm hoping that in a few weeks I can take it to get it sanded and for that, I can't have anything extended below the physical bottom of the benchtop as would be the case with a proper vice install.
    --

    The most expensive tool is the one you buy "cheaply" and often...

  8. #8
    Join Date
    Feb 2009
    Location
    Bucks County, PA
    Posts
    973
    It's looking awesome, Jim! As usual, great write-up as well.
    And there was trouble, taking place...

  9. #9
    Join Date
    Mar 2003
    Location
    SE PA - Central Bucks County
    Posts
    65,859
    Thanks, Steve. It's certainly going to be an attractive thing to look at when it's not covered with, um...stuff.
    --

    The most expensive tool is the one you buy "cheaply" and often...

  10. #10
    Join Date
    Dec 2004
    Location
    Cincinnati, OH
    Posts
    924
    Nice design with what you have on hand. Excellent presentation as well. You get more done in a day than I do in a month.
    Rustic? Well, no. That was not my intention!

  11. #11
    Join Date
    Nov 2007
    Location
    olmsted falls,ohio
    Posts
    490
    Beautiful jim.love all the different woods.you could make chairs and use it as a table lol.

  12. #12
    Join Date
    Mar 2003
    Location
    SE PA - Central Bucks County
    Posts
    65,859
    Quote Originally Posted by jim sauterer View Post
    Beautiful jim.love all the different woods.you could make chairs and use it as a table lol.
    Well, I do eat lunch at my bench occasionally...'can't leave the CNC running without supervision.

    -----

    Today was a very productive day on this benchtop project...a hole-y day on what is for many a very Holy day, if you will. Yup...I perforated the you-know-what out of this top. Well, more correctly, my yellow "shop assistant" did a nice job with the deed. . It's not something I think I would enjoy doing by hand and precision is very important when a grid of holes will be used for alignment during assembly, etc.

    Since the bench is much longer than my cutting capacity on the CNC, I did this work on the "solid" end first and then flipped the workpiece around. This was easily possible to do while maintaining exact registration by making sure that all the vectors to be cut were exactly centered on the job so that it didn't change anything in either the x or y direction relative to x-y zero...speaking of which, that was set to the front, left corner and then I screwed down supports so that the workpiece couldn't move and so that it could be flipped around and still be exactly in the same orientation to x-y zero.

    IMG_7137.jpg

    I cut the "solid" end first as that was only two rows of .75" hole for hold-fasts and dogs associated with the vice to be installed.

    IMG_7138.jpg

    I then flipped the workpiece around to cut the more involved end with the panels...both .75" holes for hold-fasts and 20mm holes in a 96mm grid for general assembly and work support

    IMG_E7139.jpg

    The final result was like this after I added an additional row of 20mm holes at the end of the panels

    IMG_E7140.jpg

    All the work on the "top" is essentially done outside of completing the .75" holes all the way through which I'll do once the bench is mounted on the Adjust-A-Bench base. At that point, I flipped the benchtop over so I could work on the support needed for attaching to the base on the "panel" end as well as preparing for the vice up at the solid end. One little note about the latter in a few minutes...a silly thing, you might say.

    The support for attaching to the bench is the only "cross grain" component so it's not glued in and accommodations are there for enough "float" to allow for reasonable seasonal wood movement. The two pieces were cut slightly short and are attached to the middle rail with what is effectively a floating arrangement using some old piece of metal from my odds and ends stash that had a long slot down the middle. The outside connection is with a single lag bolt in a recess which will be later plugged.

    IMG_7142.jpg IMG_7143.jpg IMG_7144.jpg IMG_7145.jpg
    --

    The most expensive tool is the one you buy "cheaply" and often...

  13. #13
    Join Date
    Mar 2003
    Location
    SE PA - Central Bucks County
    Posts
    65,859
    It was then that I turned to the vice preparation. And I'm going to tell you up front that I have to redo this tomorrow...it's on the wrong side of the bench. LOL But only mechanical fasteners were used (because I need to be able to remove the vice once I can get this out to be sanded in the wide double drum sander at Bucks County Hardwoods) so I only need to drill a few holes to rectify the position. There were a few small lessons learned about putting lag bolts into purpleheart here...most importantly don't underestimate the size you need for your pilot holes. This stuff is HARD and I snapped off a lag bolt. Fortunately, an adjustable plumber's wrench was able to grab it for careful removal.

    Layout...

    IMG_7146.jpg

    Fixed face vertical extension (no glue...only lags for now...thankfully due to above mentioned, um...brain fart.
    IMG_7147.jpg

    Clearance holes....
    IMG_7148.jpg IMG_7149.jpg

    And the work on the bottom is done...other than quickly relocating the vice to the correct side and some minor trimming at the bottom of the waterfall end.
    IMG_7150.jpg

    Oh, the vice movable face is glued up and will get drilled, etc., once the bench is flipped over and I can position it absolutely level with the top.

    IMG_7151.jpg

    I only have a few small pieces of purpleheart left at this point...it's remarkable how much I got out of that one board that was in the rack all these years!
    Last edited by Jim Becker; 04-12-2020 at 6:57 PM.
    --

    The most expensive tool is the one you buy "cheaply" and often...

  14. #14
    Join Date
    Jan 2006
    Location
    Grand Forks, ND
    Posts
    2,336
    Super nice Jim!! Looking forward to more progress pics. Any finish planned for the top?
    A bus station is where a bus stops. A train station is where a train stops. My desk is a work station.

  15. #15
    Join Date
    Mar 2003
    Location
    SE PA - Central Bucks County
    Posts
    65,859
    Quote Originally Posted by Jeff Monson View Post
    Super nice Jim!! Looking forward to more progress pics. Any finish planned for the top?
    I'm seriously debating the idea of a finish. Normally, I just use BLO which is renewable and I may still do that here with some wax. But if I fashion a protective cover from hardboard or something that I can flop on top if I'm doing something messy, I may consider a nicer finish. I do not intend to "beat" on this bench as I'm not a big hand tool user...I pull them out for finesse work primarily...so the biggest challenge is insuring glue drips release and that I don't get overspray on it while finishing. The latter will be more of a "change habits" thing. I have a little time to think about this, however, since until I can get it into the wide sander, I'm not going to worry too much about finishing. Chances are, it will be oil and wax because it's easily renewable.
    --

    The most expensive tool is the one you buy "cheaply" and often...

Posting Permissions

  • You may not post new threads
  • You may not post replies
  • You may not post attachments
  • You may not edit your posts
  •