Page 1 of 2 12 LastLast
Results 1 to 15 of 19

Thread: Make a molding..

  1. #1
    Join Date
    Jun 2010
    Location
    twomiles from the "peak of Ohio
    Posts
    12,169

    Make a molding..

    Just a few cutter changes are needed..
    Pattern.jpg
    To go from this, to..
    pattern done.jpg
    This..Step one..
    step 1.jpg
    I cut a bead, next
    step 2.jpg
    Change to a cove bit in the Stanley 45...next
    step 3.jpg
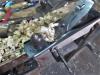
    Switch to a straight cutter, and make a rebate, next..
    rip line.jpg
    Figure out the line to rip to...
    Finally, install the molding....
    good corner.jpg
    Sand/scrape to finish up
    opened lid.jpg
    Call it good. Rebate can be done with a Stanley #78. I made the cove cutter by regrinding a 3/4" wide cutter to shape.
    Be sure to make long enough "sticks" to allow for the corners.

  2. #2
    Join Date
    Oct 2016
    Location
    Jura, France
    Posts
    118
    Thank you Steven, it is always interesting to see the different steps involved.

    What is the reason for the rebate? Wouldn't it be stronger to have the moulding and the box bottom resting at the same level?
    Last edited by Axel de Pugey; 04-02-2020 at 10:09 AM.

  3. #3
    Join Date
    Jun 2010
    Location
    twomiles from the "peak of Ohio
    Posts
    12,169
    Rebate for the box to sit on, as I sometimes cut curved spaces along the bottom to make smaller "feet".

  4. #4
    Nice work.

    I picked up a Stanley 45 not long ago, and quickly learned several things:

    1. It works
    2. It ain't as easy as it looks
    3. Folks who use these are tough

  5. #5
    Thanks, Steven. Good to see that pile of cutters used. Some might be saying "those things really work?". Many have
    enjoyed owning those ...few have used them!

  6. #6
    Join Date
    Sep 2007
    Location
    Longview WA
    Posts
    27,433
    Blog Entries
    1
    Quote Originally Posted by Mel Fulks View Post
    Thanks, Steven. Good to see that pile of cutters used. Some might be saying "those things really work?". Many have
    enjoyed owning those ...few have used them!
    Some see the Stanley #45 as training wheels for moving up to the Stanley #55.

    Making molding can be fun > https://sawmillcreek.org/showthread.php?225903

    An old trick comes in handy when attaching molding > https://sawmillcreek.org/showthread.php?232798

    A little detail or shape can add interest well worth the added effort.

    jtk
    "A pessimist sees the difficulty in every opportunity; an optimist sees the opportunity in every difficulty."
    - Sir Winston Churchill (1874-1965)

  7. #7
    Join Date
    Mar 2004
    Location
    DuBois, PA
    Posts
    1,904
    Quote Originally Posted by carey mitchell View Post
    Nice work.

    I picked up a Stanley 45 not long ago, and quickly learned several things:

    1. It works
    2. It ain't as easy as it looks
    3. Folks who use these are tough
    You omitted #4! It's loads of fun!
    If the thunder don't get you, the lightning will.

  8. #8
    Join Date
    Apr 2007
    Location
    Columbus, Ohio, USA
    Posts
    3,441
    That is very cool. I enjoy seeing how this is done.

  9. #9
    Join Date
    Jun 2010
    Location
    twomiles from the "peak of Ohio
    Posts
    12,169
    Hardest part, is marking out what you need for a molding, then "break it down" into a series of steps....as to which cutter to use..and which to use first....

  10. #10
    Join Date
    Jul 2014
    Location
    Edmond, Oklahoma
    Posts
    1,750
    Steven,

    I was thinking the #45 only came with cutters for cutting grooves, dados, rabbets, beads, and flutes. Am I wrong on this, or did you figure out a way to get it to cut the cove with an existing iron or figure something else out?

    My 45 only has the dado/rabbet/groove irons, a sash cutter, a tongue iron for tongue and groove work, a splitter, and beading irons I think. I would have to go out in the garage and look to know for sure, but that is what I am thinking. I am not sure if I could convince it to cut a cove.

    Thanks and regards,

    Stew

  11. #11
    Join Date
    Jun 2010
    Location
    twomiles from the "peak of Ohio
    Posts
    12,169
    There was a 3/4" bead cutter (WOW) that got reground into a cove, of sorts....since you only need half of the cutter.....have since used it as a full width cutter.

    Set the skates to support as much of the cutter as you can. Take as shallow a cut as you can to start with...then advance the cutter as needed..

  12. #12
    Join Date
    Oct 2016
    Location
    Jura, France
    Posts
    118
    Sorry if this is sounds naive but I always wondered, to do the initial marking on the end grain, do you just take the iron out and draw a line arount it?
    If you are planing to use several irons next to each other it must be tricky to draw accurately.

  13. #13
    Join Date
    Jun 2010
    Location
    twomiles from the "peak of Ohio
    Posts
    12,169
    Draw the "pattern" out on paper first...Using the cutters that you think will match the molding you want to make.

    That re-ground "Cove" cutter looks just like someone had turned it into a "Cambered" iron. I used the right hand part of that cove cutter.

    If you all want, I can post a picture of that cutter...
    fourth groove.JPG
    Grooves for Auger bits to rest in...
    third groove.JPG
    Black circle is called the Cam Rest, used when the distance between the fence (yellow circle) and the plane is a bit too wide, prevents the plane from tipping over to the side.
    stanley 45.JPG
    All set up, and ready to get "groovy", man....

  14. #14
    I wish the Veritas Combination Plane had coves and beads. I have considered grinding some but then I look at router table and pick up the ear muffs.

  15. #15
    Join Date
    Jun 2010
    Location
    twomiles from the "peak of Ohio
    Posts
    12,169
    The only reason I need ear muffs, is if they can also play music, or...deafen all the cussing in the shop......

Posting Permissions

  • You may not post new threads
  • You may not post replies
  • You may not post attachments
  • You may not edit your posts
  •