Page 1 of 2 12 LastLast
Results 1 to 15 of 20

Thread: Help with Stickley wastebasket build--wood, metal

  1. #1
    Join Date
    Jul 2007
    Location
    Seattle, WA
    Posts
    116

    Help with Stickley wastebasket build--wood, metal

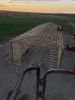
    I'm interested in trying to reproduce this Stickley No. 94 Scrap Basket:

    wastebasket quarter top.jpgbottom hoop.jpgStickley no 94.jpg

    It's tapered and uses solid rivets to attach the white oak staves to the iron hoops. I'm interested in this because it seems like a good excuse to use some oak off-cuts and learn a few new skills. For such a simple-seeming project, I could use help with a bunch of things:

    1.
    The 1910 Stickley catalog refers to "wrought iron hoops."
    I'm assuming I can make the metal hoops out of cold-rolled sheet metal by hammering it cold to form and taper it slightly, like a cooper might make barrel hoops. Does that sound reasonable? Any guesses from the photos about the gauge of metal?
    2. I don't see any obvious seams or joints in the hoops in any of the photos I've seen of the inside of the basket. I'm not sure if the original would have been welded, but that's what I'm thinking of doing. Any better ideas?
    3. The rivets and hoops have a nice black finish. I've found articles online on how to achieve a black finish on iron, but they all seem to involve heat and/or used motor oil. How do I get the rivets to turn black after peening them on the inside? I obviously can't use heat and oil or toxic chemicals where the metal contacts wood. I assume fuming the piece with ammonia won't cause the metal to darken, but I couldn't find a definite answer on that. Any ideas?
    4. Finally, a woodworking question: How to shape the concave surface of the inside of the staves? I know there are specialty planes and drawknives used in barrel making, but that seems like overkill for such a small project. Possible make a Krenov-style plane with one of Ron Hock's radius-edge plane irons, then smooth things out with cabinet scrapers? The staves appear to be almost flat at the bottom but have a pronounced concave face at the top. Carving a changing amount of concavity bottom to top seem to call for hand work, even if there might be a way to do it with a router on a sled.
    5. The solid wood bottom fits into a dado cut in the ends of the staves. I think I can figure out a way to do that with a slot cutter in the router table, but it's not completely obvious how to do it. Again, this is something barrel makers have a dedicated tool for but I don't. Any brilliant ideas?

    I'd appreciate any thoughts you folks might have. I've been puzzling over these points for a while now, but am almost done with my current project so will have time to start on this one soon.

    Thanks!
    Warren
    Attached Images Attached Images

  2. #2
    Join Date
    Mar 2003
    Location
    San Francisco, CA
    Posts
    10,321
    I can't imagine that the radius on the inside face of the staves changes from top to bottom. I'd bet it is constant. Both Stickley and you can make that without crazy efforts. You can use that Krenov/Hock handplane. Or there is a technique for milling that shape with a table saw. In essense, you slide the staves left-right over the top of the blade which is barely protruding from the table's surface. It is a standard technique; look it up for more details.

  3. #3
    Join Date
    Mar 2003
    Location
    San Francisco, CA
    Posts
    10,321
    Me, I'm a pretty skilled woodworker, but I am intimidated by metal working. I'd seriously consider making Stickley's iron hoops from wood. I'd try either of two methods. One would be steam bending -- white oak bends very well. Or I'd do it with curved lamination -- wrapping veneer around a form, gluing as I wrap.

    And I'd consider using copper rivets instead of iron. They're readily available. Copper looks great with white oak. And copper is completely period-correct.

  4. #4
    Join Date
    Oct 2008
    Location
    Columbus, OH
    Posts
    3,064
    Quote Originally Posted by Jamie Buxton View Post
    I'd seriously consider making Stickley's iron hoops from wood. I'd try either of two methods. One would be steam bending -- white oak bends very well. Or I'd do it with curved lamination -- wrapping veneer around a form, gluing as I wrap.
    I'm thinking it would be difficult (impossible?) to bend a straight strip of wood into essentially a short cone with the top edge radius greater than the bottom edge radius. I think that the hoop will have to created out of segments made into a ring and then routed or turned to a cone?? The segments would need to be edge glued to have any strength.

    You might be able to cut circles from the veneer to form a cone but to laminate the veneer circles into a thicker cone, each circle would have a slight difference in radius to account for the thickness of the veneer. Hmm, interesting woodworking challenge.
    Brian

    "Any intelligent fool can make things bigger or more complicated...it takes a touch of genius and a lot of courage to move in the opposite direction." - E.F. Schumacher

  5. #5
    Join Date
    Nov 2009
    Location
    Peoria, IL
    Posts
    4,506
    I'm sure the originals hoops would have been forge welded in a blacksmith shop. You could use flat head rivets you didn't want to weld it. But you would have to taper the steel to keep it smooth around the wood. I doubt if the steel was less than 1/8" thick. I'd fume the oak before assembly. You may need to do some dye touch up if there is any sapwood. An inshave is the tool for making the cove on the staves

  6. #6
    Join Date
    Sep 2016
    Location
    Modesto, CA, USA
    Posts
    9,979
    If you fume iron/steel it will rust to black and turn the oak touching it to black for 1/4 -1/2 inch. Try a little scrap in a glass jar and see what happens. Hold it up with plastic so it does not soak in the liquid. Have it touch some oak in there as well. A bare nail pounded into wood comes to mind. Or wrap some baling wire around the board.
    Bil lD

  7. #7
    Join Date
    Sep 2016
    Location
    Modesto, CA, USA
    Posts
    9,979
    I would form the ring from strap then rivet the ends with flush head rivets if you do not want to weld or solder.
    Bil lD

  8. #8
    Join Date
    Jul 2007
    Location
    Seattle, WA
    Posts
    116
    Thanks, all. I definitely considered making the hoops from oak, but I sort of like the challenge of doing them the original way. But that might be more project than I need at this point. I'm intrigued by the idea of forge welding, but my little propane forge isn't going to cut it. I might try flush rivets--thanks for the suggestion.

    I agree that the concavity in the staves might be constant over their length and I'm just not seeing much of it at the bottom because the staves are narrower there, so the curve is less pronounced.

    Best,
    Warren

  9. #9
    Join Date
    Mar 2003
    Location
    SE PA - Central Bucks County
    Posts
    65,854
    You could make the hoops out of wood with a taper if you taper the material before bending. A simple jig setup will allow you to do that with your thickness planer using a full length shim and the "superglue and masking tape" hold-down method. When you bend them into a circle, the thicker portion is to the top. And yes, it will require a bit of hand work where the two ends have to join. But I believe it's doable.
    --

    The most expensive tool is the one you buy "cheaply" and often...

  10. #10
    Join Date
    Jun 2007
    Location
    Peoria, IL
    Posts
    46
    Here's a link to Woodsmith's plans for a similar waste basket. Like you, I would prefer the metal straps but this might give you some other ideas for construction.

    https://www.woodsmithplans.com/plan/...epaper-basket/

  11. #11
    Join Date
    Oct 2011
    Location
    Seattle
    Posts
    549
    Hi Warren,
    I made bucket "kits" for for our community Fall Festival(Woodway Wa.- just south of Edmonds- 15min N of Seattle!) for the kids to assemble.
    Made 75 kits--what was I thinking-- hundreds of tapered cuts--. I used #12 wire to make the hoops. Couldn't figure out how to form metal easily.
    For the dado cut on the stave bottoms--cut them on the TS before you taper the staves. I still have the tapering jigs and a faint memory of how I did it all
    so if you need help let me know. I was asked by the Guv. to shut down my office 'til May 18th so I have time!!! Good luck, John Bush.

  12. #12
    Join Date
    Jul 2007
    Location
    Seattle, WA
    Posts
    116
    Fantastic--I guess that's one way to make the rivets the color you want them--make 'em out of wood!

  13. #13
    Join Date
    Jul 2007
    Location
    Seattle, WA
    Posts
    116
    Thanks! I was thinking the dado would have to track a hollowed-out stave, so cutting them flat on the table saw wouldn't work. But there won't be much concavity at the bottom and you can't see the dado when the bottom is inserted, so maybe that would work.

  14. #14
    Join Date
    Oct 2011
    Location
    Seattle
    Posts
    549
    Warren,
    Forgot to mention that you want to tilt your dado stack to match the angle of the stave. JCB

  15. #15
    Join Date
    Jan 2008
    Location
    Western Nebraska
    Posts
    4,680
    Rolled hoops are fairly easy to find, google will find a few pages of companies eager to sell them. I'd just build my own, take a strap and a band clamp, make a circle and MIG weld the beveled ends. Grind weld flush, and presto. Depending on how you want them to look, you could beat them up a little to look hand forged, and use one of the patina techniques to get the color. I personally wouldn't taper them, I'd use a thin steel like 11 gauge (1/8") , rivet to the top one first, then use a strap clamp to squeeze them to the smaller bottom hoop. The top one would flex slightly, and you'd get the look you are going for. This would also make the basket lighter than forging something thicker. Unless you want a 50# basket...

Posting Permissions

  • You may not post new threads
  • You may not post replies
  • You may not post attachments
  • You may not edit your posts
  •