Page 1 of 3 123 LastLast
Results 1 to 15 of 34

Thread: Interested in hand tools but scared of sharpening? Hear me out on this!

  1. #1
    Join Date
    Jul 2019
    Location
    Northeast WI
    Posts
    571

    Interested in hand tools but scared of sharpening? Hear me out on this!

    I am by no means an expert on sharpening. I'm not. But I can sharpen well enough that I can get done what I need to do. What I am about to say is my opinion, so please take it for what it's worth.

    A friend stopped by my shop the other day and was really interested in my hand tools. He said he was thinking about getting into it but was intimidated by sharpening and the investment of sharpening supplies. This made me think.

    When I was learning how to sharpen I watched tons of videos on the internet and read articles with people who have diamond stones and other fancy equipment. Rob Cosman, Paul sellers, the third coast Craftsman all used diamond stones.I looked at the price of this stuff and honestly was afraid to get started because of the investment. I was afraid if I didn't buy the best of the best I wouldn't get results.

    When I eventually did buy my stuff, against all the wisdom on the internet and YouTube, I bought a cheap Norton double sided oil stone and really cheap strop that came with some compound. All in all I think I spent $32. I added some mineral oil for lubricant and a cheap set of Irwin chisels and I was off to the races. I bought what I could afford.

    What I learned with my cheap stone and chisels is that after my first sharpening I made the chisel sharper. I followed the tips and tricks I learned online and improved my tool. And the more I sharpened the sharper my tool got. I was learning and building confidence.

    I don't know how many videos I watched or articles I read that say start with diamond stones so you don't have to upgrade in the future. While this is a valid point, I don't believe it's the most practical. Was your first car a Ferrari?
    Eliminate the stress of how much money you spent while you learn.

    If you are wanting to learn how to sharpen, buy a cheap oil stone, a cheap strop, and a cheap chisel. Focus on technique and form. Learn how to move and hold the blade properly. If you make a mistake, so what? You're not out a ton of money. Learn by doing! Build your confidence.

    The point I am trying to make is don't feel like you need to buy hundreds of dollars of sharpening equipment to get started. Don't stress about making mistakes and focus on learning. I am telling you making a mistake on a $7 chisel is much less painful than a mistake on a $100 chisel.

    I know this may be common sense, but if it helps give someone confidence to buy cheaper equipment and get their feet wet, I feel it's worth it.

    Don't be afraid to start with cheap equipment. The experience you will gain is priceless, and when you do upgrade, you will have the confidence to do the job right.

  2. #2
    Join Date
    Sep 2007
    Location
    Longview WA
    Posts
    27,433
    Blog Entries
    1
    And the more I sharpened the sharper my tool got.
    This is a common phenomena. Even though my sharpening ability has been able to bring edges to the point of shaving hair, my sharpening abilities and understanding is still improving.

    One helpful thing people can do to accelerate their freehand sharpening skills is to video your sharpening from the side. This will help one to see if their hands are holding the bevel angle steady.

    jtk
    "A pessimist sees the difficulty in every opportunity; an optimist sees the opportunity in every difficulty."
    - Sir Winston Churchill (1874-1965)

  3. #3
    Join Date
    Nov 2013
    Location
    United Kingdom - Devon
    Posts
    503
    Could not agree more. To get started this set up is perfect, further it's my set up at work. I think a combination stone would keep 90% of woodworkers happy for life.

    At home I bought a fine oil stone from a flea market and spent time collecting good vintage tools. In my opinion this takes it up a notch. However it's not essential.

    I find project time the hardest thing to get.

  4. #4
    Join Date
    Feb 2004
    Location
    Perth, Australia
    Posts
    9,492
    If you are wanting to learn how to sharpen, buy a cheap oil stone, a cheap strop, and a cheap chisel.
    Jason, in principle I agree with all you wrote. You do not say whether you are going freehand or using a honing guide, nor whether you have a grinder, or a way to grind a primary bevel. This complicates the matters somewhat, so we need to find a recommendation that simplifies it back again.

    To the oilstone, which is what I started on, I would add sandpaper-on-glass, which is what I moved to. Waterstones and diamond plates were well into the future.

    I have nothing against a honing guide. These do make the process easier (not necessarily more efficient, nor train a skill which may be transferred to other angles). I believe that more would take up hand tools if they had a way of getting blades sharp at the start of the learning process. Not everyone wants to put time into freehand sharpening, but this would be the next step for those when they are ready.

    Grinding a primary bevel can be done on sandpaper with a honing guide. This also lets the beginner rescue their blade and start over.

    Regards from Perth

    Derek

  5. #5
    Join Date
    Dec 2010
    Location
    South Coastal Massachusetts
    Posts
    6,824
    Quote Originally Posted by Jason Buresh View Post
    I bought what I could afford...

    I know this may be common sense, but if it helps give someone confidence to buy cheaper equipment and get their feet wet, I feel it's worth it.

    Don't be afraid to start with cheap equipment. The experience you will gain is priceless, and when you do upgrade, you will have the confidence to do the job right.
    I could not have said this better, myself.

    Even Waterstones are now available at reasonable prices.

    Kudos

  6. #6
    Join Date
    Jul 2019
    Location
    Northeast WI
    Posts
    571
    Quote Originally Posted by Derek Cohen View Post
    Jason, in principle I agree with all you wrote. You do not say whether you are going freehand or using a honing guide, nor whether you have a grinder, or a way to grind a primary bevel. This complicates the matters somewhat, so we need to find a recommendation that simplifies it back again.

    To the oilstone, which is what I started on, I would add sandpaper-on-glass, which is what I moved to. Waterstones and diamond plates were well into the future.

    I have nothing against a honing guide. These do make the process easier (not necessarily more efficient, nor train a skill which may be transferred to other angles). I believe that more would take up hand tools if they had a way of getting blades sharp at the start of the learning process. Not everyone wants to put time into freehand sharpening, but this would be the next step for those when they are ready.

    Grinding a primary bevel can be done on sandpaper with a honing guide. This also lets the beginner rescue their blade and start over.

    Regards from Perth

    Derek
    Derek,

    You make an excellent point that I failed to mention. I do have a honing guide I use strictly for grinding primary bevels. And I do use the sandpaper and glass method for that process.

    I feel the sandpaper and glass method is not an economical choice for everyday sharpening due to the cost of snadpaper, but for regrinding a bevel the extra surface area to move around on while using a guide is a big plus.

    I use an inexpensive guide from Amazon. While it can be tricky to set up, for $12 and how often I use it I can't complain.

    I find with grinders you can screw up an angle much faster than a slow and steady hand sharpening. That's my lack of experience though.

  7. #7
    I like your post because I think newbies like me can be intimidated by the amount of verbiage spilled on the right or best way to sharpen. All those opinions remind me of martial art enthusiasts arguing about what master teaches the authentic form. I'll second Derek's nod to wet/dry sand paper. I got a thick hunk of glass for free from a glazier, and you can buy a small amount of sheets while you learn. I'd favor this method because you don't have to worry about damaging your stone, and water's less messy.

  8. #8
    Thanks for this post, Jason. I certainly agree. I have often recommended a medium India and Soft Arkansas combination stone and a piece of smooth leather as a viable sharpening system. This is certainly good enough for high quality professional work.

    One of the problems with buying expensive gear is that so much of this stuff is designed and promoted by people who don't have much experience or judgement themselves. For example there are people who encouraged the purchase of $500 or $1000 of Shapton stones, who themselves now no longer use these products. They left behind the people who followed their advice and bought these products. The idea that one should buy quality gear to start with fails when there is so much poor information around. There are people designing chisels who barely know how to use a chisel.

  9. #9
    Join Date
    Jan 2019
    Location
    Fairbanks AK
    Posts
    1,566
    The opening post in this thread is why I think this website needs some kind of 'like' button. Well said OP.

  10. #10
    Join Date
    Mar 2019
    Location
    Los Angeles, California
    Posts
    970
    I took two classes, each two days long, on sharpening. One class focused on Japanese water stones, the other using DMT Diamond Stones method, with Japanese stones for the final polishing. Of the two, I favored the DMT method. Both used Veritas Guides.
    Regards,

    Tom

  11. #11
    Join Date
    Feb 2004
    Location
    Perth, Australia
    Posts
    9,492
    It is probably appropriate to post an article from my website, written in 2006, "The 10 cent sharpening system".

    It also includes a clever honing guide by the late Brent Beach, who passed away a few months ago.

    Regards from Perth

    Derek


    The 10 Cent Sharpening System


    I had a visitor today in the form of Mike, a primary school teacher, who was setting up a woodworking program for his kids at school. What is exemplary, he is doing this on his on initiative and out of his own pocket. Several Perth members of the Ubeaut woodworking forum had donated planes. When I heard of Mike’s wonderful effort I felt that the least I could do would be to hone the blades, tune the planes and ready them for use.

    Of course, little did I know that this involved 8 of the most abused and rejected planes – four #4s and four block planes – all cruddy and warped. Thanks to the miracle of electricity and a large belt sander, all soles were flattened, all blades and chip breakers de-rusted, blades ground and honed to razor edges, and planes tuned to take fine shavings. And in just 3 hours!

    I anticipated that Mike would need some strategy to maintain the sharp edges. So I came up with “The 10 cent Sharpening System”, which actually cost nothing since I just used a few scraps lying around. However quick and cheap to make, this is really a serious sharpening system and I've posted it here so that others might enjoy using it as it is so compact and works very well. Mike timed me taking a blade with a rough primary bevel to a razor edge in under 30 seconds.
    None of this system is original. Just my adaptation in this package, which I consider perfect for the thinner Stanley blades, since the primary bevel on these can be ground rapidly on sandpaper.

    At this price we are talking Scary Sharp, that is, the use of wet-and-dry sandpaper as the sharpening medium. I only used one grit – 600 – but I later made provision for lower grits as well. In addition to the 600 grit W&D, I used .5 micron Veritas green compound.

    For a honing guide, the best at the price (5 cents) is the jig designed by Brent Beach. No, just kidding. This is a cracker of a jig at any price as used in this type of system.

    Here is Brent’s jig.


    Where Brent uses a glass substratum, I purposefully built this from an off-cut of MDF. The honing guide was just a block of Tasmanian Oak from the scrap bin. I am not sure of Brent’s dimensions here, but I suspect that the one I built is lower (I used the same height as a Eclipse guide). One possible advantage is that the set up is compact. The disadvantage is that the backbevel angle is 10 degrees, so micro backbevels need to be done as per David Charlesworth’s “Ruler Trick”, that is, with a steel ruler.


    So what is the system?

    There are three parts: the honing guide, the honing board, and the guide angle set.


    The honing guide

    My Brent Beach copy:


    The honing board

    What we have here is 600 grit W&D contact glued to the MDF. Later I realized that a better system would be to simply have two clamps (using bolts and butterfly nuts) so that sandpaper strips could be changed out.

    The far end is a section with Veritas green compound – just “scribble” this on the MDF.In between the two, the MDF surface is given a coat of wax to reduce friction.


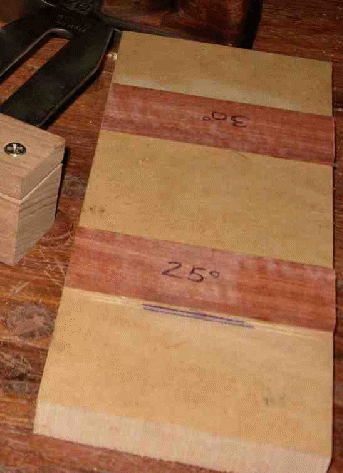
    The Guide Angle Set

    There are two elements here.

    Firstly, the depth of projection is set for 25- and 30 degrees. This also automatically squares the blade in the guide.

    Secondly, here I have drawn in lines for microbevels (1/32” is sufficient for a 1-2 degree secondary bevel) – just shorten the projection to these lines.

    Later (again!) I realised that a better system would be to just use a shim (one for each reduction) placed against the fence to set the depth.


    Method

    Most know this process well.


    • Grind a primary bevel (I used 120 grit on a belt sander in this project. One could use a 6” grinder with a coarse 38 grit wheel, or even sandpaper glued to a longish grass plate and run the jig sideways along one side of the glass). The Guide Angle Set will enable one to grind this at 25- or 30 degrees. Use 25 degrees for the primary bevel.


    • Set the blade for a secondary bevel on the 600 grit (pull the blade back to the first line), and hone on the 600 grit W&D. The bevel created this way needs only to be 1/64 - 1/32” wide.


    • An alternative to the 1-2 degrees created this way (which is preferred for block planes) is to use the 30 degree setting. This is preferable for bench planes and bench chisels.


    • Hone this further (same angle) on the green compound. This step will polish the bevel but not widen it further.


    • Use the Ruler Trick to remove the wire edge (a particular boon on older blades with non-flat backs).


    Items 2-4 took about 30 seconds.


    In summary, there are many ways to sharpen a cat – but none cheaper or simpler.


    Derek Cohen
    Perth, Australia


    June 2006

  12. #12
    Join Date
    Jan 2007
    Location
    Michiana
    Posts
    3,071
    Quote Originally Posted by Jason Buresh View Post
    Don't be afraid to start with cheap equipment. The experience you will gain is priceless, and when you do upgrade, you will have the confidence to do the job right.
    Good advice. I started with sandpaper and a $10.00 honing guide. As it turned out, I stuck with a low cost alternative, namely PSA abrasive film on glass blocks that are glued to MDF. If I need to establish a new edge I hollow grind on a Borg grinder or use an inexpensive diamond stone I got at a sporting goods store. The abrasive film does the rest. I made a couple strops for the last couple swipes and to keep things fresh while using. I generally find keeping things sharp is easier than getting things sharp.

    As I've continued down the path I have upgraded my honing guide to a LN, but that's about it. Otherwise I've stuck with the "cheap" methods and I'm telling you they works just as well as the expensive stuff.

    26712452175_7e480b7af1_b.jpg
    Sharp solves all manner of problems.

  13. #13
    Join Date
    Apr 2015
    Location
    New England area
    Posts
    588
    $200 gets you all you need - a basic 6" grinder, a medium stone, a fine stone, strop and dressing. Could be done for less if you choose a grinder-less option like sandpaper.

  14. #14
    Join Date
    Dec 2016
    Location
    South West Ontario
    Posts
    1,503
    I bought a single sided oil stone to start, made a box for it, still have it, bet most have one somewhere.

    Of the jump to water stones buying the guide is the most painful expense. Look in Re-stores, I found the standard Lee Valley pair of water stones for Cdn$40 for my son.

    You will jump to water stones or diamond eventually but the initial oil expense is small. Diamond plates did not impress me, leaving fine scratches on the edge but they do sharpen for a while then seem to wear out and take forever; not so with water stones.

    The other painful expense with water stones is a flattening method. Rubbing them together helps but is very lengthy. My large CBN plate does a fantastic job quickly.
    ​You can do a lot with very little! You can do a little more with a lot!

  15. #15
    Join Date
    Mar 2016
    Location
    Millstone, NJ
    Posts
    1,631
    I started with scary sharp technique on glass.(cost me all of about 30 in paper/film I couldn't get this to work for me so I moved to dmt diamond. This would leave everything rougher than I would like so i switched again to water stones

    I started with 2- 1000 and 3000 then over time I bought 1 every few months 2000,5000,10000 and a dmt diaflat. then added strop/compound.

    If I were to do it again i would get a 1000/3000 water stones supplemented with paper/film from the start and add to it over time. I could have saved in the long run.

Posting Permissions

  • You may not post new threads
  • You may not post replies
  • You may not post attachments
  • You may not edit your posts
  •