Page 1 of 2 12 LastLast
Results 1 to 15 of 16

Thread: Sometimes, it's just a little thing that makes something better

  1. #1
    Join Date
    Mar 2003
    Location
    SE PA - Central Bucks County
    Posts
    65,836

    Sometimes, it's just a little thing that makes something better

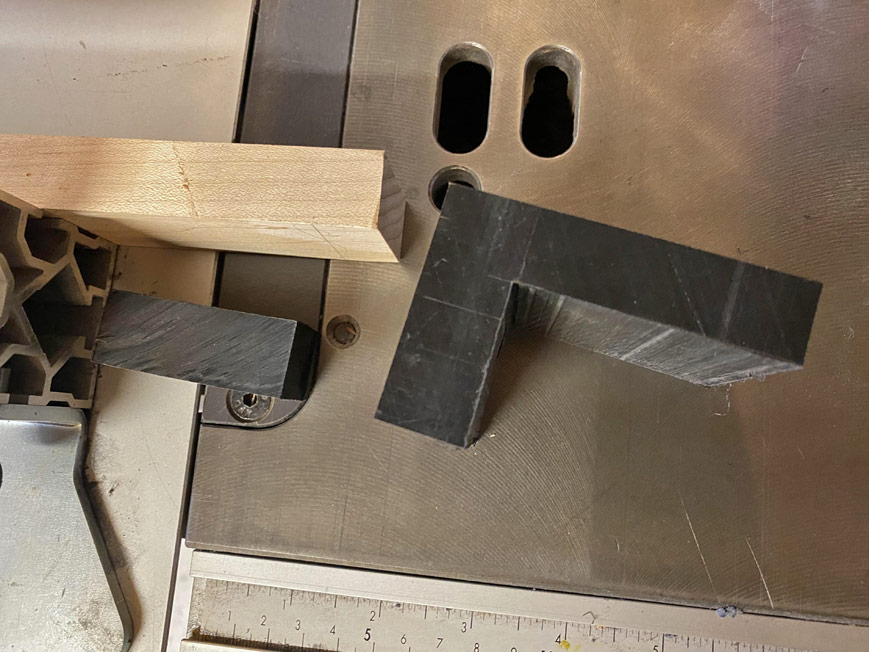
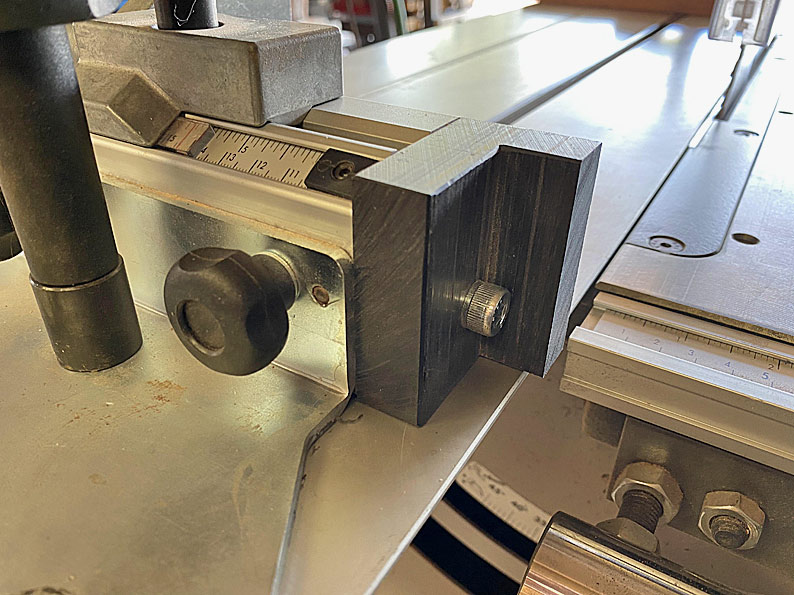
    I only had a short time in the shop today due to a few other obligations and errands, so I took those few minutes to do a small task that's been on "the list" for awhile now...replacing the end of the miter bar on my sliding table saw. The end that engages the blade to be specific. I've been running the OEM plastic one since I bought the saw back in the mid-2000s with the exception of a short period of time when I made a wooden one poorly and reverted. The OEM part has gotten too worn and too sloppy. So it's been retired other than for "emergencies" and replaced with a nice piece of oak. A little measuring, a little line drawing, a little cutting with the table saw and band saw, a little refining with a flush cut saw, a chisel and some sandpaper and...we're back to zero clearance business and being flush with the guide fence. Sometimes it's the little things!

    IMG_6917.jpg IMG_6918.jpg
    --

    The most expensive tool is the one you buy "cheaply" and often...

  2. #2
    That’s sweet but you have cnc right. Oh you’d need a multi axis one to make that right?

    You should have your buddy scan it an then have them made.

    I know that’s one accessory for every slider everyone never replaces when it needs it.

  3. #3
    Join Date
    Dec 2010
    Location
    WNY
    Posts
    9,704
    Why can't you just put a piece over the front of the fence, and then just slide it sideways as the end gets chewed up? I have no clue about sliders so maybe that's not possible, but there ought to be some simple solution.

  4. #4
    Join Date
    Mar 2003
    Location
    Upland CA
    Posts
    5,561
    That depends on what kind of stops are on the fence, John. Some are the flip type which take what Jim just built. They use the actual fence to set the workpiece against. You make the sacrificial piece fit the fence, like above, and the lower part for the blade is to clear the blade guard.

    Others have the spring loaded lever that springs out from a bracket to form the stop, and shove back into the bracket if the stop is not used, like when you use two stops for two different measurements. The bracket itself is half an inch or so in thickness, and you can make any height sacrificial piece as long as it is the same thickness as the bracket.

    Just to be different, my MM 310 Smart uses both types, flip ups on the big crosscut fence, and levers on the short crosscut fence. My old Felder also used the levers.
    Rick Potter

    DIY journeyman,
    FWW wannabe.
    AKA Village Idiot.

  5. #5
    Join Date
    Mar 2003
    Location
    SE PA - Central Bucks County
    Posts
    65,836
    Quote Originally Posted by Patrick Walsh View Post
    That’s sweet but you have cnc right. Oh you’d need a multi axis one to make that right?

    You should have your buddy scan it an then have them made.

    I know that’s one accessory for every slider everyone never replaces when it needs it.
    I could have done this on the CNC no problem, Patrick. No scanning is necessary...it's a simple two sided cut. It was just faster to use the already sized piece of oak I made a number of years ago with a few quick saw cuts. I likely will create a CNC version at some point, however. Love my CNC, but my small hand saws and chisels still get appropriate work.

    Quote Originally Posted by John TenEyck View Post
    Why can't you just put a piece over the front of the fence, and then just slide it sideways as the end gets chewed up? I have no clue about sliders so maybe that's not possible, but there ought to be some simple solution.
    The stops are unusable if you put a sacrificial fence in place. I only use one when I'm cutting with the blade tilted so I have a reference for the cut line and then I use blocks and clamps for stops.
    --

    The most expensive tool is the one you buy "cheaply" and often...

  6. #6
    Join Date
    Feb 2004
    Location
    Perth, Australia
    Posts
    9,491
    This is what I did recently, Jim. It is indeed a small addition, but makes such a big difference.

    I still need to trim mine down so as to lower the blade ...


    Regards from Perth

    Derek

  7. #7
    Join Date
    Mar 2003
    Location
    SE PA - Central Bucks County
    Posts
    65,836
    I left mine tall for now, Derek, as it's rare I use the over blade guard because it can't be used for non-through cuts, given it attaches to the riving knife. The OEM piece is only about 20mm tall for the last 30mm or so of its length.
    --

    The most expensive tool is the one you buy "cheaply" and often...

  8. #8
    Join Date
    Feb 2010
    Location
    Collegeville PA (30 min west of Philly)
    Posts
    1,143
    Blog Entries
    1
    Quote Originally Posted by Jim Becker View Post
    ....with the exception of a short period of time when I made a wooden one poorly and reverted....
    This was my favorite part. It somehow makes me feel good to know that guys at your level once in awhile do something poorly, and have to do it twice, like guys at my level :-)

    (Side note... the major difference being, that this is basically how EVERYTHING goes for me at this stage of the game)
    - Bob R.
    Collegeville PA (30 minutes west of Philly)

  9. #9
    Join Date
    Mar 2003
    Location
    SE PA - Central Bucks County
    Posts
    65,836
    I appreciate your confidence, Bob, but I make a LOT of mistakes. I've just tried become a little more skilled in hiding them. Sometimes I'm successful; sometimes, well...nope.
    --

    The most expensive tool is the one you buy "cheaply" and often...

  10. #10
    Join Date
    Dec 2008
    Location
    Ouray Colorado
    Posts
    1,398
    I did something similar to Jim when I fitted a Felder short fence to my T17. I made a tight fitting shaft to go inside the extrusion then have a replaceable add on block for the chipbreaker. I was going to screw the shaft to the fence but it fits tight and doesn’t move. I slide the fence out of the way for ripping a lot and have a setting gauge to reset the stops.
    B68236FD-F4EE-44A5-A0AE-2A05F54ACE81.jpg
    7EB2B8C1-45C6-4491-A9F1-7F827FE43B98.jpg
    A9B9D9FD-C025-4FED-9F43-61CFAD48887A.jpg
    D00710A3-1CB5-426C-8D3B-991F25331269.jpg

  11. #11
    Join Date
    Dec 2010
    Location
    WNY
    Posts
    9,704
    Now that's a clever approach, Joe, and could easily be adapted to what you made Jim. Just cut away maybe 1/2" of your piece between the extrusion and blade and screw a piece of 1/2" wood, UHMW, etc. to it. Slot it and it could be extended as needed. Or just replace it.

    John

  12. #12
    Join Date
    Mar 2003
    Location
    SE PA - Central Bucks County
    Posts
    65,836
    Joe, the piece for the fence end does indeed go into the extrusion...about three inches so nothing like that "fence post" you show ...and I was very careful to size that so it was just barely snug and couldn't move laterally. I actually had to put a little material back ON the 'tenon' to make that so. A nice long tenon into the extrusion is absolutely the way to do it and the OEM was similar...but sloppy. I decided today that I'm going to make a replacement for the end of the fence on my outrigger, too. It's not as bad as the smaller one was on the miter fence, but it's not as precise as I want it to be. The size is different, so new stock will need to be assembled to fit the task.
    --

    The most expensive tool is the one you buy "cheaply" and often...

  13. #13
    Join Date
    Feb 2004
    Location
    Perth, Australia
    Posts
    9,491
    Here is the way I did it for the Hammer K3 (I did post this at another time).

    The material used is UHMW.

    A plug was made for the fence. The was secured by a screw from inside the track above ...


    The bolt is M8 ..


    I need to recess the bolt head and lower the fence extension to clear the blade guard, which is at full height currently.

    The next step is to make a few more, especially for angles, such as 45 degrees.

    Regards from Perth

    Derek

  14. #14
    Join Date
    Mar 2003
    Location
    SE PA - Central Bucks County
    Posts
    65,836
    I like the way you did that Derek.
    --

    The most expensive tool is the one you buy "cheaply" and often...

  15. #15
    Join Date
    Dec 2008
    Location
    Ouray Colorado
    Posts
    1,398
    Quote Originally Posted by Jim Becker View Post
    Joe, the piece for the fence end does indeed go into the extrusion...about three inches so nothing like that "fence post" you show ...and I was very careful to size that so it was just barely snug and couldn't move laterally. I actually had to put a little material back ON the 'tenon' to make that so. A nice long tenon into the extrusion is absolutely the way to do it and the OEM was similar...but sloppy. I decided today that I'm going to make a replacement for the end of the fence on my outrigger, too. It's not as bad as the smaller one was on the miter fence, but it's not as precise as I want it to be. The size is different, so new stock will need to be assembled to fit the task.
    Jim, you should try the 2 piece chipbreaker. It is easier to build and easier to get a precise flush fit with the add on front piece. I made extras of the front piece but still on the first one I made. My fence can be adjusted sideways and the scale also so I can freshen it a little when needed. With this adjustability also possible to do angles using the chipbreaker and fence scale.
    0BD74342-F744-454D-8D94-C088CB1FB448.jpg

Posting Permissions

  • You may not post new threads
  • You may not post replies
  • You may not post attachments
  • You may not edit your posts
  •