Page 2 of 3 FirstFirst 123 LastLast
Results 16 to 30 of 36

Thread: 2 drawer chest

  1. #16
    Join Date
    Jun 2010
    Location
    twomiles from the "peak of Ohio
    Posts
    12,185
    2 hours went fast...may have put in a wee bit of "overtime" too...Base came out of it's clamps...was trimmed down a bit....then glued in place..
    2 drawer chest, base installed.JPG
    And set this aside...then that lid...
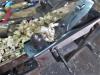
    Cleaned up, flattened, and trimmed....then added bread board ends....which meant I needed a tongue on each end. Roughed out with the tablesaw, then fine tuned with a Routah..
    2 drawer chest, router work.JPG
    Not much room for error, either...
    2 drawer chest, B&B Tongue.JPG
    Since the lid is barely 5/16" thick....then a dry fit...
    2 drawer chest, dry fit bread boards.JPG
    And then the glue and clamps, and cauls..
    2 drawer chest, Bread boards glued up.JPG
    Used the #358 Mitre box to trim the drawer fronts to length...
    2 drawer chest, drawer fronts fitted.JPG
    Due to the clamps, case is sitting on it's top....
    Dug out some molding blanks..
    2 drawer chest, molding blanks.JPG
    Once the clamps come off, I can add a molding around the base..
    2 drawer chest, molding locations.JPG
    May do a little fancy cutting...maybe add some "feet" in the corners?

    And that was it, for today....tried to get a little done..
    Stay tuned, there's always tomorrow..

  2. #17
    Join Date
    Jun 2010
    Location
    twomiles from the "peak of Ohio
    Posts
    12,185
    So...have all day, today...to either sit here and yak....or try the shop...after it warms up a bit....a bit nippy down there, this morning....ground might be a tad froze. Since the Dungeon is in a basement....cold ground = cold shop.

    Suppose I could wander down there, and take the clamps off of things....and clean the joints up. Almost out of glue, too. May work on drawers today....and get them ready to assemble.

    Maybe after Lunch, eh?

    Stay tuned....( you do want pictures, right?)

  3. #18
    Anything with “Steven C Newman” on the author line is a Must Read. Love your camera work. It is dungeon-y.

    Thanks for the effort you put in to share your fun.

    TW

  4. #19
    Join Date
    Jun 2010
    Location
    twomiles from the "peak of Ohio
    Posts
    12,185
    3 hours of shop time, today. Got to the point I was getting cramps in my toes ...and then this went empty...
    2 drawer chest, running on empty.JPG
    In-between? lid was cleaned up...
    2 drawer chest, lid cleaned up.JPG
    But something looked...off..
    2 drawer chest, lid not square.JPG
    Not square,,,,one of those days....got this squared up, then rounded the corners a bit..
    2 drawer chest, rounded corners, hinge.JPG
    And figured out which hinges to use. Set this aside, for now...and spent almost an hour working on the case...
    2 drawer chest, sides cleaned up, ready for molding.JPG
    Flattening the sides, getting them and the plywood to meet flush....round and round we go....because the next step needed a gap-free surface to work..
    2 drawer chest, molding applied.JPG
    Front gets a few cuts made, the one in back didn't...
    2 drawer chest, molding details, end.JPG
    The 2 ends also got a cut-out....just not as fancy...
    2 drawer chest, molding details, front.JPG
    I intend to add glue blocks/feet in the corners....can't today, ran out of glue...

    Stay tuned for Part 2 of today's follies...

  5. #20
    Join Date
    Jun 2010
    Location
    twomiles from the "peak of Ohio
    Posts
    12,185
    And..part 2. Set the case aside, for now....I did size the drawer fronts to fit...
    2 drawer chest, fronts planed to fit.JPG
    Stanley #3 to joint an edge or 3....then worked on the lid again...had a pilot drill IN the shop
    2 drawer chest, pilot holes, and drill.JPG
    North Bros. #41, with the smallest bit it had. 6 turns to get to the depth, wax for the threads on the very tiny screws....was only one thing missing...the screwdriver to drive the screws
    Had to hobble up the stairs, pick up the screwdriver, and hobble back down....why this screwdriver?
    2 drawer chest, hinges installed.JPG
    The only one small enough to drive them screws. Phillips head ones. have to wait until the case is dry, before I install the lid on the case. I located some knobs that might work for the drawers..
    2 drawer chest, drawer knobs.JPG
    Maybe. Then cut a bunch of drawer parts...including an extra side. Never know when it might be needed. Backs were ripped and cut to size (I hope) and then planed down flat..
    2 drawer chest, back of drawer planed.JPG
    That sheet of plywood was cut down for both drawer bottoms. So, maybe IF I get a new bottle of glue...and get rid of these cramps in my toes..maybe I can build two drawers, tomorrow?
    We gaining on it..stay tuned

  6. #21
    Join Date
    Jun 2010
    Location
    twomiles from the "peak of Ohio
    Posts
    12,185
    A little over 2 hours this evening..IN the shop...Glue?
    2 drawer chest, old glue,new glue.JPG
    Out with the old( empty) and in with the new (full) bottle...Needed to remove a few clamps, first..
    2 drawer chest, ready to unclamp.JPG
    In the process of cleaning things up....found dried glue from squeeze outs...needed to remove that.
    2 drawer chest, glue clean up.JPG
    Extra board for support...got around the the front of the case....sanded all corners until they were round....and found a spot where the molding was higher than the floor..can't have that..
    2 drawer chest, needed planed flush.JPG
    As that is where a drawer will slide in and out at....decided to just plane it flush..
    2 drawer chest, planed.JPG
    Then, decided to add the lid....
    2 drawer chest, lid installed.JPG
    6 turns with the Yankee #41 was JUST deep enough for the pilot holes....7 turns was too deep...note the hole? Best close the lid...
    2 drawer chest, lid closed.JPG
    And set this aside...for now ( 17 photos....) Stay tuned, part 2 coming right up..

  7. #22
    Join Date
    Jun 2010
    Location
    twomiles from the "peak of Ohio
    Posts
    12,185
    Ok...Drawer fronts get a rebate along the bottom edge....
    2 drawer chest, drawer front rebate.JPG
    Stanley 45 is a quick and easy way to do them...once you get the board to lay still....
    Test for fit with the plywood bottom panel...
    2 drawer chest, test fit bottom 1.JPG
    Fronts get attached to the sides with finger/box joints....lay out some fingers...
    2 drawer chest, front's fingers.JPG
    Then chop the waste with a couple "finger tools"...
    2 drawer chest, finger tools.JPG
    Then use those finger to lay out more fingers..
    2 drawer chest, sides done.JPG
    Never fails..first set is always too loose, set set is always too tight...might get that figured out, someday
    Tested the plywood for size..
    2 drawer chest, bottom needed fitted.JPG
    As usual...too wide, too long, one end not square....fixed all of that....spread so glue, and started a little bit of assembly..
    2 drawer chest, glued up drawer 1.JPG
    Original "plan" was to just nail it up...the Ash and the small nails didn't play nice....either a split, or a bend...Vise works nicely as a clamp, and a way to hold a lot of part in one place...
    Never have enough clamps? Well.
    2 drawer chest, needed 2 more clamps.JPG
    had to add two more...so...that about stops any more shop time....closed up for the evening ( 1830 hrs to 2100 hours) and head back upstairs.

    Might even try a bit tomorrow, even though it is a Monday...Stay tuned

  8. #23
    Join Date
    Mar 2004
    Location
    DuBois, PA
    Posts
    1,904
    Steve,

    You're hand cutting a lot of box joints these days: do you find them easier or harder to do, than dovetails?

    Thanks,

    T. Z.
    If the thunder don't get you, the lightning will.

  9. #24
    Join Date
    Jun 2010
    Location
    twomiles from the "peak of Ohio
    Posts
    12,185
    About the same, actually. I get bored doing one type of joint, so I go and try the other for a while...keeps me in "practice", that way.

    next project is just as liable to have dovetails, as it is to have box joints. All depends on the project, and what size it is.

  10. #25
    Join Date
    Mar 2004
    Location
    DuBois, PA
    Posts
    1,904
    Quote Originally Posted by steven c newman View Post
    About the same, actually. I get bored doing one type of joint, so I go and try the other for a while...keeps me in "practice", that way.

    next project is just as liable to have dovetails, as it is to have box joints. All depends on the project, and what size it is.
    Thanks! I might just try hand cutting box joints.

    T.Z.
    If the thunder don't get you, the lightning will.

  11. #26
    Join Date
    Jun 2010
    Location
    twomiles from the "peak of Ohio
    Posts
    12,185
    Well, normally, shop would be closed on a Monday....got tired of the ugly view out the windows...and went to the shop...had a stack of clamps to remove
    2 drawer chest, clamp supply.JPG
    Don't worry, they won't be there, very long...cleaned up the drawer...
    2 drawer chest, bottom drawer.JPG
    Kept test fitting it, until it slid right in....couple high spots needed planed down...Then added a couple knobs..
    2 drawer chest, knobs and bit.JPG
    That drill bit seemed to be the correct size....wasn't. so, glue in the hole, glue on the tenon, rub a pinch of sawdust onto the tenon...then clamp both knobs in place..
    2 drawer chest , knobs installed.JPG
    and set it aside, for now...finger joints for the other drawer..
    2 drawer chest, top drawer, 1st corner.JPG
    I might just get the hang of these joints..someday...wound up doing all four corners...might as well, right? Then the drawer's bottom, a bead of glue everywhere...and the forest of clamps..
    2 drawer chest, needed more clamps.JPG
    And that was as far as I could go....just over 2 hrs in the shop....I removed the clamps from the knobs...
    2 drawer chest, almost done.JPG
    We're gaining on it.....will see about the other drawer, tomorrow

    Stay tuned

  12. #27
    Join Date
    Jun 2010
    Location
    twomiles from the "peak of Ohio
    Posts
    12,185
    Other drawer came out of the clamps, today....needed a bit of tune up..
    2 drawer chest, fancy plane and shavings.JPG
    Both of these planes, and the sanders went to work...until the drawer fit, without any binding...then the knob install...used a different drill today...
    2 drawer chest, knob install, tools.JPG
    That is just a "normal" twist drill in the brace...I started to hole with a blue handled tool..
    2 drawer chest, hole starter.JPG
    The holes seemed to fit the tenons on the knobs better...
    2 drawer chest, 1 knob installed.JPG
    Could have used less glue, too...
    2 drawer chest, both knobs installed.JPG
    Dry fit,,
    2 drawer chest, pre-stain.JPG
    Had to add a divider in the top drawer...issues with a clamp bowed front....

    There was a coat of that Gunstock stain applied and wiped down....letting it dry a while....
    Almost done...sorry, don't have a way to do a video.....

  13. #28
    Join Date
    Jun 2010
    Location
    twomiles from the "peak of Ohio
    Posts
    12,185
    Stain applied and wiped down..
    2 drawer chest, front stained PIP.JPG
    And...
    2 drawer chest, back stained PIP.JPG
    And..
    2 drawer chest, end stained PIP.JPG
    And..
    2 drawer chest, top stained PIP.JPG
    Slide the bottom drawer out...
    2 drawer chest, bottom drawer PIP.JPG
    And the top drawer..
    2 drawer chest, top drawer PIP.JPG
    Haven't decided on whether to stain the insides of the drawers....takes forever to get that smell out...

    letting this dry a day....and then see about a top coat....
    Stay tuned...

  14. #29
    Join Date
    Jun 2010
    Location
    twomiles from the "peak of Ohio
    Posts
    12,185
    There is a spot upstairs...on top of the sideboard beside my computer desk...that seems to be a "catch-all" for about any small tool. Drill bits, hardware, screwdrivers, small stuff from sales..

    Will go through all of that, what I don't want, gets tossed out, what I want to keep...will go in this little tool chest.

    Size of the project...looks large, doesn't it? Top is 1/4" x 8" x 12-1/2". Box stands 6-1/2" tall...at the base, it stretches 8-1/2" deep. Top compartment is 1-1/4" deep. Drawers are 1-1/8" deep

    May leave the insides of the drawers un-finished. Need to go and get a brush or two, to apply the varnish to the outsides....

    This was just a way to use up left over pieces of Ash. And, to keep my hands in "practice" by doing things. Ideas for the box? Came from the one Paul Sellers was building in his MasterClass series....I just added a few tweaks, is all. Store bought stuff for this project amounted to just the hinges and the knobs....all else was on-hand in the shop, from other projects.

    Note...that lid used a bread board edge....but both are only 1/4" thick. Try that some time...

    Once the stain stops stinking the place up, I think I can apply the clear gloss poly....and post this as a "Finished Project".....

    thanks for looking in..

  15. #30
    Join Date
    Sep 2019
    Location
    Central Florida
    Posts
    102
    Nice work...enjoyed the thread!

Posting Permissions

  • You may not post new threads
  • You may not post replies
  • You may not post attachments
  • You may not edit your posts
  •