Page 1 of 3 123 LastLast
Results 1 to 15 of 36

Thread: 2 drawer chest

  1. #1
    Join Date
    Jun 2010
    Location
    twomiles from the "peak of Ohio
    Posts
    12,166

    2 drawer chest

    Just started up...another one of my Build-alongs...
    2 drawer chest, start up.JPG
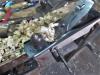
    Some of the parts....mostly 5/16" thick, from doing all that resaw work.
    2 drawer chest, top parts.JPG
    These two will get glued up into a lid...edges will get jointed, later will cut it to length.
    2 drawer chest, ends jointed.JPG
    The 2 pieces for the ends were jointed to match each other...but..
    2 drawer chest, not square.JPG
    Were not square on either end, and one was longer than the other...
    2 drawer chest, mitre saw.JPG
    They are square now, and the same length....the panel for the back was then cut for length...
    2 drawer chest, ends and the back.JPG
    Back needed ripped to match the width of the ends...I save the cut-off...have a plan for it..
    2 drawer chest, front two parts.JPG
    Will be the front of a Poplar drawer divider, between the two drawers...
    Which brings us to Part II....stay tuned..

  2. #2
    Join Date
    Jun 2010
    Location
    twomiles from the "peak of Ohio
    Posts
    12,166
    OK, Part II...concerns the panel for the lid/top....edges needed jointed..
    2 drawer chest, top jointed.JPG
    Both edges that will be in the glue joint, in fact...
    2 drawer chest, glue joint test fit.JPG
    Piece is just sitting there, nothing holding it in place...and no gaps.
    Got out the clamps, cauls, and glue....had to use the jaws of the vise as a third hand ( to keep things flat, too) while the clamps were applied
    2 drawer chest, top glued up..JPG
    One caul at the top. 3 HF clamps, over, under, over.....let this sit a day or so.

    next up? Box/ Finger Joints by hand.....also intend to use them when making the 2 drawers. May nail on the drawer bottoms...we'll see....first, I'll get the back and the sides connected, and that strip across the front, as the top will have a storage area under it. Haven't decided on a bottom for the case, yet.

    Stay tuned for the next exciting episode

  3. #3
    Join Date
    Jun 2010
    Location
    twomiles from the "peak of Ohio
    Posts
    12,166
    Actually, I decided to clean out the tool well...and clear the top of the bench, first..
    Cleared the bench, ready for the next job.JPG
    The tools now in there, are ready-use....waiting on the next job...Needed to pick out a couple drawer fronts..
    2 drawer chest, new fronts.JPG
    To get the spacing right....Also use a chisel, to space the fingers out..
    2 drawer chest, finger spacer.JPG
    Cut a bit of plywood down, to protect the top of the bench...
    2 drawer chest, half way, first side.JPG
    From all the chopping going on...saw the lines, knife the "base line" chop 1/2 way through..flip over..
    2 drawer chest, flip over, done.JPG
    Complete the chops. New mallet seemed to do better on the black end...yellow just bounce of.

    Quick 5 minute sharpening on the chisel..had too many(3!) bevels going on...went with a single 25 degree one...used the completed set of fingers, to lay out their matching sockets...saw, chop, flip, chop....time for a dry fit..
    2 drawer chest, first dry fit.JPG
    Then had errands to run...then 2 trash cans of scraps, shavings, sawdust needed to go to the firepit....along with a bunch of cardboard boxes....then stand by, to keep an eye on it...

    Busy day....Amazing how many toys...er..TOOLS can be found in a tool well....

    Stay tuned...may try to get the other back corner done next....then work on the front....maybe even a few grooves?
    We'll see..

  4. #4
    Join Date
    Jun 2010
    Location
    twomiles from the "peak of Ohio
    Posts
    12,166
    Cleaning out that tool well...turned into a treasure hunt of sorts....
    Clear the bench, treasures found 1.JPGClear the bench, treasures found 2.JPGClear the bench, treasures found 3.JPGClear the bench, treasures found 4.JPG
    And about a pound of screws, with very sharp points...
    Clear the bench, cleaned tool well.JPG
    Amazing what such a small space can hold....swept the last of the shavings out....set up a set of ready-use tools that can stay on the bench..
    Cleared the bench, ready for the next job.JPG
    And now the bench is ready for more work..
    Clear the bench. all done.JPG
    This is the main work area in the shop....welcome to The Dungeon...

    Thinking of using the one end piece to layout matching fingers down on the other end of the back piece....then use it to layout the other end piece finger to match....Need to sharpen up..a couple pencils, first. That Yankee Screwdriver has an APEX tip holder in it...can change out to whatever tip I need to use..

  5. #5
    Join Date
    Jun 2010
    Location
    twomiles from the "peak of Ohio
    Posts
    12,166
    Today being a Monday....shop was closed for the day. Try again on Tuesday. Might get something done....

  6. #6
    Join Date
    Jun 2010
    Location
    twomiles from the "peak of Ohio
    Posts
    12,166
    Tuesday Shop time....got a lot done in 2 hours..
    2 drawer chest, front view, dry fit.JPG

    Film @ 2300 hrs....have an errand to run, first...BRB

  7. #7
    Join Date
    Jun 2010
    Location
    twomiles from the "peak of Ohio
    Posts
    12,166
    Ok..errands ran....where was I?
    2 drawer chest, 2nd corner dry fit.JPG
    Second back corner dry fitted...
    2 drawer chest, jigged up.JPG
    Back needed a groove done...this is the jig ( adjust the plane a tad, and the jig...ends were also grooved)
    2 drawer chest, Stanley 45.JPG
    Back gets a groove for the compartment's floor, ends get a groove for the drawer divider..
    2 drawer chest, back is groovy.JPG
    Not very deep, either...lumber is 5/16" thick. Front of the compartment also needed a rebate...reset the 45..
    2 drawer chest, front rebate.JPG

    Then some layout work for the front..
    2 drawer chest, front laid out.JPG
    To find out where all the fingers and notches will go...
    2 drawer chest, front corner chop.JPG
    have to hide a couple grooves...
    2 drawer chest, front dry fit.JPG
    One end done...then the other end was done...then that dry fit...

    Stay tuned, need to cut two plywood panels to size, then a glue up can be done...

  8. #8
    Join Date
    Jun 2010
    Location
    twomiles from the "peak of Ohio
    Posts
    12,166
    Got up way too early, today.....Mountain Dew/Pills Breakfast is still trying to wake me up.....weather outside is dreary, 30 degrees too cold. Might be a good day to head to the shop....

    Need to cut 2 plywood panels to size, and get them fitted to the case...and make sure I get the right one where it belongs....Been known to mess that detail up...

    Checked that panel I glued up for a lid....more than long enough....just not WIDE enough....will need to add another strip to one edge....wondering if adding bread board ends to the lid will help keep it flat.....

    Stay tuned...there MIGHT be some cussing involved, today ( more than usual?)

  9. #9
    Join Date
    Apr 2007
    Location
    Columbus, Ohio, USA
    Posts
    3,441
    Quote Originally Posted by steven c newman View Post
    Stay tuned...there MIGHT be some cussing involved, today ( more than usual?)
    And the obligatory blood sacrafice that comes with every build.

  10. #10
    Join Date
    Jun 2010
    Location
    twomiles from the "peak of Ohio
    Posts
    12,166
    None so far....
    Plywood cut to almost the right sizes...drawer divider needed adjusted.
    2 drawer chest, plywood jointer.JPG
    and test fitted..
    2 drawer chest, divider test fit.JPG
    Next, the floor needed a little work..
    2 drawer chest, floor jointed.JPG
    And test fitted..
    2 drawer chest, floor test fit.JPG
    Cleaned up a few spots...laid it all out..
    2 drawer chest, war zone.JPG
    As this will be a "War Zone" ....Too many clamps, not enough hands...
    2 drawer chest, enough clamps...JPG
    May have missed a spot?
    2 drawer chest, done clamped.JPG
    Maybe. Moved this to the center of the bench...had other things to do..

    Stay tuned..

  11. #11
    Join Date
    Jun 2010
    Location
    twomiles from the "peak of Ohio
    Posts
    12,166
    Ok, lid work...first glue was out of the clamps...and cut to size...needed an edge jointed..
    2 drawer chest, lid work.JPG
    Both it and the add-on piece were jointed...then a "rubbed" glue joint..
    2 drawer chest, rubbed joint.JPG
    Yes, there IS a glue joint...look at the arrow. Decided to just add clamps and cauls, anyway..
    2 drawer chest, add clamps.JPG
    Vise jaws act as a 3rd hand, and a pair of cauls...almost the last of the clamps in the shop....after these, it would be the pipe clamps...
    Bench is now full of glue-ups...guess I can stop for the day...
    Stay tuned..

  12. #12
    Join Date
    Feb 2011
    Location
    Carlsbad, CA
    Posts
    2,230
    Blog Entries
    2
    Nice work Steven- I appreciate you posting the comprehensive pic and colorful commentary! Looking forward rest of build.
    Cheers, Mike

    BTW: Is it correct to sign response post? I ask because my a Boys just informed me I don’t need to sign my text messages because they obviously know who I am. Who knew???

  13. #13
    Join Date
    Jun 2010
    Location
    twomiles from the "peak of Ohio
    Posts
    12,166
    Keeps me out of the local taverns....
    Clamps came off the mess, today....nothing creaked or groaned ( except me, of course..) Then the clean up began..
    2 drawer chest, back cleaned up.JPG
    easy part...the back...then the sides..
    2 drawer chest, one side cleaned up.JPG2 drawer chest, other end cleaned up.JPG
    Then the fun one..the front....drawer divider needed thinned down a bit...was a bit too fat...Stanley 60-1/2 plane to do most of that task...
    2 drawer chest, front cleaned up.JPG
    Top and bottom edges of the case got a visit from the Stanley #3....leveled the playing field...

    Base: The plywood I was going to use..didn't "measure up".....so..
    2 drawer chest, base glued up.JPG
    I made a new one. Didn't have a single piece big enough, so I glued up a panel...Will clean it up tomorrow....along with the lid
    2 drawer chest, lid needs cleaned up.JPG
    I did make sure it is large enough, though..
    2 drawer chest, check for fit.JPG
    So...now I am stuck with a full bench, again..
    2 drawer chest, full bench, again.JPG
    Then see about making a couple drawers?
    Stay tuned..

  14. #14
    Join Date
    Jul 2014
    Location
    Edmond, Oklahoma
    Posts
    1,750
    Hi Steven,

    Chucked a bit at your statement "too many clamps, not enough hands," I could relate to that . However you then add, "may have missed a spot." With regards to potentially missing a spot, you have enough clamps on it, that I think you would have to work at it to find another place where another clamp would be very useful. Not saying it couldn't be done, just saying you would have to work at it.

    Nice build so far.

    Regards,

    Stew

  15. #15
    Join Date
    Jun 2010
    Location
    twomiles from the "peak of Ohio
    Posts
    12,166
    Well, I did miss one corner...
    So...Which of these 3 tasks to do, today...once Lunch has settled in..
    2 drawer chest, full bench, again.JPG
    Get the base cleaned up, trimmed for size, installed and trim added...
    Clean the lid up, and flat...trim to size, decide IF a bread board end is doable, and install the lid
    Or
    Build two drawers, and fit them to the case...with handles...

    Hmmmmm? And...with a 2 hour time limit?

Posting Permissions

  • You may not post new threads
  • You may not post replies
  • You may not post attachments
  • You may not edit your posts
  •