Results 1 to 9 of 9

Thread: With Mallets Toward None

  1. #1
    Join Date
    Sep 2007
    Location
    Longview WA
    Posts
    27,441
    Blog Entries
    1

    With Mallets Toward None

    Well, Abraham Lincoln's Birthday is coming up next week, so to honor this historic day it seemed appropriate to make a mallet out of a piece of bog cherry that came down in a storm a few years ago.

    This is pretty much like my first mallet in design and material > https://sawmillcreek.org/showthread.php?161952

    It is almost 9 years old now and the handle has become well polished from use.

    To start on a new mallet, a section was cut off of the little log above the milled pieces:

    Hunk of Cherry for Mallet.jpg

    The ends of the piece for the head of the mallet were coated with wax. It turned out to not be necessary. The piece about 6" long trimmed off the end was left on the bench and hasn't developed any cracks. The pieces were cut using my bandsaw then planed smooth.

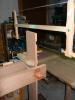
    The top and bottom of the mallet head were marked with Xs from corner to corner to find the approximate center. After this the handle center was found and then the dividers was given a little squeeze for marking the ends of the mortise:

    Checking the Handle.jpg

    The handle was cut to ~1-1/4" so it could be trimmed to fit the 1" mortise.

    Then the mortise ends were laid out:

    Mortise End Lines.jpg

    The taper of the handle was drawn on the handle and then transferred to the sides of the head to help with the chisel work.

    Then the mortise gauge was set to the chisel and marked the mortise:

    Mortise Marking Gauge.jpg

    A light first pass was taken:

    First Pass.jpg

    The old mallet is still in the picture. After all, it takes a mallet to make a mallet.

    Roy Underhill did this on his program when making mallets. Since for a mortise this deep it is easier to start with drilling out some of the waste. For this a 1" forestner bit was used. Side to side the centers lined up. From end to end the angled faces were already cut when the Xs were marked and the holes, drilled from top and bottom, were misaligned by a bit more than 1/16", no big deal.

    After a lot of chopping and paring with repeated checks of the tapered mortise with bevel gauges it was time to start on the handle.

    First it was cut to fit the width of the mortise and smoothed. With the taper and handle shape drawn on the handle the bottom was cut straight and then the taper was cut.

    A little work with a spoke shave and the test fit was good:

    Test Fitting.jpg

    A bit more cutting to shape the top, smoothing with spokeshaves and chamfers all around and it is starting to look like a mallet:

    Almost Finished.jpg

    Most of what is left to do is to make it feel like it belongs in my hand.

    jtk
    Last edited by Jim Koepke; 02-07-2020 at 1:06 AM. Reason: , drilled from top and bottom
    "A pessimist sees the difficulty in every opportunity; an optimist sees the opportunity in every difficulty."
    - Sir Winston Churchill (1874-1965)

  2. #2
    Join Date
    Sep 2010
    Location
    New England
    Posts
    2,475
    So you did this with mallets aforethought?

  3. #3
    Join Date
    Sep 2007
    Location
    Longview WA
    Posts
    27,441
    Blog Entries
    1
    Quote Originally Posted by Dave Zellers View Post
    So you did this with mallets aforethought?
    Only towards those who are mallet adjusted.

    jtk
    Last edited by Jim Koepke; 02-07-2020 at 1:01 AM. Reason: entered wrong wording
    "A pessimist sees the difficulty in every opportunity; an optimist sees the opportunity in every difficulty."
    - Sir Winston Churchill (1874-1965)

  4. #4
    Join Date
    Dec 2010
    Location
    South Coastal Massachusetts
    Posts
    6,824
    Quote Originally Posted by Jim Koepke View Post
    Only towards those who are mallet adjusted.

    jtk
    That's "mallets aforehead" - 2 minutes for high sticking, 15 minutes game misconduct and a ride home in the back of the bus with all the gear.

  5. #5
    Join Date
    Apr 2007
    Location
    Columbus, Ohio, USA
    Posts
    3,441
    This is one of my bucket list projects. I have never made one, and just never got around to it. Very nice.

  6. #6
    Join Date
    Sep 2007
    Location
    Longview WA
    Posts
    27,441
    Blog Entries
    1
    Quote Originally Posted by Andrew Pitonyak View Post
    This is one of my bucket list projects. I have never made one, and just never got around to it. Very nice.
    Andrew, It isn't a difficult task. For me the hard part is finding a good piece of wood 3X4" or larger by 5 or 6" long.

    Here is a link to Roy Underhill's episode > Big Ash Mallet.

    My first mallet was purchased at a hardware store. Making my first mallet taught me a few things about cutting a mortise. More has been learned since then. This latest mallet is likely going to stay with in the shop. It was my fastest mallet build so far.

    All of my other mallets, about a half dozen, have been sold or given away. A couple of them were put on the bandsaw to cut pyramids on one face and sold as meat tenderizers and ice breaking mallets at the local farmers market.

    Somewhere on my computer, likely also here on SMC, is an image of a few of my mallets together. Here is a blended image of a couple of tenderizers:

    Tenderizers.jpg

    Just found the ring of mallets:

    Mallet 'justed.jpg

    My comment on it being here on SMC made me realize it might be easier to find here than on my computer.

    jtk
    Last edited by Jim Koepke; 02-07-2020 at 1:40 PM. Reason: Added imags
    "A pessimist sees the difficulty in every opportunity; an optimist sees the opportunity in every difficulty."
    - Sir Winston Churchill (1874-1965)

  7. #7
    Join Date
    Jul 2014
    Location
    Edmond, Oklahoma
    Posts
    1,750
    Jim,

    In the link you did where you show making the old mallet, you are wearing a glove, and imply that wearing a glove is a safety issue in case of a chisel problem, and one of the other folks agreed.

    I have never done any deep mortise chisel work, but plan to make a mallet in the next few months. (Currently working on restoring chisels.)

    What is the hazard such that a glove is needed for protecting the hand?

    Thanks and regards,

    Stew

  8. #8
    Join Date
    Sep 2007
    Location
    Longview WA
    Posts
    27,441
    Blog Entries
    1
    What is the hazard such that a glove is needed for protecting the hand?
    If you are pushing hard on the chisel and all of a sudden your shaving gives away, your hand can hit the work with some force. If the edges of your mortise are square, that can HURT.

    This time my shop was cold and my Insulite gloves with the finger tips cut off were worn. Also my vise extenders work as a good rest for my left hand to prevent it from going into the work:

    Trimming Mallet Mortise.jpg

    This actually helped a lot by having my left hand as a steady rest when paring.

    jtk
    "A pessimist sees the difficulty in every opportunity; an optimist sees the opportunity in every difficulty."
    - Sir Winston Churchill (1874-1965)

  9. #9
    Join Date
    Sep 2007
    Location
    Longview WA
    Posts
    27,441
    Blog Entries
    1
    In my write up one step wasn't covered.

    When paring on a through mortise, it helps to prevent blow out by chamfering the edge of the mortise:

    Chamfer All Around.jpg

    In this mallet build the first occurrence of blow out reminded me of this. Taking 1/8" off the bottom took care of it.

    jtk
    "A pessimist sees the difficulty in every opportunity; an optimist sees the opportunity in every difficulty."
    - Sir Winston Churchill (1874-1965)

Posting Permissions

  • You may not post new threads
  • You may not post replies
  • You may not post attachments
  • You may not edit your posts
  •