Page 1 of 3 123 LastLast
Results 1 to 15 of 35

Thread: Leftovers

  1. #1
    Join Date
    Jun 2010
    Location
    twomiles from the "peak of Ohio
    Posts
    12,171

    Leftovers

    There are a few...since the router case didn't take all that much...
    Leftover Ash, grain details.JPG
    And two more about like the long one....very wavy edges, too..
    Leftover Ash.JPG
    Thought I could rip and crosscut enough down to make a glued up top..of some sort..
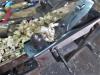
    Leftover Ash Table, other side.JPG
    In the middle of all that ripping going on....I got bit...
    Leftover Ash Table. OWWW.JPG
    T-shirt slowed it down enough....Next time I'll wear that cottonduck shop apron...

    Leftover Ash Table, aprons.JPG
    One of these longer ones will wind up as a drawer front.

    Have three more upstairs, waiting to come down to the shop....all are quarter sawn 3/4" x 6" x 54" long...with a bit of live edge on a couple....Thinking legs and aprons...and not try to stab myself. Letting the 3/4 x 14 x 21-3/4" blank sit a few days..
    Leftover Ash Table, top glue up.JPG
    While I decide which face to make the top with...the one that won't become a drawer front, will become bread board ends..

    Stay tuned.....a little sore, today...

  2. #2
    Join Date
    Jun 2010
    Location
    twomiles from the "peak of Ohio
    Posts
    12,171
    And...what still has to be hauled to the shop...
    Leftovers 2, face grain.JPG
    face grain
    Leftovers 2, edge grain.JPG
    Live edges..at least 2 are...
    Leftovers 2, endgrain.JPG
    End grain view....

  3. #3
    Join Date
    Dec 2016
    Location
    South West Ontario
    Posts
    1,503
    Stephen, you have the grain perfectly aligned in that glue up!
    ​You can do a lot with very little! You can do a little more with a lot!

  4. #4
    Join Date
    Jun 2010
    Location
    twomiles from the "peak of Ohio
    Posts
    12,171
    I tend to let the grain tell me which board goes where....
    Have a photo of the scrap that whacked me, the other night..
    Leftovers, dangerous scrap.JPG
    Was trying to get rid of that knot....should have worn my apron, while working..
    Leftovers, hang the apron up.JPG

    Anyway...had two planks that needed worked on, today...
    Leftovers, jobsite saw.JPG
    One was cut down a bit, about 24" sections. The other can be seen leaning against the furnace, if you look past the apron
    The two sections had a problem..
    Leftovers, wavy edge, before.JPG
    Took a few cuts, but..
    Leftovers, wavy edge, after.JPG
    Both are the same width, and the waves are gone.....needed a good, straight edge, for the next cuts...
    Leftovers, leg parts.JPG
    Set the rip fence to 1-1/2"...ran both sections through a few times...wasn't enough for 8 parts...dug out a couple from the scrap bin....
    Stay tuned, part 2 of today's hour long session is coming right up

  5. #5
    Join Date
    Jun 2010
    Location
    twomiles from the "peak of Ohio
    Posts
    12,171
    The two "extras" needed thinned down a bit, to match the rest. Then, ran a few at a time through as a cross cut, to square one end on each part. Then needed to match them all up for length
    Leftovers, cross cut set up.JPG
    Used a square on the trimmed ends, to line them up, and then clamp them together. Slid the mess over to the blade..
    Leftovers, crosscut, before.JPG
    And made the cut..
    Leftovers, crosscut, after.JPG
    Then sorted through the parts, to get a decent set of legs..
    Leftovers, sorted.JPG
    Spread a good bead of glue between the halves, moosh them around a bit, and clamp them all up at once..
    Leftovers, 4 glue ups.JPG
    let them sit a day, then come back and square 4 legs. And then taper two sides ( gets rid of the worst sections, that way..)

    Sorted through some of the cut-offs....I think this will do for a drawer front?
    Leftovers, drawer front.JPG
    And I can rip the other one in two, to make the bread board ends..
    Leftovers, bread board stock.JPG
    As soon as the clamped up mass gets off my saw...
    Leftovers, jobsite saw fence.JPG
    I can reset the "high tech" fence system for the bread board work...

    Stay tuned

  6. #6
    Join Date
    Jun 2010
    Location
    twomiles from the "peak of Ohio
    Posts
    12,171
    Thinking this will be a Shaker Style Table, with a drawer. May fancify it up a bit....last one was a bit on the plain side, and didn't even have a drawer....

    Whether to go to the BORG for a 1 x 6 x 8' for the drawer sides and back...or just use what's left of the Ash....we'll see...

  7. #7
    Join Date
    Apr 2007
    Location
    Columbus, Ohio, USA
    Posts
    3,441
    "high tech fence system", got a chuckle out of that, but it works!

  8. #8
    Join Date
    Jun 2010
    Location
    twomiles from the "peak of Ohio
    Posts
    12,171
    Ok...all the clamps came off, today....legs first..
    Leftovers, out of the clamps.JPG
    Reset the fence to take just the dried glue off ( saves my good plane irons) and then squared things up on them..
    Leftovers, Legs squared up.JPG
    Ends are squared, legs are 1-3/8" all around. set these aside for a bit. Reset that expensive fence again...
    Leftovers, Bread board set up.JPG
    And managed to get two equal pieces...
    Leftovers, 2 ends ripped.JPG
    Milled a tongue on each end of the top panel...and milled a groove into the bread board ends..
    Leftovers, fitting one end.JPG
    Groove seemed a bit tight...used a plane (finally!) to thin the tongue a bit...
    Leftovers, Auburn plane.JPG
    Auburn Tool Co. No. 181, 1.25" skewed rebate plane.....fit?
    Leftovers, tight fit.JPG
    And then a glue up...
    Leftovers, glue up details.JPG
    With cauls as needed. laid out a taper on one leg..
    Stay tuned, part 2 coming up..

  9. #9
    Join Date
    Jun 2010
    Location
    twomiles from the "peak of Ohio
    Posts
    12,171
    Ok..Tapers...measure down to clear the width of the aprons..mark a line around. Make a mark down at the foot...3/4" wide feet...and connect the dots
    Leftovers, taper lay out.JPG
    Then the bandsaw to rough out the taper ( ruler is a steel, Tinner's Rule)
    Leftovers, taper rough cut.JPG
    Then, repeat for a second side..
    Leftovers, 2 tapers cut.JPG
    Need to set up a jig to hold the legs still, while a plane smooths things out, and evens up the top.
    Leftovers, glue up.JPG
    This mess is now sitting over on the tablesaw...as I will only need the bandsaw , and a plane or two, to taper all four legs...then I can lay out the aprons and such...and maybe some mortise work?

    Stay tuned..

  10. #10
    Join Date
    Jun 2010
    Location
    twomiles from the "peak of Ohio
    Posts
    12,171
    Ok...needed to add plane stops to the bench..
    Leftovers, plane stop, toe end.JPG
    One for the toe of the legs, the other...
    Leftovers, plane stops, vise end.JPG
    This way, I can clamp the leg in place, while I do the layout lines, and...
    Leftovers, jack plane work.JPG
    Once the bandsaw was done, first a jack plane to level the surface, and remove the saw marks/burns...then..
    Leftovers, smoother finish.JPG
    A #3 smoother to clean up after the jack plane....then a couple swipes with a fancy jack plane...
    Leftovers, fancy jack.JPG
    Instead of doing any sanding.....I made sure to mark which face gets a taper...
    Leftovers, all lined up.JPG
    helps keep track of where I need the next tapers at....hate to do the wrong face....
    Leftovers, 4 legs done.JPG
    All legs have their tapers done. Need to lay out for a few mortises...after I get 3 aprons done....Drawer front is the fourth "apron"
    Need to flatten the top, next..
    Leftovers, NEXT.JPG
    And lay out where the legs need to be..

    Not too bad of an evening's work...stay tuned

  11. #11
    Join Date
    Jun 2010
    Location
    twomiles from the "peak of Ohio
    Posts
    12,171
    A bit under the weather, today....right side is having issues with me walking anywhere....let alone shoving a plane around....may try again, tomorrow..

    Stay tuned...

  12. #12
    Join Date
    Jun 2010
    Location
    twomiles from the "peak of Ohio
    Posts
    12,171
    Feeling slightly better...and BORED, today....so

    Beltsander was trying to throwing bearing....went out and bought a new one...along with a few belts. Gave the sander a test drive....leveled out the glue joints a bit, to get rid of the glue blobs..like these..
    Leftovers, top 2 ready.JPG
    Got rid of the hard blobs, then gave the Stanley #3 a try...
    Leftovers, top2 flat.JPG
    Flip the board over...
    Leftovers, top 1 flat.JPG
    set the front 2 legs and the drawer front onto the table's top...
    Leftovers, 4 legs set up.JPG
    To get an idea of what the aprons needed to be....plank in the background, to supply the apron stock...
    Leftovers, aprons laid out.JPG
    Laid out for a back apron, and 2 side aprons...Not enough room to cross cut on the tablesaw?
    Leftovers, no room....JPG
    We have ways...was also too long for the mitersaw...
    Leftovers, Mitersaw bench.JPG
    So...a D-8 was used again...
    Leftovers, D-8 results.JPG
    It's a start, anyway....stay tuned, more to come....2 hours in the shop....BUSY hours..

  13. #13
    Join Date
    Jun 2010
    Location
    twomiles from the "peak of Ohio
    Posts
    12,171
    Ok...Blanks were almost the right length...however...edges were a bit....rough..
    Leftovers, straight line rip.JPG
    Straight line ripped one edge....then ripped the other edge to match the width of the drawer front...and then made sure the ends WERE square, and the 2 side boards matched each other for length...Had a use for that mitersaw...first I needed a stop block...
    Leftovers, stop block.JPG
    Set for a 1/2" long tenon...laid out stop lines on the parts..
    Leftovers, Leave the lines.JPG
    Leave the lines. made all the shoulder cuts...
    Leftovers, shoulder cuts, tenons.JPG
    Ok, how to remove the waste? Well, maybe a nice, sharp, wide chisel, and a mallet?
    Leftovers, mallet and chisel.JPG
    Line up to the line, one whack, scoot the chisel a bit, repeat...until..
    Leftovers, waste gone.JPG
    You get to this point....a little rough...we have ways..
    Leftovers, leveled.JPG
    Then notch the tenons a bit...
    Leftovers, Tenons done.JPG
    Maybe tomorrow, I can start of a few mortises?

    Swept the shop, called it a day....will have to see how tomorrow goes..

    Stay tuned

  14. #14
    Join Date
    Jun 2010
    Location
    twomiles from the "peak of Ohio
    Posts
    12,171
    Well....tried out the beading plane...
    Leftovers, beading plane.JPG
    Didn't work too well for the legs....so just the aprons get a bead along the bottom edge..
    Leftovers, beaded apron.JPG
    Legs DID, however get a cove along the outside corner....router bit was a bit...chippy..
    Leftovers, chippy cove.JPG
    We have ways..
    Leftovers, cleaned up cove.JPG
    Along with a glue joint that was still showing up....added a slight bevel to a few edges, too...then the real fun began...
    Leftovers, 4 coves.JPG
    Pick one of these, set up to chop a mortise..
    Leftovers, mortise, better view.JPG
    Set up 2 combo squares...one for each side of the mortise....chisel is an 8mm Narex....
    Leftovers, mortising tools.JPG
    With too many bevels...tomorrow, I will grind a single 25 degree bevel, and hone that sharp....the 35 degree "extra" bevel just plain sucked...
    Somehow got a mortise or two done...
    Leftovers, first mortise done.JPG
    Where I have to mallet drive it home....Guten tight...then a second one..

    Then quit for the evening....worn out

    Stay tuned..I need a nap..

  15. #15
    Join Date
    Apr 2007
    Location
    Columbus, Ohio, USA
    Posts
    3,441
    I keep thinking about this:


    "Leftovers make you feel good twice. First, when you put it away, you feel thrifty and intelligent: 'I'm saving food!' Then a month later when blue hair is growing out of the ham, and you throw it away, you feel really intelligent: 'I'm saving my life!'"


    - George Carlin, comedian

Posting Permissions

  • You may not post new threads
  • You may not post replies
  • You may not post attachments
  • You may not edit your posts
  •