
I haven't seen this subject discussed much with sliding table saws, and it is one I completely underestimated the importance of when I bought my saw. Turns out, I'd buy one again just for this capability, regardless of the other 41 reasons. I see lots of discussion about how good sliders are with sheet stock, and they are, but they can be awesome on rough lumber to. Because sliders are a popular subject, I thought it might be useful to post some pics of this rough lumber milling technique.
Here's the problem at hand, my order of poplar for face frames came in messed up by someone at the mill not knowing how to set up their new Weinig double side planer. My S2S with a straight edge boards showed up looking like this, the straight edge is not, and one side has wane on both edges that won't plane out thick enough so it has to be cut off. Of course, this project is also already behind schedule and I didn't have time to wait for replacements:
poplar board.jpg
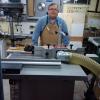
To deal with this the old fashioned way involved a jointer, then multiple table saw setups to yield 2" face frame stock. With a slider saw it's MUCH faster. First I rough cut to length on a chop saw knowing that the cut isn't square because I don't have a straight edge, but his enables me to get 3 pieces of face frame stock out of the places on the board where the wane is not as bad, rather than just running a straight edge on the whole board first. After the rough cut to length, simply hold the stock down on the slider carriage, you can use the clamps, I generally just use hand pressure against the crosscut fence and down. Line up the kerf to get the clean stock you want, in this pic I turned the stock slightly to maximize the usable. Note, I do use two hands, the saw is off and one hand is obviously taking a picture.
strait edge rip.jpg strait edge rip 2.jpg
Next just slide the now straight lined board to the rip fence to yield a piece of face frame stock. This particular board will yield two sticks.
rip to width.jpg
Next square one end of the stock, remember that the rough cut was probably not square. Note the stop is flipped up so I can square up one end and still be long.
crosscut to rough length.jpg
Last pass is to crosscut to length. Board was flipped so the new square end is now against the stop, this pass squares up the last end and unsquare face.
crosscut to length.jpg
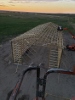
All this takes seconds in practice, and no measuring or resetting of fences or stops. MUCH quicker than any other method that I know, and in this instance it allowed me to get this beast standing on its own today instead of waiting on the delivery truck to bring better lumber.
hall tree.jpg

 Reply With Quote