Results 1 to 15 of 15

Thread: walnut top fill question

  1. #1
    Join Date
    May 2015
    Location
    Ingleside, IL
    Posts
    1,417

    walnut top fill question

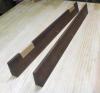
    during sanding, I noticed something I had seen during prep and glue up. (which was a disaster all by itself)

    20200105_130118.jpg 20200105_130224.jpg 2020-01-05_13h20_11.jpg

    Sanding is just going to make it worse I think. It's pretty shallow - maybe a 1/16". Any suggestions on how I might avoid cutting it off and re-glueing a different piece (which I don't have)? CA glue? Epoxy? Sawdust and TB3? Mashed potatoes? I'm planning on a wipe on poly finish. But maybe I need to rethink that?
    Stand for something, or you'll fall for anything.

  2. #2
    Join Date
    Dec 2005
    Location
    West Lafayette, IN
    Posts
    6,530
    Bring to someone with a big drum or wide belt sander?

  3. #3
    Join Date
    Mar 2003
    Location
    SE PA - Central Bucks County
    Posts
    65,874
    I typically fill defects like that with tinted resin that doesn't look out of place. The end result will be better if you're also doing grain filling given how large that particular defect is with an open pore wood like walnut, IMHO.
    --

    The most expensive tool is the one you buy "cheaply" and often...

  4. #4
    Join Date
    Dec 2004
    Location
    Cincinnati, OH
    Posts
    924
    That's a tough one. It looks like two different wood tones with the bulk in the lighter tone. If this will be a show piece, any patch will be a detraction. If it is rustic (as nearly all my work tends to turn out) you might try a couple of well matched plugs. More irregular shaped ones blend in better but are harder to make.

    I have had no luck with the wood dust and glue combo but somewhat good results with wood dust or toner in epoxy although monochrome. I experimented with inserting a number of slivers of wood in epoxy which does provide a long grain surface but the method did not work real well. I will try it again, though.

    If your artistry permits, you might color the grain pattern with ink on top of a well matched fill. I'm just grasping at straws. It kinda depends on the finish you use and the quality you are willing to accept.
    Rustic? Well, no. That was not my intention!

  5. #5
    Join Date
    May 2015
    Location
    Ingleside, IL
    Posts
    1,417
    Thx Jim - Tinted resin I'll try on some scrap. What would you use for grain filler that will allow me to continue with the wipe on - a finish on walnut I really like.
    Stand for something, or you'll fall for anything.

  6. #6
    You must have a small piece of that board. I would patch with a diamond shaped piece of same board. Done carefully
    no one will notice it.... That means you will have to make them look at it ! And proclaim you a genius . And maybe fix the
    ugly parts of their faces.

  7. #7
    Join Date
    Mar 2015
    Location
    SE Michigan
    Posts
    3,225
    I’d probably start with a lighter color grain filler...wonderfill or timber mate. I’d then seal the filler with shellac. It’s always easier to start lighter and darken...difficult to lighten a dark color. Then play with various tints to color. The rationale for water based filler and shellac is that if the coloring doesn’t work, it’s all easily removable. You can also use an xacto to make small grain indentations to match.

    Another option I would consider is to use a walnut grain filler over the entire surface. If all the grain is filled, the larger spots may just blend in. A lot more effort. You can seal the entire surface with shellac first, but either way it’s all reversible.

    The pros would likely work with hot wax sticks and tinting as well as “drawing” in grain, then sealing with shellac.

  8. #8
    Join Date
    Jan 2004
    Location
    Lewiston, Idaho
    Posts
    28,546
    I have used tinted epoxy on some of my turnings with good success.
    Ken

    So much to learn, so little time.....

  9. #9
    Join Date
    May 2015
    Location
    Ingleside, IL
    Posts
    1,417
    Thx folks - time for some experimenting. And I was hoping to be done with this soon. Oh well.

    I have lots of scraps, so I'll gouge a few places and try the tinted epoxy.

    I've also order some timbermate in walnut to see what that does - I've never used a grain filler before, so don't know what to expect. Everything I've built was QSWO and I like the grain in it. When I use the filler, and sand it off it shouldn't affect the wipe on, correct?

    Worse comes to worse I get another board from Dan Cassen and try again. Working with walnut has been very different from working with QSWO. Love the way it looks with just wipe on poly, but it is more brittle (for lack of another word) than QSWO. Not nearly as forgiving.
    Stand for something, or you'll fall for anything.

  10. #10
    Join Date
    Mar 2015
    Location
    SE Michigan
    Posts
    3,225
    Bill, after you sand the filler smooth, give it a light spay or thin wipe of dewaxed shellac (the rattle can shellac is dewaxed) just to seal it in before the wipe on poly.

  11. #11
    Bill, I hope you will consider the patch. Gonna just run my steps by you. I start by cutting a piece of cardboard that will cover all the damage. Small defects get a diamond shape. On your table it would be straight piece with a diamond point on each-end. Patch is usuall about 1/4 inch thick and will have a slight bevel on all sides. Place the patch on the damage
    and carefully scribe around it . If the damage is big enough to where a router helps ,I use one. Make sure the patch is a
    little thicker than the hole depth. Glue it. Trim it down. I used to do a lot of those in an antique shop. Some were ordered
    by owners ,others were done at order of the shop owner. Certainly a much easier job than what many here are doing.
    And it's a truly satisfying save.
    I never use the router for all cutting. Only the middle area. Edges get sharp chisel
    Last edited by Mel Fulks; 01-05-2020 at 6:13 PM.

  12. #12
    Join Date
    Jul 2007
    Location
    NE OH
    Posts
    2,628
    Another option would be shellac burn in sticks, which are what the furniture repair folks use to repair damage to finished furniture. They come in multiple colors and you can mix them to get whatever shade you need. The folks who are good at it (not me) can use multiple colors in a single patch to better blend with the surrounding wood and simulate grain. Using them requires a hot knife to melt the sticks and allow the material to drip into the repair, which is then carefully scraped flat. One advantage of this approach is that it's reversible if the results aren't to your liking.
    --I had my patience tested. I'm negative--

  13. #13
    Join Date
    Mar 2011
    Location
    Rochester, Minn
    Posts
    232
    I will second the vote for a Dutchman (patch). I made a cherry secretary for my son and daughter in law with glass doors/shelves above, and when drilling shelf holes as one of the last steps the drill bit caught and I went through. At nose height on the face that is most visible, of course. Found a scrap with similar grain, cut a diamond that would match, and then curved one edge a smidge so that it the most prominent grain line in the furniture went exactly along a seam, cut around it with a sharp knife, excavated a 1/4" depression, and fit the new one in. A router plane would be perfect but I don't have one, so used a trim router (avoiding the edges) to get the bottom flat. Patch, sand, then used a brown sharpie to extend a couple of grain lines into the patch, seal with one coat of thinned sealcoat (shellac), and finished the piece as intended. No one can see it unless it is pointed out, and their nose is 2" or less away. It was a day's fiddling, but in no way difficult. I was frankly astounded at how successful the repair is.

    Terry

  14. #14
    Join Date
    Jul 2016
    Location
    Lebanon, TN
    Posts
    1,722
    May be I missed it, but how about routing out the defect area and putting walnut veneer in the patch area.

  15. #15
    Join Date
    May 2015
    Location
    Ingleside, IL
    Posts
    1,417
    Well, looks like I'll be cutting that board off and replacing it. I finished work on the base and put the top show side down on the bench and found this:
    20200108_174714.jpg on the underside opposite the problem on the face. I just don't want that board anymore - don't trust it. Should have seen it a long time ago.

    Now - where did I put that thread on track saws...................
    Stand for something, or you'll fall for anything.

Posting Permissions

  • You may not post new threads
  • You may not post replies
  • You may not post attachments
  • You may not edit your posts
  •